Showing posts with label Thousand Sons. Show all posts

1.11.2013

The Bitz Bins

I know I mention the bins now and again.  I think most game stores have some version of the bitz bins.  People bring their unwanted bits and models into the store in exchange for credit, and the store re-sells them for a bit of profit.  The downside is it's a bit like a rummage sale and you’re working around poses, paint jobs, and leftovers.  The plus side is you’re usually getting them at a big discount.  Often 60-70% off.  Sometimes even more.

I know some people have this kind of phobia about using pre-owned models, but if you can get past that it’s possible to save a lot of money.  In the past ten years or so, here’s a few of the things I’ve found in the bitz bins of my local stores (first in San Diego, then later up here at my favorite store in Los Angeles)...

* an Eldar Avatar of Khaine—I don’t play Eldar, but I’ve always thought it would be neat to paint an Avatar like molten metal—darker on the outside, hotter closer to the core.  Kind of like the Balrog from Lord of the Rings.  He also had a Thousand Sons head in his hand, so a little glue remover and I had a spare trooper for my Thousand Sons army.  Bonus.

* three Krootoxes—a few editions back (when I had more disposable income) I had a very nice Kroot Mercenary army.  Now I just have a lot of Kroot, and the hopes that the upcoming Tau Codex will address the issue and make it a viable allied force, at least.  Still, three metal Krootoxen (Krootoxi??) were a nice bit of heavy firepower, especially at five bucks each.

* legs and torsos for about twenty-five Ork Boyz for my lovely lady, plus an unassembled Black Reach deffkopta.  If all this cost me ten bucks, I’d be amazed.

*a little over two dozen Catachans—their heads were crooked, and two or three needed their arms redone, but other than that they just needed paint.  They were put together with superglue, so on the really bad ones it just meant popping off a head or an arm, scraping it down, and then putting it back on with proper plastic glue.  I think that find cost me twenty dollars.

* a plastic Eldar Wraithlord—Again, I don’t play Eldar, but my friend Gillian does.  It was missing its weapons and posed a bit awkwardly, but other than that it was fine.  Well, it had a really awful paintjob.  She’s already salvaged it and sent it back out on the battlefield.

* parts for a solid Lizardman army – I don’t play Warhammer Fantasy, either.  I have no interest in it.  But, as I’ve mentioned before, I love the models and I have a long-time love of Lizardmen (reaching back to the Sleestak on Land of the Lost).  I found the parts to make a dozen Saurus warriors, a dozen skinks, a skink hero, an Oldblood on a cold one, a salamander, and even five of the Temple Warriors.  I just liked building and painting them.  I might do a whole post on these guys. 

* at least twenty assorted Dark Angels detail pieces for Marcus.

* a box’s worth of Bloodletters--  Alas, one had a twisted leg and two of them had one foot snapped off, so I only took home eight of them (and who wants a unit of eight Khorne demons...?).    They’ll make a great allied force for my World Eaters.  I used one of the old skeleton helmet horns and a skull to replace the missing foot on one of them.  They’re about half-painted and already itching to fight.

* probably a dozen Dark Eldar heads, arms, and detail pieces, not to mention a double-handful of the older bodies.

* a handful of Blood Angels pieces for Matt.

* parts for at least twenty zombies – These mixed with leftover Catachan parts to become a full squad of Catachan plague zombies.  Poor bastards...

* two Black Reach Space Marine captains.  One was really just the larger back half with legs and cape, but I've got a use for it.

* about fifty of the old Bretonnian bowmen, plus about two dozen detail elements from the new ones to make them pop—Even without playing it, I know enough about Fantasy to know the bowmen get mocked a lot.  I also know enough about math to know that anything is dangerous in large numbers.  Goblins, grots, Kroot, scouts, bowmen... anything.  More to the point, I just love the look of dozens and dozens of archers standing ready with their bows.

* just shy of a dozen Daemonettes.  These showed up a few at a time, usually in pieces, but I kept picking and saving them.  First it was just a few to add to my existing units.  Then it was a nice, Slaneeshi six of them.  Then nine (one with a standard).  Then eleven.  One more and I’ve got a nice group of allies for my Emperor’s Children.

* and tons and tons of bitz.  Almost anything you can imagine.  Shoulder pads, ammo pouches, canteens, purity seals, knives, daggers, bolters, holsters, sheaths, targeters, backpacks, banners, spare arms, spare heads, spare skulls, chains, spikes, tentacles, tails, wings, bases, and much, much more.

Now, don’t get me wrong.  I’m not saying your local bitz bins are going to be some kind of gold mine (again, this is ten years worth of finds), and they’re not really a place you can plan on finding something.  But for the hobbyist on a budget, it’s always worth taking some time and sifting through.  Sometimes you can find some fantastic, useful detail pieces.  Or models.  Or whole units.

And if your friendly local gaming store doesn’t have bins... why not?  It’s a win-win for everyone.

10.24.2012

Yet Another Dark Vengeance Update

Just wanted to share these real quick...

I’ve been holding off assembling the Hellbrute for two reasons.  One was that I wanted to actually read the codex first and see if there were any noteworthy changes or options I wanted to make as far as the model went.  Two is that I wanted to read the fluff behind it and see which of my Chaos armies it’d best fit into... which could also result in changes.

Overall, though, it struck me that the Hellbrute is just a renamed dreadnaught.  Which feels like a bit of a cheat, but hopefully it means Chaos is finally going to get a new dreadnaught model after just... oh, sixteen years or so.

Anyway, I decided to make two quick changes to the Dark Vengeance Hellbrute.  Like a lot of models in this set, it’s built into a very static pose and there’s not a lot of places to alter it.  One place you can, though, is the head at the center of the model.

I’d decided this particular Hellbrute was going to join my Thousand Sons army, so it seemed very out of character to have an exposed head.  I dug around and found one of the very old Chaos Warrior helmets from the Fantasy line (back when all those models were a bit more hunched and cartoonish).  Once the tall spike was cut off its top, it had a surprisingly solid resemblance to a Thousand Sons helmet.

The big trick, though?  I didn’t gouge out the Hellbrute’s face, I just flipped it around.  By turning that face plate front to back, it gave me a nice little cradle to set the helmet in. I also discovered if I rotated it 90 degrees the edges fit well against the inside shapes of the “sarcophagus.”

The other little tweak I made was the base.  I had a spare dreadnaught base—the one with all the rocky terrain and shell casings—and decided to see if the Hellbrute would fit on that.  Turns out he does once you snip off the support pegs.  The two low quadrants are pretty much level.

Helpful Hint – You’ll need to clip the inside corners of the scenery-slab under the Hellbrute’s left foot to make this work.  Not much, just maybe an eighth of an inch.  There’s also a shell casing or two that can be trimmed off the base to get a good fit.

Voila.  Cheap and easy conversion to make my Hellbrute stand out.

Here’s another one.  Some of you probably caught this already, but Chaos has a bonus HQ model hidden in the Dark Vengeance set.  Let’s take a look at that Chosen champion, Draznicht...

He’s dressed in pretty elaborate robes and capes.  He’s got a power mace.  His helmet is a stylized skull that’s grown some horns somewhere along the way.  The “vents” of his backpack look like a censer.

He’s a Dark Apostle.  You don’t even need to convert him.  He’d work absolutely fine as is.  However, if you wanted to make two simple tweaks...

I filed down the top of his backpack and gave him one of the chaos star icons from the basic Chaos Marine set.  Someone you know who plays Chaos has a pile of them, I guarantee it (assuming you don’t already).  I also gave him a little banner from one of the old Plague Monk sets (I think that’s what they’re called—it’s a fantasy Skaven thing).  This is a great little piece I grab whenever I find one, and I use it all the time as an additional frilly-prayer piece.  It looks great on Relictors, Grey Knights, and random Word Bearers.  And now on Dark Apostles, too.

And there you have it.  Dark Apostle Keven of the Alpha Legion, ready to lead his cultist army to...  Well, to their deaths, probably.  That’s what generally happens to cultists, after all.

And, yes, Keven is a subtle reference to The Cabin In The Woods. 

6.09.2012

Silver Towers of Tzeentch, Part VI


First off, I must bow to marketing and plug my new book.  14 just came out this week from Permuted Press.  You can buy it in paperback, for your Kindle, your Nook, and in another week Audible.com will have the audiobook version, read by Ray Porter who a bunch of you might remember from a bit part in the LOST epilogue.  This is how I pay the bills. so it's a great way to support In The Grim Cheapness and still come out ahead.

But now, to conclude with the Silver Towers.

I’ve got all the bulk stuff done.  At this point I just wanted to add a few little details here and there.  The thing is, I don’t want to overwhelm it with details.  There’s something very unnatural and appealing about the clean lines of the original Epic model.  Plus the fact that none of the towers have doors or windows...

On the original model, each tower has one or two big cannon barrels jutting out of their walls. Common courtesy (and rules) said I should have something that counts as a “fire point” for the Towers’ random Bolts of Change.  I didn’t want something as crude as a  barrel, though.  I toyed with the idea of simple gargoyles made of card triangles and also with having mystical banners hanging off the towers.

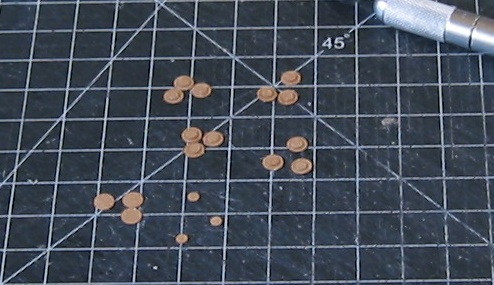
In the end, I decided on stacking disks from my different hole punches.  I did a 1/8’ on top of a 1/4” one.  They don’t distract from the sleek lines of the towers as much as gargoyles or banners would.  I can also paint them blue to help tie them to the Thousand Sons a little more.

Helpful Hint—If you wanted to drop another buck or two and had a hobby store nearby, you could get a few small fake jewels that would work, too.  Figure out if you’re going to want them as-is or if you plan on painting them so you can decide when to attach them.

Remember way back when I drew the horizontal lines on the towers?  This is why.  Now I can add these fire-points across the tall and short towers and keep them level.  It gives me a nice symmetry that helps to tie them together.  I put them all around the model since the Bolts are random and also “turret mounted,” effectively meaning they can fire in any direction.  I used the lower line on the short towers, the higher one on the tall towers.

This left the Beam of Power.  It’s a single weapon, also turret mounted.  I decided to do three more fire points for the main tower and put them higher up (on the highest horizontal line).  It makes them stand out, and my gaming group is relaxed enough for them to count as one weapon.  I also traced three small 1/2” circles and cut those out, so these points are three discs deep.  They went on the highest of my horizontal lines, which also added to the sense of “the big gun.”

I added a bit of sand (plain old sand from the alley—not modeling sand or textured earth or anything like that) around the base of the towers.  It’s a hair more support.  I left it tight around the bases because I really want a lot of the top to be grass.  Some of the sand got a little too high and I scraped it back down.  These are mystical towers, after all.  I added a bit on the underside of the plauteau as well, to break up the textures there.

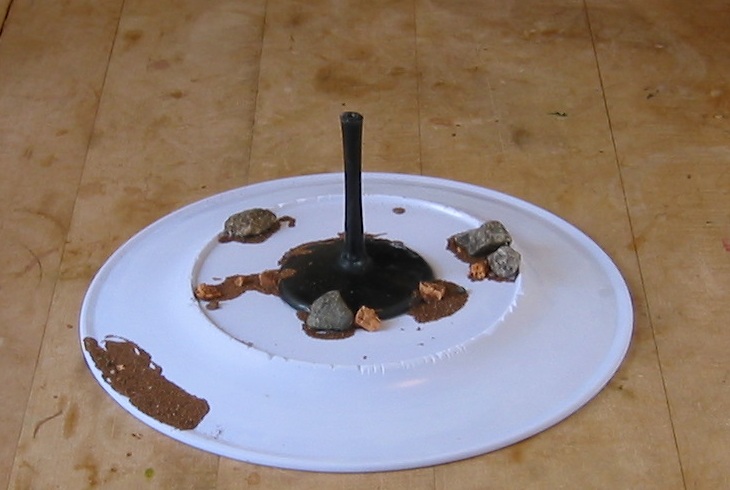
I decorated the base with some sand, some pieces of broken cork, and a few big rocks, too. That will help hide the ridge of the plate.  I briefly toyed with the idea of a big Tzzentch symbol “burned” into the ground, or maybe a chaos star, but it didn’t really work with the odea of a moving tower.

I spray painted the whole thing black to start.  Base, cylinder, and towers.  The towers took two coats, because I wanted to make sure the rocks on the bottom were all done, as well as all the spaces between the towers.

Helpful Hint—I decided to leave these three separate pieces unglued.  It makes for much easier transportation, and for touch-ups if it ever needs them.

To do the silver, I used spray-paint again.  First, thought, I wrapped the entire plateau-section in paper (another use for junk mail) to mask it.  I did two coats to make sure they got covered from every angle.

Another Helpful Hint—Never do heavy coats of paint with Paperhammer models.  Getting them wet is one of the worst things you can do.  Take your time and do light coats.

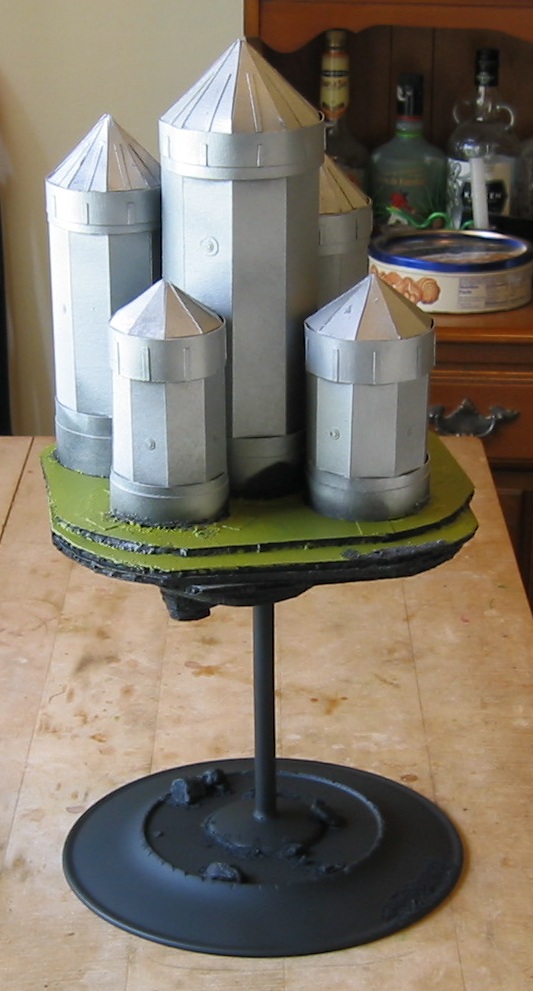
I haven’t finished painting (this is an early-on photo), but when I do I’ll add a picture to the bottom.  Here’s how it’s going, though...

The plateau is just lots of Camo Green and eventually some grass.  The bottom and sides of the plateau got a few drybrushes with Space Wolves Gray and Fortress Gray.  Yes, I’m still using the old names.  Sue me, I’ve got paint to use up.  I touched a few places with different browns to give the appearance of loose soil clinging to the granite.  I did the same on the base of the stand.
           
The vents on each tower are done in black.  Nice and simple.  From a distance, it even makes them look a bit like they’re cut into the surface, not sitting on top of it.

I painted the fire points as gems, using the gem technique from the old Codex: Eldar.  On the larger ones for the Beam of Power, I made the outer ring gold to help it stand out and  look a little more impressive.  The gold also gave it another link to the Thousand Sons.

And there you have it (or them).  The Silver Towers of Tzeentch.  In retrospect, I might’ve made the island a tiny bit smaller—maybe just an inch or two across—but overall I’m pretty happy with how this came out.  It’s a bit bigger than a Monolith, a bit smaller than a Warhound, so that puts it in a good size range for 400 points. 

Helpful Hint--If you’re into Warhammer Fantasy as well as 40K, you could probably do also this all at one-third the size and make a nice Arcane Fulcrum of some sort.  Just get a square tray or plate for the base and leave off one or two towers so you’ve got room to place a figure or two.  This is a very easy model to scale down.

Final cost for this Grim Cheapness project was probably around eight bucks.  A dollar each for the plate, wine glass, pens, and glue.  Call it four dollars for the spray paint (even though I already owned both colors).  Even if I’d had to buy the foam core for the plateau, I think it only would’ve been two or three dollars more.  So we’re talking ten bucks and maybe twenty hours of work (if you count drying time) for a 400 point model.

Next time I’ve got some more simple, cheap Dark Eldar conversions to show off.  After that are a few Necron and Ork ones.  And I might try to cash in on the popularity of this whole Summer of Fliers thing with a new Paperhammer project.  Hopefully before summer’s over.

Oh, and a few posts down I added an in-progress painting shot of Gigan.

12.23.2011

Silver Towers of Tzeentch

Yep.  It’s time to dip back into Chaos and into the Apocalypse-sized side of Warhammer 40,000.

Back when I was finishing up the Baneblade, I was struck with a sudden inspiration.  These cylinders I keep making for weapons and engines and pivots... what else could they be used for?  Was there a way they could be even bigger?  I was making the pivot for the Baneblade’s main turret and it struck me that if I cut the edges of the “flower” on the other side, they would all fold in and make a point.  But what could I do with that?  Large spikes?  Missiles?  Towers?

And then I remembered a datasheet that GW put out a while back...
           
First, I needed to build the floating “plateau” the towers stand on.  Foamcore’s nice and cheap for this sort of thing.  If you look around, you may even find people throwing out sheets of it.  The stuff I used had been cue cards and signs.  Even if you have to buy it, one three or four dollar pack will give you more than enough.
           
I measured out a rough square about 10” x 10”.  Then I measured two more shapes at about 10” x 9”, and another one around 9”x9” or so.   Any time I ended up with scrap pieces I’d cut those into squares, too.  Or as close to square as I could get.  This worked down until I had a pretty good sized pile.

Helpful Hint - I did all these by eye, just using the ruler to get quick measurements.  I knew I was going to be cutting and chipping this to make them rough and uneven, so there wasn’t much point in being precise and straight to start with.  It was also a lot faster.

I went over each square and cut down corners and edges.  I glued the 10”x9” shapes on either side of the 10”x10” one and set them under a book to dry.  I wasn’t that concerned about them lining up or being straight.  My only concern was that the smaller ones were within the edges of the larger one..

Once this piece was done I set it down and started using all the other shapes to build up one side.  I ended up rounding them even more and split it into two small towers.  One big one would work, too.  Whatever appeals to your personal “flying island aesthetic” will work.

Helpful Hint - You can mix some cardstock in there, too, if you want.  It would give even more  variety to the layers.  You could also use tissues soaked in white glue to coat everything and make smoother rocks.  I kind of like the layered look, though.  It’s as if some sorcerer ripped the whole complex out of the ground and we’re seeing the strata of stone.

I coated this whole thing with black paint and glue.  The goal is to make sure there’s no exposed styrofoam anywhere.  As the GW scenic guys have pointed out many times, spraypaint and styrofoam do not mix (the aeresol eats away at the foam).  So I took my time, made sure the edges were covered, and let it dry.

Once that was done, I took this piece outside and flipped it over, so it’s resting upside down (on the side the towers will attach to).  Now I hit the whole thing with some textured spray paint.  I happen to have two cans of this stuff left over from a job I did.  It’s a little pricey, so you might not want to buy it just for this.  You can get the same effect by buying a bottle of white glue, painting the underside, and then just dumping some coarse sand on it—it’ll just take a while longer.  You could even leave it as is, basecoat it black, and just drybrush it with a lot of different grays.  The goal is to make it rock-like, so again that’s whatever your personal preference is.

Helpful Hint – You can also use all these steps just to make a nice hill for your game table.  If you decide to, though, I’d measure out the open spaces and make sure you’re leaving areas large enough for two or three models (or one large one).

Okay, next bit’s a little tricky.  I needed to find the balance point of this little flying plateau I’d built.  I flipped the piece over so it was flat-side down and put it on my hands with both fingers out.  The object is to get as much of it on my two fingers as possible.

Then, very slowly, I slid my fingers together.  Through the wonders of science—namely physics—the plateau moves and shifts so my fingers end up at the balance point.  I marked that point and then did this a few more times from different angles.  It’s not going to be exact, but it’ll be pretty close.  Close enough for what I’m doing.

Last but not least... some power tools work.  I used my DeWalt and very carefully put a hole through the center mark of the plateau.  I took my time with this and also used a square to get the hole as close to perpendicular as possible.

This Is Important--   Power tools are no joke, and I’ve seen a lot of people get hurt by them.  Yeah, everyone says that but I mean it.  I have seen lots of gouged thumbs.  On the off chance you’re under twelve and you want to try this—or even if you’re an adult who’s never used power tools before (it’s okay, there are a lot)—ask someone for help.  Dad, Mom, your older brother or sister, a friend, somebody who knows how to use the tools correctly.

At which point I need to stop and go apply my paper skills to wrapping presents.  But I’ve got the week off so expect the next update in a couple days.

Merry Christmas and a Happy Holidays to the six or seven of you who read this.  Hope you've got all your shopping done.

7.02.2010

The Rhino Fleet

Sorry for the extended absence. A bunch of real world stuff that would only bore you to tears. I'll make up for it with a very picture-heavy post.

So, a while back I showed how you could make a simple, bare-bones Rhino with the card templates available at The Golden Bolter Society and at the BWC Yahoo Group. There's a few variations, but this is the simple Mk. 1 variant. With minimal practice, you can get to the point that one of these basic hulls will take about an hour's work.

My first attempt to do anything with the hull was a Christmas present. My friend Gillian has an Emperor's Children army, and there are few armies that don't benefit from adding a demolisher cannon. So my first Rhino hull became a Vindicator. There's even a PDF in the Golden Bolter files of the old White Dwarf article that shows how to custom-build such a vehicle (which had no model at the time). The main barrel is just two pieces of plastic tubing (exactly like I did for the Malcador) mounted on a plastic Rhino hull section. The exhaust pipes were going to be hidden behind side armor plates, so I just made them from bits of old sprue topped with Chaos gargoyles. I should've put a 40mm square base on top, too, which would've given it a more "heavy" look.

Helpful Hint-- Most of the time with Paperhammer stuff I’m using plain old white glue. When you’re gluing plastic to cardstock, though, you have to use superglue. And you have to use a lot because it’s going to soak into the cardboard. On the plus side, the cardboard gets a lot more rigid and durable. On the downside, it’s a bit of trial and error until you get the amounts just right. I generally use about half again as much superglue as I’d normally use. Keep a toothpick handy, too, in case you need to guide drops of glue away from delicate or detailed areas

The side armor is triple-thick card. I cut it, glued it, and pressed it under book to get a solid piece. The rivets are just discs from the 1/8" hole punch. In retrospect I would've done two things differently. I would've angled the sides to match up with the lines of the Rhino. I also would've made the top layer of card three sections. This would've made it look a lot more like the old "classic" ablative armor. I don't think anyone would question this as "extra armor," though.

So, for the first real attempt, it's a fairly passable Chaos Vindicator. If you've got three or four cereal boxes and some of the leftover Rhino bitz already, you could put together three solid Heavy Support choices for either a Chaos or loyalist siege army in just one evening.

What else can you do with a Rhino hull, though? Or a fleet of Rhino hulls...?

Well, first off, with a little more work, you can cut out some extra details and give yourself a phenomenal Rhino, one nobody (well, no rational person) could possibly argue against having on the battlefield. If you've actually got a pile of Rhino bitz kicking around, you can make it almost indistinguishable from an actual Games Workshop model. This one is all paper except for the hatches, tail lights, and the weapons (which are just dreadnaught storm bolters with the skull-icon shaved off so you can't tell they're upside down).

Helpful Hint-- The exhaust pipes took a little extra work, but I think they’re worth it. I marked out four even dots on the center panel, then used the 1/16” hole punch. Also, when you assemble them, push the support tabs at the top and bottom all the way down into the pipe. They’ll still work, and this way you don’t have any odd bulges where to many layers of cardstock overlap. Then glue the top and bottom in place. Finally, use the 1/8” hole punch to make two discs, double them up, and stick them on top as the nozzle/mouth of the exhaust pipe.

Yes, between the time I built the Vindicator and started working on this fleet, I broke down and bought the 1/16” hole punch I'd wanted (see the Amazon ad to the right). It opens wide, so you can place a hole right where you want it. I highly recommend one if you’re thinking of doing a bunch of this paperhammer stuff. Why shall become apparent.

What next? Well, hidden away in the Golden Bolter files is yet another PDF, this one showing how to make a Whirlwind turret from stuff you've probably got around the home. Most notably, the "silos" are a 40mm Fantasy monster base cut in half. I used some spare plastic card that I had to build the turret around the two half-bases (although I could’ve done it with cardstock, too), then used two sizes of plastic tubing to make what should pass for a simple hydraulic mount.

Helpful Hint--I attached the thinner sections of tubing to the whirlwind turret first. I used those to figure out the exact placement of the wider sections and glued those to the hull. The tubes are never glued to each other, so I can remove the turret either for a “weapon destroyed” result or just to make it easier to store and transport the model.

Note that this time I did the side armor in a more classic style, just like I said I should've done up above. I took the same square armor and then cut the corners down to match the shape and angle of the hull. This time I used the 1/16th hole punch for what I had in mind from the start; to make smaller rivets. They add a fantastic level of detail. Which also means I should make another one for Gillian...

Helpful Hint-- I love this 1/16th hole punch (wish I’d had it for the Malcador), but there’s one thing worth keeping in mind with the rivets. You’re making a piece that’s not much wider than it is thick, so the cardboard tends to “flake” a bit. It’s not unusual for a rivet to peel apart into two or three sections of paper, only one of which is glued to the model. It happens I’d say it happens to about one out of five. Make extra rivets, use a little extra white glue so it soaks through, and be patient.

Add on a few details from the Marine vehicle sprue and... voila! It's also a pretty close match for another scratch-built Whirlwind I made for my White Scars a few years back. And the only thing more fun than a Whirlwind is a pair of Whirlwinds, yes? So this one will be joining the Khan.

So, anyway, what to do with the next few hulls? Well, I had the bare bones of an Iron Hands force at one point that had gotten broken up and distributed to other armies. The plastic Rhinos went to my Thousand Sons, but it left me with a bunch of the old metal components for some Razorbacks. I ended up with a bunch of plastic components, too, which is why you’re seeing random elements painted black in some of these pictures.

Another shameful admission. I've always toyed with the idea of an Ultramarines army. Yes, they're Smurfs and they hog all the good fluff. Still, the very ornate, Romanesque look has a definite appeal to it. Especially when my other two loyalist Marine armies area bunch of Mongol hordesman on bikes and... well, questionably loyal (the Relictors). So it was about this time I started thinking about an all-paper (or mostly paper) vehicle Ultramarines army. You may see more and more of it in the months to come.

The two Razorbacks went together just like the basic Rhino, except for the back hatch. It took a bit of card-shaving to get the metal plate to sit just right, but once it was done these were both very passable vehicles. I have the parts for a third turret, and that one might get ablative armor on the side, too.

And that's a couple different things I've been doing with some spare parts and cardstock Rhino hulls. There's still a Predator template I want to try (with and without side sponsons), so I may have to revisit this in a few weeks or so.

By the way, there were a few requests over at the Bell of Lost Souls for a Sisters of Battle Repressor. It’s not my kind of thing, but I noticed someone recently stumbled across a pretty decent template for it. I’ve also heard a rumor you need to print it at about 95% to make it come out right. I probably won't be building one myself (SoB being one of maybe three 40K armies I've just never had any interest in) but if anyone wants to give it a try, I've got a few ideas on ways to make the template a little more solid (and easier to build). Drop a comment here and I’ll explain how. If enough people ask for it I might even be tempted to throw it together, post the how-to, and then raffle it off or something.

Next time, if all goes well... everyone's favorite green Xenos.


1.29.2010

The Paper Rhino

About a year ago I discovered the joy of Paperhammer. I'd understood the idea before that, but hadn't realized there was a whole mini-cult of people who enjoyed making elaborate (and sometimes not that elaborate) templates for a variety of Warhammer 40,000 vehicles and units. There are templates for old and new versions of many tanks, and even a fair degree of ForgeWorld stuff. There's a fellow named Jeff Vaughn who's done an absolutely amazing set of diagrams for a Warhound Titan.

We'll be getting to those eventually, don't worry...

Anyone who's even slightly interested in Paperhammer should probably swing over to The Golden Bolter Society, where they've got a great archive of templates. I'd also recommend just doing the 60-odd Meg big batch download and get everything. Easier to deal with, plus a few of the individual links were having problems at one point. There's also the BWC Archive group at Yahoo.

I decided to take my first steps into Paperhammer with a Mk.I Rhino. One reason was a bit of nostalgia--it was the first 40K vehicle I ever owned, so there was something nice and symbolic in starting with it here. It's also a pretty easy template to follow. There's a lot of detail elements on this template, but the core form is a mere five pieces. Hull, two sides, two tread bases. Simple and straightforward.

Plus, I think it's pretty tough to argue the Rhino is one of the most versatile vehicles in the game, from a modeling point of view. There are four separate armies that can use them (five if you count Orks using them as looted vehicles). The Rhino's also the base for another six tanks (Razorback, Whirlwind, Vindicator, Predator, Immolator, and the Exorcist). If you've got access to free (or extremely cheap) Rhinos, you've got a lot going for you. Even if they're the older ones.

So, an empty raisin bran box gave up its existence for these five parts. I applied them to the cardboard with a cheap glue stick from the 99Cents Store (four for a buck, really). It's so cheap, in fact, the templates tend to peel off once you're done cutting, which is a plus. I also use an old credit card as a squeegee to get them on the cardboard as smooth as possible, with no wrinkles or odd bubbles.

As I said, the Rhino's an easy template to follow, and the unknown creator (please speak up and grab credit) even included tabs for gluing. On this very first attempt, I used a straight edge for every single line and let stuff dry extra-long, but even so it only took a little over an hour to do all of this.

Helpful Hint--You can save a bunch of time by just cutting these things out with a halfway-decent pair of scissors. If the tab edges aren't perfectly straight... so what? They're going to be glued inside your model where no one can see them. Save the time-consuming straight edge and blade for scoring the long, straight folds that are going to matter.

It's probably worth noting that I didn't put on any of the wheel or tread details that are supposed to cover the two tread bases. I toyed with it, but they didn't seem worth the effort considering these elements are almost completely hidden by the hull. What I finally did was cut out four of the "wheels" that were included in the template, cut them in half, and then trim them down to fit. So if you wanted to do that, it would boost the five-part rhino up to nine (or thirteen, if you get nitpicky about the halves).

When you put it side-by-side with this handy Thousand Sons Rhino, you can see they're almost spot-on identical as far as proportions go. With the addition of just a few little details (most of which are probably already in your bitz collection if you ever had a few Mk.1 Rhinos) and a coat of paint, they'll be almost indistinguishable from a plastic kit. Final price... barely $2, unless you want to count price of the raisin bran. Then it's closer to $3.50.

That's just the first taste of Paperhammer, which is going to be a recurring theme here. In a few weeks I'm going to show a few different pictures of what I ended up doing with this particular Rhino and a few more I built. I'd like to get them dressed up and painted a bit first, though, so you can see how they'll fit into different armies.

Next time I'm going to tackle something a little bigger and more complex. And spiky, if you're into that sort of thing.