2.06.2011

The Baneblade, Pt IV

Okay, I have glue again.

I also made one small tweak to the last post, which I shall repeat here. When you mark the long strip for the tread base, the three measurements should be...

2 1/4” --- 5 15/16” --- 1 5/8”

Small tweak, but it’ll make things easier.

So, last time I left off with me going blind measuring out tread links one after another. You need lots of them, each measuring 1 7/16” x 3/8”. You can break out the pencil and ruler or...

Helpful Hint - If you’ve got a measured cutting sheet like the one I use, you can just make a simple jig. It’s what carpenters use when they have to cut multiples of the same object. By setting the ruler on a certain line and moving the cardstock to a certain line, I know that every piece will be the right measurement and square on the sides. I machined out almost 150 tread links in about an hour and a half.

I doubled up all the links and pressed them between wax paper and under a book. This made them solid and very straight. If you end up with a few “halves” that are a bit too thin or too short, don’t worry about it. Center the ones that are too thin, line up the ones that are too short (or too long, arguably) with one end of the other half. Most of these will end up being your under-the-tank tread links. You’re going to want about 35 links per side, plus a few spares (just in case).

Go through your tread sides and pair them up so you’ve got a right and left for each set of treads. Make sure the ones you’re least pleased with end up as the inside pieces. For example, the left side of the left-hand tread is going to be facing the world, but the right side is going to be facing the inside of the tank. Make sense? You may want to mark these so you don’t lose track of which is which.

So, time to assemble the whole thing.

I cut a few extra pieces of card to be the tabs for this tread assembly. They’re 1 3/16” (to sit across the base) with some extra on either side. Size doesn’t really matter here. I wanted them big enough to give me a solid contact point, but small enough that they wouldn’t interfere.

Three of these tabs went along the 5 15/15” length of the tread base--two at the end, one in the middle. Two more slightly thinner ones went right inside the other two marked-off sections at the start of the curve. Clamp these as best you can, because you don’t want a lot of play in them.

Once the tabs are dry, take the tread base--that long strip you cut last week--and match it up to one of the sides. I used the outside piece since this will get seen the most and this is the one I’ll have the most control over during assembly. Add glue and clamp the tabs to the side. Double-check before locking the clamps down and make sure nothing’s slipped. You may need to push and prod a few tabs to the right position and then clamp them there.

Those curves you worked into the tread base should be wrapping around the big wheel on the front and back of the side piece. Bend this gently so it all lines up. Make a quick pencil line at the point where the curved section levels out and becomes a straight edge again. I added another tab just past this point. While it was drying, I also snipped off the excess card on the tread base (anything that extends past the horizontal top).

Once that last tab is dry, I clamped it in place against the side. Again, it takes a little tweaking to get the base to sit just right around those curved ends. I took a lot of time on these, because that curved section of track is probably going to be the most visible part of this whole assembly.

With all the tabs dry, it was time to add the other tread side. Again, this should probably be the inside half of the tread set. Glue the tabs and set the side on top. Odds are you’re not going to have any clamps or clothespins that can reach the tabs now, but there is a big opening at the top you can fit your fingers in. Press each tab into place. Make sure the whole assembly stays square, too. This is going to be one of those awkward times where all you can do is sit and hold the thing for twenty minutes or so. Personally, I decided it was finally time to crack open the first season of Dollhouse while doing these two sections.

Helpful Hint - Keep checking on these tabs. The glue is going to make them curl up as they dry, which means less surface area and less hold. Just move your fingers from tab to tab, pushing them down and holding them in place.

You may notice there’s one blue tab almost in the center of the tread. That’s just there to help keep the center of the whole assembly square. You don’t need it, but it does help add to the solidity of the whole thing.

I also cut a few strips of card that were 5” by 1 3/16” wide. These got folded in half to be consummate V’s. One got tucked into each end of the treads, and one straddled that tab in the middle. The treads were strong enough now to hold up Under The Dome with no problem, which means they’ll survive tabletop warfare.

Now it was time to add the actual tread links. I took one of the tread guards and set it down over this tread assembly. This let me know just how much was going to get covered and what sections of the treads were going to be seen. I marked this off with a pencil.

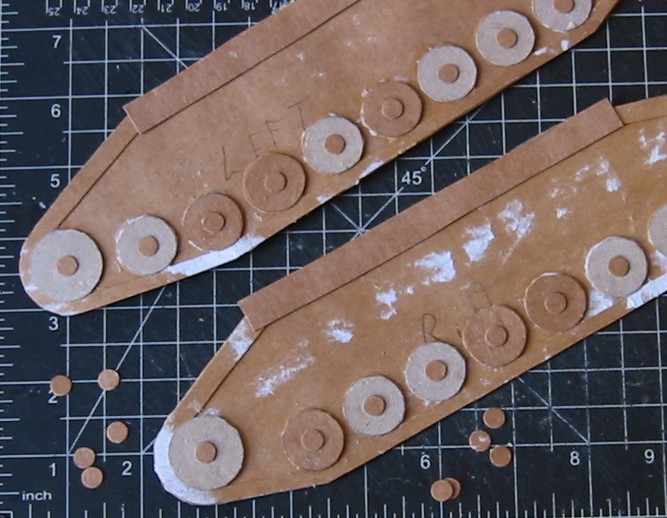
As I mentioned above, the curves are the big focus point, so I wanted to make sure those got extra care and attention. I started at the front (the pointier end) right at the visibility line I just sketched. I placed one tread link just above the line and started working my way down. There’s about 1/16” gap between each one, but I was eyeballing it so it might be a hair more or less. The real thing here was to take my time and make sure everything was even and level. I also tried spacing one or two ahead so I could avoid ending up with a link that sat on one of the sharp corners or something.

You may come across a tread or two that’s slightly longer or has a gap on one end because of different sizes. I talks about this up above. Make sure the good edges face the outside of the tread and they line up there. It’s far less likely anyone’s going to see the underside of the Baneblade between the two tracks. If they do... well, one way or another, they probably won’t be seeing it for long.

Once the treads were in place I made a pile of disks with my 1/8” hole punch. I put a tiny drop of glue on the side between each tread link and used my hobby knife to put a disk there. These are the pins that hold each link together. If you’re careful you can also use them to help disguise any gaps or irregularities along the edge.

Helpful Hint - Let’s say you’re really, really detail crazy. You probably want some aquillas on these tread links, don’t you? One of the easiest ways to do this is to use some of the many 40K fonts floating around out there. They’ve got three or four versions of the aquilla (even an Inquisitorial one) There are rulers in Word so you can figure out just how big they are and print out ten or twelve of them on heavy paper. Just add them on top of some of the links once they’re in place. You can also use these “font details” on other parts of the tank or on other projects.

And there you have it solid, usable treads for the Baneblade model. We now return you to your regularly scheduled template.

I may need to take off a week for this new project I’m on, but next time... everybody’s favorite part.

Guns. Lots of guns.

1.28.2011

The Baneblade, Pt III

Many thanks to all of you who voted in the Preditors & Editors poll. It is appreciated.

Now, back to our regularly scheduled super-heavy war machine.

So, all the major sections are done on the Baneblade. There’s just one big challenge left, and it was going to be a bit time-consuming. This is my only real complaint with Jeff Vaughan's models. They are absolutely fantastic in almost every respect, but...

He never does treads.

The Baneblade templates have the tread guards and the wheels, but no instruction on how to put treads between them. There's a suggestion of how far apart they should be, but that's it. Sooooooo... you need to figure out one of the most visible elements of the tank on your own.

Fortunately, I did it for you. And really, Mr Vaughn left us all the details.

If you hop to page 10 (DWG-BB-210) there’s a front and side view of the finished model to help with construction. You’ll notice that in this picture, the Baneblade does have treads. So here’s what we’re going to do.

The picture’s at 75%, so it needs to get expanded back to a normal 100%. All we need is the treads and tread guards, so feel free to trim off the turret and the fuel tanks. If you want to save some paper, you can also double up so you’ve got a left and right side on one page. You’ll probably get a little bleed into the margins, but not enough to cause problems. You can double check the size against the tread guards you’ve already built.

And if you’re really lucky, someone already did this in Photoshop and will be sending the file Baneblade Treads to Paperhammer.com so it can be posted there. Once said person figures out how to make a PDF that doesn’t lose scale...

Anyway...

Print out four copies of this. The image extends slightly out past most printers' range, so you’ll probably need to clean up any edges so the template has complete ends. Now go through with a pencil and extend the treads “into” the tread guard. This doesn’t need to be exact. As long as you more or less match that red outline over there, you’ll be fine. Do this on both images on all four sheets.

Cut out these tread outlines. You probably want to mark them as left and right sides, just to save yourself potential headaches later. Unless something’s gone horribly wrong, you should end up with four left sides and four right.

Take two of each (left and right) and put them aside. These will be your bases, and they’re done now. Take the other two and extend the wheel outlines on each one to a full circle. On page six (DWG-BB-206) there are the actual wheel sizes and outlines. They’re almost exactly the size of a quarter and a nickel if you’re careful tracing. You may want to try a penny instead of a nickel unless you want to sharpen your pencil constantly.

(foreign readers I apologize-- if someone wants to mail me a bunch of Euro coins I can try to include those in the future).

Cut out these wheel outlines and the “frame” that they’re on. Extend the frame up along the top edge, too. It’ll make things easier in the long run. I’m going to call these the wheel frames.

You’re also going to need 32 small wheels and eight large ones. By this point in the project you should have enough scrap cardboard it shouldn’t be that big a deal. Use either the template or the coins, throw on an episode of Chuck or Archer, and start cutting.

If you’re really insane (I’m not, but I’m tossing it out there for those of you that are) you could mark the center of each wheel and punch it out with the 1/4” or 1/8” hole punch. It’ll probably take a few tries, so I’d make extra wheels if you decide to go this route.

Okay, now take a base and a wheel frame (both left or both right--make sure they match). Line them up and glue. Wrap them in wax paper and leave them under something heavy, or maybe even a few heavy things. I recommend Stephen King’s Under the Dome, Dan Simmons’s Drood, or both.

Helpful Hint -- One of the downsides to white glue is it contracts when it dries, so larger projects with a lot of surface area (like this) will ripple and bend very easily while the glue dries. You want these very flat. It takes a bit more time, but leave them under the books for two or three hours, until they dry completely.

Once you’ve got all of those done, you should have a left and right side for each set of treads. Attach the wheels and also add a strip along the top edge. That strip is a spacer which will make sure things sit square when this gets assembed and put into the tread guards. Wrap the sides in wax paper and press them under a few more big books again. Double-check before you put the weight on that nothing’s slid or shifted. You don’t want to be gluing things in the wrong place.

Time for some extra detail. Use a 1/4” hole punch to make small hubs on the wheels. They may look a bit oversized now, but remember that most of this is going to end up under the tread guards. You can also use the 1/16” punch to add some rivets. Again, most of this is going to get hidden, so don’t put anything above the height of the wheels.

Now, cut a few long strips of card that measure 1 3/16” wide. The final goal is two pieces, each in the range of 15” long. Unless you’ve got some gigantic cereal boxes, there’s a good chance you’ll need to graft two strips together.

This is Important - When you scab these two pieces together, do it at the center. The center of this strip is going to be the underside of the treads--beneath the tank-- and you want to end up with any irregularity out of sight. So graft two eight inch pieces together at the center.

Go out about three inches from each center. You want to mark off a section 5 15/16” long. This is the base of each tread. Score these lines. To the front, mark off another section 2 1/4”. To the rear, mark off 1 5/8”. Do not score these last two sections. Again, the only score marks should be at the two ends of the base.

Now, from the smaller sections on either end, you want to curl the cardstock around your hobby knife, a magic marker, or something in that size range. You want the card to have a good curl to it. Remember, this curl should be past the front and back sections you marked out.

Cut out a few more long strips of card 1 3/8” wide. Start cutting these strips into 3/8” lengths. These are going to be the treads, and we’re going to make them double-thick, so you’re going to need a lot of them. Start cutting now. Stop in a few days.

Alas, this has eaten up a lot more time than I though it would. And the last of my glue. I need to make this a stopping point for now, but next week we’ll get the treads all together and do a bit more work on the hull.

1.21.2011

The Baneblade, Pt II

So, I wanted to concentrate on the hull this time around.

I’ve already got the bottom hull section cut out, so the next step is the front hull. It’s the one labeled DWG-BB-205. This is a tricky piece because the front of the Baneblade has that “shelf” next to the Demolisher cannon where the heavy bolter turret sits. Some of these lines need to be scored on the opposite side so they bend the other way. The lines in red are the ones that need to fold “backwards.”

Helpful Hint - Be careful when you’re planning out tabs. Because of this multi-directional folding, some of the tabs will have to bend in different directions, too. Don’t just bend them by brute force--take the time to score them properly. If you don’t it’s going to lead to messy edges.

When I started clipping this together, I focused on the shelf area. Make sure you get these edges good and tight. This area is going to be one of the main focus points of the model. If you’ve got gaps or uneven edges, everyone who looks at the model is going to see them. It’s like those dreams of going to school in your underwear where you tell yourself no one will notice if you just act naturally--but you know it’s not really going to work. This is a very visible section. Take your time with this part and make sure it’s nice and clean.

Once this is dry (or earlier if you’ve got enough clothespins), you can attach the front hull to the bottom hull. Hopefully you cut out a nice big tab at the D line (marked as such on the template). Clip it in place and give it lots of time to dry.

The next piece is also a bit complex. It’s the main turret base on page four of this template (DWG-BB-204). There’s a lot of angles here, so you need to be precise. First though...

This Is Important - There is a simple mistake on the template This piece is inside-out. If you build it as-is, you’re going to end up with the mirror of the piece you need. This is one of the times that Vaughn’s simpler style pays off, because it’s very easy to reverse. You can put it up to a window and re-trace it or just flip over the cut-out piece and use the template to connect the points and angles on the opposite side. Heck, if you’re better than I am with Photoshop (not too hard) you could just mirror the template page when you print it out. Make sure you do this before assembling the turret base or you’re just going to get angry.

I made sure this piece had big tabs around the edge to attach to the top. Because of all the angles where the sides slope in, I decided to start on either side and make sure those were solid before sealing the whole thing up. Again, this is that front-top center-of-attention area, so take your time and make it look nice.

Helpful Hint - It was a pain trying to get clothespins into those small angled spaces. Then I realized I didn’t need to. Push the sides into position and then use the clothespins on the tabs you added. They’ll keep the whole thing pulled together, plus you don’t have the headache of having to put them right on a glued spot.

Once you’ve got those sides clipped, hang on before doing anything else. Again, do not finish assembling the turret base. Before we go any further in building the hull, there’s another big decision to make. This one’s going to decide how much work you do this week.

As Mr. Vaughn has designed his template, there’s no mechanism to allow the main turret to rotate. It’s just another construct at the top of the hull. I’m going to toss out a few ideas and show you how to do the one I picked.

First (and easiest) is don’t worry about it. Games Workshop has often said in their rules and FAQs that if it looks like a piece should be able to rotate, it should be treated as such. Unless the people you game with are complete powergamers determined to tweak and nitpick every rule so they can win, having a solid turret shouldn’t be a problem. Just finish assembling the base, glue the turret in place, and call it good.

Second (and just as easy) is not to attach the turret at all. Add a bit of weight into it so it sits well on the assembled base and turn it (or remove it) at your leisure. This could lead to some arguments about measurement, however, since your turret won’t have a fixed “home” position. It’s large enough that a shift of an inch or so might not even be noticeable. And we all know how much one inch can change the game.

Third is magnets. Yep, magnets. All the cool kids are using them. Put one in the turret, one in the base, and now you’ve got the best of both worlds. If you go this route, triple check the polarity of the magnets before you glue them in place.

Last is the basic post-in-the-socket method that most Games Workshop models work off themselves. I’m going to build a simple axis post for the main turret to turn on. In fact, as I get to them, I’ll be doing this for all the turrets. What this means for now is that I need to put a socket in the turret base. To help with placement, I want to jump ahead and assemble the turret. You’ll see why in a moment

The turret (DWG-BB-209) looks a bit intimidating. This is because the exploded view makes it hard to pin down what’s what, and it is slightly counter-intuitive. The center of the template is the rear of the turret section. The slightly-curved front where the Baneblade cannon will mount is marked in red.

I started pulling this piece together at the back and working forward. I glued the four corners of the rear section first and let them sit. Then the two “side flaps” that come down from the top of the template. And then, again, we’re going to pause before going any further.

So, to figure out where to place the socket, I used two methods. First was (heaven forbid) researching the facts. On the older model Baneblade, the socket rested off-center in the turret base (right about where the large red circle sits in the diagram). Also, we can tell from the pictures in the template (DWG-BB-212) that the turret should sit mostly in front of the A edge of the base. So placing the mostly-constructed turret lets me see where its point of rotation should be. With all this in mind, I’m going to cut my socket right about where the X is.

I say “about” because you can be a bit loose here. For now, just cut a hole about an inch across, centered around that X. It can even be a little messy (I got it started using my hole punch). Then I looked through and cut another hole out the bottom of the base. Again, I’m not worried about being too precise. It’ll all make sense in a little while when we mount the turret in two weeks.

Once you’ve got that done, you want to attach the turret base to the hull assembly. This is the best time to do this and make sure the hull as a whole is nice and solid. Line up the A and B edges on each piece and clamp it. Let this dry for a good long while.

While it’s drying, cut some strips of cardstock about 11/16” wide. Fold each of these two or three times to be your consummate V’s inside the turret base. They’ll keep it nice and solid when dreadnaughts, carnifexes, and demon princes try to pound on it. Keep them clear of the socket, too.

I also cut out the armor plates for the turret base. Then I numbered each of them and the corresponding spot on the hull where they go, just so I could keep them straight. Note that there isn’t an armor plate for the backside, where tab C is going to attach. That side is going to get covered by the rear hull section when the tank gets assembled in a little bit.

Now glue edge C in place. This one will be a little tricky because the place you want to put pressure is in the back of the turret base. It’s going to be nigh-impossible to clamp this, so you’re just going to have to hold it until it dries. Just make sure you do this as Fringe or a Deep Space Nine rerun is coming on or something and you’ll be fine.

Once C is dry, seal up the turret base. Start at the back and work your way forward. As I’ve said before, take your time. This is going to be a high-attention area, so you want it to look good. Don’t forget you can reach in through those two socket holes to press tabs down if you need to (as long as your Consummate V’s aren’t in the way).

Helpful Hint - At this point you can use the tread guards if you need to set the hull assembly down. They’re the right height and width to hold everything up (naturally), so use them if you must.

That’s it for this week, but as you can see we’ve got something that is recognizably Baneblade-ish now. Next week, I’m going to tackle the most intimidating part of any tank. The part that grinds you into the muck.

By the way, there’s a new anthology of the month up, too. It’s Timelines from Northern Frights Publishing, a baker’s dozen of time travel stories that all tie back to H.G. Wells The Time Machine. Some are very direct links to that classic, others are much more tenuous. There is one damn fine, creepy story from J.W. Schnarr and John Sunseri (who Brian Keene recently named one of his favorite authors of 2010). And, yeah, I’ve got one in there, too.