Today we put it all together and finish this template.
Man, this is the longest it’s taken me to build any of the projects I’ve tackled here. I hope somebody appreciates this...
 Before I dive into new stuff, I want to take one tiny step backwards, though. I was looking at the armor plates for the legs and realized I could add two more points along the trim near the center of the plate. They’re the same right-angle triangles I used on the ends, cut from a 1/8” strip, except I glued them on the hypotenuse rather than the side. It’s a tiny, tiny bit more detail, but all these tiny bits are easy and they add up real fast.
The claws attach pretty easy. If you look close, the back edge is a bit long and that gives you a solid point to connect each section to the arm. I also put a drop or two of glue inside each piece so it would run down and add to the join once the claw was in place. Put the two big claws flush with the sides of the arm and there should be a tiny bit of a gap left to fit the thumb in place.
 I want to point out I was careful placing the claws because I had specific things I wanted each one to do. The Nurgle Defiler was going to be resting on its knuckles, so those claws had to be double-checked in place against the model. The Khorne one was going to have one arm aggressively raised, so I wanted to make those claws look a bit more dynamic. If you’ve got a better idea how you want the model to look in the end, it’ll help a lot when doing all the extra work you need to do with a template like this, where so much of it needs to be posed.
 Helpful Hint-- Whatever way you end up posing the claws, try to have the thumb make contact with at least one of them. Use a drop of glue on that contact point. It’s a very small, subtle thing, but it will make this whole section so much stronger to have multiple connections. And you want it to be solid because you’re going to smack it against a Carnifex or some Storm Shields at least once or twice a month if you’ve got a good gaming group.
The claws are a little bit on the small side, once you get to see the whole thing assembled. If you have paper to spare, it might be worth printing them just 10% larger or so. They should still fit with no problem.
 Anyway, I let the claws sit to dry for a little bit and looked at the chassis again. After building the Plague Tower back in the spring, I knew that blank space can look especially deadly on a paperhammer model. So I decided to put some bits on the front and back of the chassis.
The back is easy. I just cut a few thin strips and glued them down to look like they were part of a superstructure. You can do some nice layering stuff in here, too.
 The front was a bit more work. I decided I wanted to build a cow catcher, a bit like the regular GW model has, or like the one on the Plague Tower. I cut a piece of card 3/8” wide and 1” long and glued it under the front edge of the chassis so there was a 1/8” edge sticking out. Then I cut out a few 1/2” triangles, exactly like the ones I used on the battle cannon. I glued these in the front to make a cow-catcher/ ram.
 With that done, I cut out the sockets for the front arms. These go on the diagonal sides of the chassis, on either side of the cow-catcher I just scratch built. Give them time to dry before you put the arms on, especially if one of the arms on your Defiler is going to be raised.
While the sockets were drying I cut out the armor plates and put on detail the same way I did on the leg plates.  I used 1/8” strips on the long edges, then added some right triangles cut from the same strips to create the Chaos look. It took a bit more time, because these forearm pieces are loaded with angles, but I think they came out pretty nice. It’s not perfect trim but it implies the trim, if that makes sense. And it’ll look good once it’s painted.
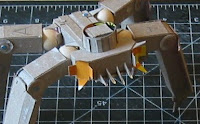
There’s also the issue of the spiky bits. Defilers have blade-spikes all over their legs and arms, and they are included on the template. However, I don’t think single-thickness card is going to be all that durable. It’s definitely going to be a pain to glue on-edge. So, I decided to combine the blades.
I took the eight blades for the C and bottom of the D armor, then doubled them up so they’d be twice as thick. I added one of the upper D blades to each, too, giving me something very similar to the feet-talons, but with a flat back.  This gave me four solid blades per model which I attached to the C armor plates.
Helpful Hint - On the Nurgle model, I put “corrosion” holes on the C plates, placed so there was only room for one blade on each piece. I used the spare blades on the lower D armor to spread them out a bit and help make up for this Defiler’s static pose.
I found that to attach the C armor to the forearm, you’ll need to cut out a few cardboard spacers.  With that extra score line to give it a diagonal corner, the plate isn’t wide enough I decided to take care of this before attaching the arms. You can freehand a rectangle to use as a spacer or use a couple of 1/4” discs. Whatever you decide to use, you want to make it two or three layers thick. Also, keep it near the center line of the armor plate--this is going to join on the spacer and at those thin diagonal edges. I cut two long strips, which gave the bonus of looking like pistons or struts when you saw then at the “elbow” or through the gaps in the Nurgle armor.
Now to attach the front arms. This is a bit trickier than the legs because there’s a lot of stuff in the way now (including... the legs). Try to pinch the tops and bottoms (the triangle piece for as long as you can, then lever in the side rectangles.
 This is Important - Let these pieces dry for a long time, especially any that are raised. If you have any sort of angle or pressure on them there’s going to be torque on the glue and the pieces will just twist free as soon as you stop pinching the flaps of the socket. I used a bunch of stuff to keep the arms in position and the flaps in place on the wooden bead. Clothespins, books, and even a couple of the skull shot glasses I mentioned before (they’re just tall enough to sit under the Nurgle Defiler). I wedged and balanced them wherever they were needed and left them all overnight.
 Last but not least, I glued the armor plates onto the arms. They went on pretty easy, and just like the leg plates, they give the model a good sense of bulk.
And that’s that. At this point we’ve built everything from lustandtorment’s original template, and it is a great template. While I made it look very long and drawn out--mostly because I was building two of them in between work assignments-- I bet one of these could be built over a long weekend without too much trouble. Four days, tops. Heck, you can cut 85% of it out with a good pair of scissors. I think this is a fantastic model, and someone would have to be a real hard-ass not to allow one of these on the battlefield.
I’ll also point out, for those who like the Blood God, that with what we’ve done so far it’d be very easy to build the Brass Scorpion of Khorne pictured in the first Apocalypse book. The one they built using parts from two Defilers. So there’s that and the Soulgrinder as bonus extras for this template as well.
Now, some bad news.
I’m afraid at this point I need to take some time off from the geeky blog. Y’see, I’ve got a book manuscript due at the first of the year, it’s only about 2/3 done, and I need to put some serious work into it. It’s the sequel to Ex-Heroes, which is listed there on the sidebar. Please feel free to check it out. Ex-Patriots is currently going to be released next summer, as I understand it. Assuming, of course, I get it done on time.
Also, as of late I feel like I’ve been rushing things to get them done to put up here, not building things for the sheer enjoyment of it--which is supposed to be a big part of the hobby, yes? So probably nothing else until close to Thanksgiving while I get caught up on the book and maybe work on one or two projects at a more relaxed rate. I’ll still check in regularly, though, if anyone has any comments, questions, or requests.
Plus, I’ve been thinking about the Defilers a bit more and I’m not quite done. If you check back over the next few weeks I should have some instructions and examples of how to make weapons options (and a few very last details) for both versions of the Defiler. Or for whichever version you decided to make.
And when I come back around Thanksgiving... I’m thinking about tanks. Big tanks.

 So, these first two models were already blue from a half-hearted attempt at an Ultramarines army. I painted them with a solid coat of goblin green. That got a heavy drybrush of scorpion green on top of it, and then a lighter drybrush of bilious green. I did about a 60/40 mix of bilious green and skull white for the next layer of drybrushing, and finished them off with a very light dusting of skull white. I tried to avoid the shoulder pads for most of the drybrushing, except for the trim. Since Relictors are a dark gray with black shoulder pads, I wanted the pads on these spectral Relictors to be darker, too.


