7.25.2010

The Hellblade pt. II

So, if you followed along last week, the model’s about 90% done at this point. Or it would be if you were using the template as is. Everything from this point on counts as an optional helpful hint. So here’s how to slap on some extra detail. A lot of this come right off that second set of templates I said to print out.

On the inside of the cockpit, I used the little chest-and-shoulders piece that comes with the Chaos vehicle sprue. It’s the one that would normally give you a head just peering out of a tank hatch. Here it makes a great pilot, especially with the Chaos Marine respirator-wearing head. You could also use a horned head and reposition the horns to look like cables running back from the helmet deeper into the cockpit. I glued the pilot in place on top of that horizontal card I added a few steps back.

The canopy gives you a few options, as I see it. You can cut it out, score it, and call it done. You can also cut the windows out of one of your two copies, then glue parts of the other one inside that frame you’ve made to create a two-level “glass” effect. You could also use clear plastic from a blister pack or flat-sided bottle for the windows, but then you need to put something inside the cockpit (which I’ve already done). I decided to cut out the windows but leave them open (it is just a model after all).

Helpful Hint-- This is one of those cases where size really does matter. The stanchions of the canopy are so thin it’s very hard to get the folds right. Alas, this is a precise piece and if the folds aren’t just right you’ll never get the canopy to fit on the cockpit. What I finally ended up doing was (very carefully) cutting the whole canopy apart and gluing each panel in place seperately. It’s more work, but quicker and cleaner in the long run.

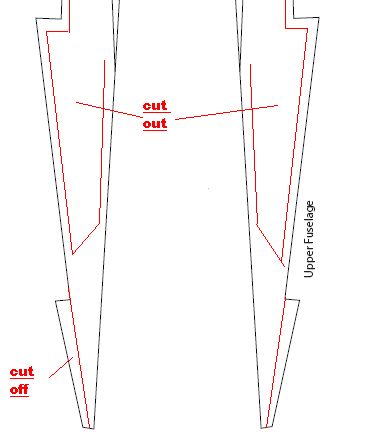
Take the extra upper fuselage template and sketch in a line about 1/4” from the edge. My little diagram is not to scale. Your own personal chaotic taste may say to make it a little less or more. Cut off the “barbs” at the front of the wings, too. Now cut along that line you added, remove the center (try to make clean cuts), and you’ve got a section of trim that should line up perfectly with the wing. You could add a few chaotic points to the trim as well, if you’re into that sort of thing. Glue this in place and use some clothespins to hold it. There may be a little tweaking involved as you go, so start at one end and work your way down, clamping as you go. If you managed to get the whole center section out in one clean piece, you can cut off the narrow end, shift that piece down onto the trim, and now it’s a bit more detail.

You can repeat this trim on the bottom fuselage if you want more detail down there, but I don’t think you really need it. Even with a flier, how often do you see the bottom of a 40K vehicle? I did it on this one to demonstrate, but it may not happen on the next one.

Helpful Hint-- I wrapped each wing in wax paper and set them Under The Dome for a while after all this, just to make sure they were straight and solid. One of the biggest problems with Paperhammer models (in my experience) is things can tweak and warp as the glue dries. The more layers (and glue) you add to something, the more chance it’s going to start bowing and twisting--expecially when it’s something flat like this. Don’t rush this stage and let things dry as long as they need to dry. I did the wings just before going to bed so they had all night to sit.

I did this trick in reverse with the spare cockpit. I sketched the lines and made the cuts, but I used the inside section for the triangular panels on the front of the cockpit. Extra detail and it bulks that up a bit more.
I doubled up the VTOL thrusters on the Hellblade’s bottom by using the forms from both sets of templates. It just gives this engine detail a bit more solidity. A couple circles from a standard 1/4” hole punch gives a touch more detail, as well.

The autocannons are just some doubled-up thin tubing (you could probably use straws) with gargoyles from one of the Chaos vehicle sprues. After much thought about how to attach them to this very angular section of the cockpit, I broke down and used two blobs of green stuff and a drop of superglue. I used two spare autocannon ammo drums from the Imperial Guard heavy weapons set to add a bit more detail. Again, remember that plastic needs to be superglued onto the cardboard.

The lower stabilizers went on now, too. I glued down a thin strip of cardboard on each side first. This gave the stabilizers a bit more to lean on and made it easier to line them up. Plus, it’s just a bit more texture when the model’s done.

This is a bit short, I know, and it’s silly that what’s really a simple model is going to take three posts to explain. Alas, I’m swamped with a few other things right now and I’d rather take a little longer and do it right. After all, I’m theoretically doing this as an example, so rushing stuff doesn’t help anyone.

Next time I’ll show you how to build a ridiculously easy engine for this thing, plus a last few gubbins for detail.

By the way, if you haven’t seen it already, check out Paperhammer 40K. It’s got templates, a forum, and a bunch of other resources for folks trying to learn about origami Necrons and similar fun card constucts.

7.18.2010

The Hellblade

One thing you don’t see a lot of in 40K is fliers. Skimmers, yeah, but real flyers get left on the sidelines a lot. Even in Apocalypse, which has pretty solid rules for them. So when I started getting into Paperhammer and sifting through different templates, they were always something that always caught my eye.

As I tend to lead towards the more ruinous powers, it wasn’t long before I found myself looking at a simple template for the Chaos Hellblade. The Alpha Legion can always use a new direction to attack from, after all. Alas, there’s no name or email address listed on it anywhere, but if you know who built it please speak up so I can give credit where credit is due.

It’s a deceptively easy-looking template because there’s just a few big parts to it. I tried once, set it down, and only recently came back to it. And now I think I’ve got it figured, along with a few very simple improvements.

Helpful Hint-- To build this the way I did, you need to print out two copies of the template for each Hell Talon you want to build. You’re not going to use all of the second set, but you’re going to use enough of it that it’s simpler just to have two copies.

There are five main parts to this template. They’re marked upper and lower fuselage, the two inner wings, and the cockpit. There’s a few more detail bits, but these are the big five.

Put the templates on cardstock. Cut the top and bottom fuselage from one, plus all four spacers (from both sets). The first thing you want to do is glue the inner wings together so you end up with a single set that’s double-thick. This is where the wings as a whole get most of their heft, so by doubling this up they’ll be almost 3mm thick when the model’s done. I double-checked that they were lined up right, wrapped them in wax paper, and set them under a hardcover copy of Under The Dome to make sure they stayed flat.

Helpful Hint-- If I make another Hellblade (and there’s a good chance I will) I think I may make one set of inner wings from foamcore just to see how that looks. The wings are just a hair too thin on this for my liking, but that’s a matter of individual taste. It may just be a matter of finding some slightly heavier card to work with.

While the inner wings were drying I went to work on scoring the two sections of the fuselage. I admit, this model threw me for the longest time and these sections were why. In theory, this model has an open “maw” under the cockpit, which is the weapons bay and the intake for the engine. What I couldn’t figure out was how the maw stayed open without just collapsing flat. The model doesn’t have any interior supports, struts, or similar structures. Needless to say, it works. Really. So if you start feeling a little confused during construction, just remember you’re not alone and be assured it all works out in the end...

This Is Important-- The usual “terminology” in Paperhammer is that solid lines are scored, dotted lines are scored on the opposite side of the template. On the top and bottom fuselage sections, the outermost set of lines should be dotted. If you score these pieces all on the same side the model won’t go together right. It isn’t too hard to line them up if you just take your time. The two long lines on the cockpit should be dotted as well, so make sure they’re scored on the opposite side, too.

So, now with everything dried and scored, I glued one set of inner wings to the lower fuselage. Take a few moments and make sure everything lines up right. If you’ve got clothespins, this is a great time to clip one on at one end and manipulate the rest into place. Then add on half a dozen and make sure each little point and seam is sealed tight. I let this sit for about five minutes like this, then glued the other inner wing to the other side. Then I double checked the position on each one, wrapped the whole assembly in wax paper, and stuck it Under The Dome again.

A while later I pulled it out and glued this assembly to the upper fuselage. Do one side at a time and clamp it in place. Unless you’ve got a lot of clamps or clothespins, you need to let the first side dry a bit before you start to work on the next one. If the scores or folds aren’t good, there may be a bit of resistance as you tweak pieces into the right position. Once you’ve got it all in place, leave it for an hour or so. You want the glue to be very dry on this. After half an hour or so, you can probably stick the wings under a book to keep them straight and flat.

This Is Important-- If you’ve put all your scores in the right place (and on the right sides), the model will not lay flat at this point in the assembly. If you stick the whole thing under a book you’re going to crush the main part of the fuselage. Press only the wings. Use clothespins on the rest until you’re sure they’re mostly dry and then take them off so their extra weight doesn’t bend the model at the table edge.

Once this is dry, it’s time to attach the cockpit. The two inside tabs are going to go up on the edges of the tail section. If the score lines are right, the long lines should match the edge of the wings so the outside tabs rest flat on the tops of the wings. This also needs to be glued tight, so feel free to use a lot of clamps and clothespins.

Now I put in a little addition of my own. A flat toothpick, cut 7/8” long. I wedged it between the center fold of the cockpit and the center fold of the lower fuselage. A little glue makes it permanent. Double check the length on your own model before gluing and make sure it looks right. No two paperhammer models are exactly the same because these are actual models, not CAD constructs. A sixteenth of an inch here or there will add up.

The toothpick makes the fuselage pretty solid, but I took one more step (which will also serve another purpose). I knew how wide the interior space was, so I cut a piece of card to be about 1/4” shorter than that measurement. This became a horizontal platform butting up to the toothpick, sitting on the lower section just below the “center” of the fuselage. We’ll come back to it in a bit. Again, double-check what the length should be on your own model.

I also took a moment and glued on the base for the upper stabilizer. It’s a nice little detail touch that won’t hinder later work.

At this point, the bulk of the existing template is assembled. Next time I’ll show you how to use those extra parts to make some (hopefully) cool detail.

7.12.2010

Killa Kans

The new Ork Codex (well not so new at this point--let's say the most recent) was a great thing for me. My Ork army, the TekBoyz, were lovers of all hi-tek warstuff, but were kind of hampered by the need to keep a warboss in the army. Anyway, right around the time I started this little ongoing art project of a blog, Games Workshop started dropping hints of some first-of-the-year releases to follow up on that codex. Among them, of course, were the new plastic Deff Dread and the Killa Kan squadron.

On most days I'd be singing praises of a plastic set, and the new Kans are gorgeous, no question about it. As it happens, though, I'd already been playing with a Kan template created two years ago by a gent named Adam Souza. It's a great one-sheet template (part of the big file over at the Golden Bolter Society) and it'll let you build a very nice Killa Kan in about an hour. Three cereal boxes will give you six Kans over the course of a weekend. And the price can't be beat.

So start by printing out said sheet. Use a glue stick to fix it to the back of a cereal box or some such piece of card. An old credit card will let you glue it down nice and smooth. In my experiments so far, I’ve found it’s easy to do two at the same time (using the front and back of the same box).

This is Important-- There aren’t any tabs on any of these components, so take a moment before you start cutting and sketch in some rough ones you’ll be able to use. Look carefully and try to picture how these components fold. Some of these components are pretty small and you don’t want overlapping or unnecessary tabs. Watch the little section on the back of the torso, too--you’ll need to make a reverse-score (on the opposite side of the sheet) for a tab to be useful there.

This template’s very easy. You can build all the components-- the main body, arm sections, legs, etc--and then assemble them bit by bit. I started at the bottom and worked up, but because of this design you can do it in any order you like.

Helpful Hint--I made the bottom layer of the feet double-thick. Trace them again on the card and it’s fine. This gives the toes a little more heft, considering they're supposed to be steel claws supporting this little monstrosity. You can also add on a few small rods or card strips to look like pistons or hinges.

The model gives you diagrams so you can build the legs with blocks the whole way (thighs, hips, ankles, shins). I went with a suggestion Souza makes in the notes and decided to use tubing instead. It’s an old Bic pen (10 for a dollar most places) that had dried out. One pen gave me legs for two Kans. If you happen to have a chisel-blade X-Acto it works great. A regular one works too, it just takes a bit longer. I glue the tubes to the feet first. Then once those are dry their glued to the thigh blocks (so I can make sure the thighs are square to one another). I wanted to use some wire from an old set of iPod headphones to make some power cables or hydraulic tubes or... heck, it’s Ork technology. Who knows what they’d be. It’d just look good. That’ll probably be on the next set.

The torso is a single piece with a bit or detail on it. I suggest gluing it shut on the bottom first and perhaps piling a bit in there for weight. I have a little tin where I save all the metal flash from models. It’s great for counterbalancing models. Drop a few pieces of that, a dozen BBs, or whatever similar thing into the torso. Then just drip some glue over it to keep it stable. White glue’s probably best as some superglues are thin enough to run out any gaps in the kan’s bottom.

Helpful Hint-- Again, Orkiness pays off. If you want different details on the kan, go for it. It’s hard for them to look wrong. A lot of these have the control panel from the template, but I freehanded a skull on one and made a very simple “jaw” on another. I also stacked 1/8” and 1/16” pieces over the eye-slit of one to make a “targeter” of sorts. Whether or not the grot inside will ever use it, well...

The three arm sections have a bit of leeway. You can make the center one a bit shorter and it’ll give you a slightly different look. Make sure that the “bicep” of the arm (the lowest section on the template) gets a good-sized tab on the end. That square is going to take the weight of the whole arm, so you want it solid.

When you assemble the arm, take a moment to pose it right. If it’s out too far you’re either going to need a base or the whole model will tip over. You also don’t want it in one of those positions that just looks weird for some reason. Once it’s together I use some pieces from the 1/8” hole punch to give the joints a bit more detail.

The close-combat claw is really nice. This is probably the most time-consuming part of the whole model. It’s a bit of work to cut out the little teeth and the multiple layers, but well worth it. You can also cut straight lines and make it look more like a set of giant shears, which I did with one of them. If you’ve got one of the Boyz chainsaw-choppas kicking around, it would probably glue in there real nice, too.

Helpful Hint--Even five layers thick, the claw doesn't fill the "wrist" space in the arm. So I took out my handy 1/4" hole punch and knocked out a dozen or so card circles. I glued together two sets of four circles each so I had a squat cylinder, than attached them to either side of the claw at the wrist. Voila--a hinge joint. It's detail and it makes the model more solid. I also skipped the shoulder pieces on the template and just did three or four-thick 1/4” circles there, too.

Take your time attaching the arm to the body and hold it until it’s dry. Not kind of dry or mostly dry--make sure there’s no doubt whatsoever this join is holding. Then brace it somehow and leave it overnight to dry more. This one point is probably going to take more stress and abuse than any other part of the model, so you want it as solid as possible.

The template has plans for a big shoota, and they’re probably the weakest part of the whole model. Not horrible, but kind of weak. It does make a passable grotzooka, though, especially with a new muzzle and a scrap bin on top. I also ended up scratch-building two kustom mega-blastas using a very old Ork plasma cannon and Marine plasma pistols. The last one’s probably going to get a rack of rokkits scraped together from a variety of sources.

Once you’re all done, add some final details. Souza says this right on his blueprints. Rivets make anything look Orky. I made a pile from the 1/16” hole punch and applied liberally to corners, edges, joints, and so on. In a few places I stacked them on top of 1/8” discs for more depth.

Helpful Hint-- If you ever end up with a gap or a loose join that just won’t stay, slap a patch on it. Just fold a small square or rectangle of card, glue it up, and place it where it needs to be. Then outline it in rivets. It makes the model more solid and it blends right in on an Ork model. If you look close, I did it on a few of the thigh-blocks and some of the arm joints. You could probably do this on a lot of Chaos models, too, without too much worry.

And there you have it. Very solid, very passable Killa Kans for pennies apiece and an hour of your undivided attention (maybe two hours if you’ve got an interesting movie on in the background). I’m probably going to keep a card-mounted template handy so I can keep build more whenever I’ve got spare time and no other projects going.

7.02.2010

The Rhino Fleet

Sorry for the extended absence. A bunch of real world stuff that would only bore you to tears. I'll make up for it with a very picture-heavy post.

So, a while back I showed how you could make a simple, bare-bones Rhino with the card templates available at The Golden Bolter Society and at the BWC Yahoo Group. There's a few variations, but this is the simple Mk. 1 variant. With minimal practice, you can get to the point that one of these basic hulls will take about an hour's work.

My first attempt to do anything with the hull was a Christmas present. My friend Gillian has an Emperor's Children army, and there are few armies that don't benefit from adding a demolisher cannon. So my first Rhino hull became a Vindicator. There's even a PDF in the Golden Bolter files of the old White Dwarf article that shows how to custom-build such a vehicle (which had no model at the time). The main barrel is just two pieces of plastic tubing (exactly like I did for the Malcador) mounted on a plastic Rhino hull section. The exhaust pipes were going to be hidden behind side armor plates, so I just made them from bits of old sprue topped with Chaos gargoyles. I should've put a 40mm square base on top, too, which would've given it a more "heavy" look.

Helpful Hint-- Most of the time with Paperhammer stuff I’m using plain old white glue. When you’re gluing plastic to cardstock, though, you have to use superglue. And you have to use a lot because it’s going to soak into the cardboard. On the plus side, the cardboard gets a lot more rigid and durable. On the downside, it’s a bit of trial and error until you get the amounts just right. I generally use about half again as much superglue as I’d normally use. Keep a toothpick handy, too, in case you need to guide drops of glue away from delicate or detailed areas

The side armor is triple-thick card. I cut it, glued it, and pressed it under book to get a solid piece. The rivets are just discs from the 1/8" hole punch. In retrospect I would've done two things differently. I would've angled the sides to match up with the lines of the Rhino. I also would've made the top layer of card three sections. This would've made it look a lot more like the old "classic" ablative armor. I don't think anyone would question this as "extra armor," though.

So, for the first real attempt, it's a fairly passable Chaos Vindicator. If you've got three or four cereal boxes and some of the leftover Rhino bitz already, you could put together three solid Heavy Support choices for either a Chaos or loyalist siege army in just one evening.

What else can you do with a Rhino hull, though? Or a fleet of Rhino hulls...?

Well, first off, with a little more work, you can cut out some extra details and give yourself a phenomenal Rhino, one nobody (well, no rational person) could possibly argue against having on the battlefield. If you've actually got a pile of Rhino bitz kicking around, you can make it almost indistinguishable from an actual Games Workshop model. This one is all paper except for the hatches, tail lights, and the weapons (which are just dreadnaught storm bolters with the skull-icon shaved off so you can't tell they're upside down).

Helpful Hint-- The exhaust pipes took a little extra work, but I think they’re worth it. I marked out four even dots on the center panel, then used the 1/16” hole punch. Also, when you assemble them, push the support tabs at the top and bottom all the way down into the pipe. They’ll still work, and this way you don’t have any odd bulges where to many layers of cardstock overlap. Then glue the top and bottom in place. Finally, use the 1/8” hole punch to make two discs, double them up, and stick them on top as the nozzle/mouth of the exhaust pipe.

Yes, between the time I built the Vindicator and started working on this fleet, I broke down and bought the 1/16” hole punch I'd wanted (see the Amazon ad to the right). It opens wide, so you can place a hole right where you want it. I highly recommend one if you’re thinking of doing a bunch of this paperhammer stuff. Why shall become apparent.

What next? Well, hidden away in the Golden Bolter files is yet another PDF, this one showing how to make a Whirlwind turret from stuff you've probably got around the home. Most notably, the "silos" are a 40mm Fantasy monster base cut in half. I used some spare plastic card that I had to build the turret around the two half-bases (although I could’ve done it with cardstock, too), then used two sizes of plastic tubing to make what should pass for a simple hydraulic mount.

Helpful Hint--I attached the thinner sections of tubing to the whirlwind turret first. I used those to figure out the exact placement of the wider sections and glued those to the hull. The tubes are never glued to each other, so I can remove the turret either for a “weapon destroyed” result or just to make it easier to store and transport the model.

Note that this time I did the side armor in a more classic style, just like I said I should've done up above. I took the same square armor and then cut the corners down to match the shape and angle of the hull. This time I used the 1/16th hole punch for what I had in mind from the start; to make smaller rivets. They add a fantastic level of detail. Which also means I should make another one for Gillian...

Helpful Hint-- I love this 1/16th hole punch (wish I’d had it for the Malcador), but there’s one thing worth keeping in mind with the rivets. You’re making a piece that’s not much wider than it is thick, so the cardboard tends to “flake” a bit. It’s not unusual for a rivet to peel apart into two or three sections of paper, only one of which is glued to the model. It happens I’d say it happens to about one out of five. Make extra rivets, use a little extra white glue so it soaks through, and be patient.

Add on a few details from the Marine vehicle sprue and... voila! It's also a pretty close match for another scratch-built Whirlwind I made for my White Scars a few years back. And the only thing more fun than a Whirlwind is a pair of Whirlwinds, yes? So this one will be joining the Khan.

So, anyway, what to do with the next few hulls? Well, I had the bare bones of an Iron Hands force at one point that had gotten broken up and distributed to other armies. The plastic Rhinos went to my Thousand Sons, but it left me with a bunch of the old metal components for some Razorbacks. I ended up with a bunch of plastic components, too, which is why you’re seeing random elements painted black in some of these pictures.

Another shameful admission. I've always toyed with the idea of an Ultramarines army. Yes, they're Smurfs and they hog all the good fluff. Still, the very ornate, Romanesque look has a definite appeal to it. Especially when my other two loyalist Marine armies area bunch of Mongol hordesman on bikes and... well, questionably loyal (the Relictors). So it was about this time I started thinking about an all-paper (or mostly paper) vehicle Ultramarines army. You may see more and more of it in the months to come.

The two Razorbacks went together just like the basic Rhino, except for the back hatch. It took a bit of card-shaving to get the metal plate to sit just right, but once it was done these were both very passable vehicles. I have the parts for a third turret, and that one might get ablative armor on the side, too.

And that's a couple different things I've been doing with some spare parts and cardstock Rhino hulls. There's still a Predator template I want to try (with and without side sponsons), so I may have to revisit this in a few weeks or so.

By the way, there were a few requests over at the Bell of Lost Souls for a Sisters of Battle Repressor. It’s not my kind of thing, but I noticed someone recently stumbled across a pretty decent template for it. I’ve also heard a rumor you need to print it at about 95% to make it come out right. I probably won't be building one myself (SoB being one of maybe three 40K armies I've just never had any interest in) but if anyone wants to give it a try, I've got a few ideas on ways to make the template a little more solid (and easier to build). Drop a comment here and I’ll explain how. If enough people ask for it I might even be tempted to throw it together, post the how-to, and then raffle it off or something.

Next time, if all goes well... everyone's favorite green Xenos.