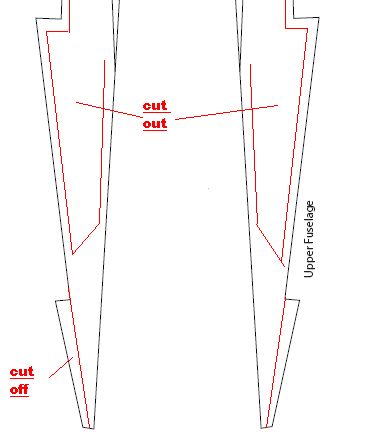
Very sorry for the delay. The real world keeps getting in the way of my little toy soldiers. I blame editors and publishers. Well, I would except they pay me to keep quiet and write...
 Cut a piece of card 2 1/4” wide by 2” long. You want to do a series of scores on it 1/4” apart, parallel to the short side, so when it’s done your piece of card has nine sections measuring 1/4” wide by 2” long. That last section’s going to be a tab, so it’s probably better if you cut the corners down. Roll this piece, glue it on the tab, and clamp it so you’ve got an octagonal cylinder 2”long. With me so far?
 Now cut out six triangles as shown. Score them down the middle and fold. Glue each of these little “spikes” on the end of the engine (creased edge up), butted up against that one strip near the 1/4” mark so they end up with just a little bit hanging out over the end. Make sure you set them on the octagonal edges, not on the flat surface. This will help hide the angular nature of the jet exhaust. You only use six so you can leave a space at the top (where the seams line up) and make the whole thing fit under the tail better.
 Helpful Hint-- If you need to cut out a bunch of triangles for spikes (for Chaos or Orks or whatever) try this. For the ones above, mark out a strip 1/2” wide, then break it down into 1/2” x 1/4” rectangles. Sketch alternate diagonals into the rectangles (left-to-right, right-to-left, left-to-right, and so on). Now you’ve got a row of triangles going both ways, top and bottom. Nothing gets wasted and each cut is effectively cutting a side on two different triangles. Make sense?
 There’s your engine. It should butt up against the horizontal card inside the fuselage. I stacked up four discs from a 1/4” hole punch to make a set of spacers. These went from the top of the engine to the inside of the tail. Alas, unless you’ve got something really cool there’s no way to clamp this. So I just sat with it and watched an episode of The Simpsons while it dried.
The 1/16” hole punch gives me a few dozen rivets to scatter at key points. I’m a bit more conservative with them here than I would be on an Ork project. I found putting one every inch or so on the trim looks pretty nice. A few on the strips wrapping the engine look nice, too.
 Helpful Hint-- If you’re ever in doubt about rivets, try marking where you want them with a pencil first. They’ll give you a good idea what things will look like, and one way or another the marks will be covered by paint.
One bit of pure geekery. Glue a rare earth magnet inside the lower fuselage. You should be able to slip it in behind the guns, under the pilot. Get it as close to the Hell Blade’s center of gravity as possible (mine fit right between the port autocannons and that wooden toothpick). Glue a matching magnet on top of the base’s dowel, but triple check polarities before putting down one drop of glue! Now your flier can come off the base for transport or to be a wreck on the tabletop.
Two last little bits. First, I took a strip of cardboard that was about 1” x 6” long, rolled it up into a tight little cylinder, and slid it down into the engine. When the cardboard unrolled, it held itself in place. This gave the back end of the fuselage a bit more weight to balance it on the stand, and also made the engine and the cockpit look a bit more solid.
 Second, I had a few small gaps in the canopy that were nagging at me. It hadn’t gone together quite right. Normally I wouldn’t mind the gap, so to speak, but the cockpit is the focus of attention so I decided to patch them and hide the work with a few more rivets.
Helpful Hint-- If you need to do a quick patch on a paperhammer project, just use plain old white paper. Trim it to the right size, make any folds you might need, and glue it in place with a generous helping of white glue. It’s not structural, but it’s more than sturdy enough for painting and general use.
Looks like explaining the details took longer than explaining how to build the flier itself, but that’s about it. If you want an air fleet for your Chaos army (and God knows dedicated Chaos players need all the help they can get these days), this is a nice inexpensive way to go. Two cereal boxes, some white glue, a few old CDs, a marble of green stuff and some bitz you can find cheap if you or one of your friends doesn’t have them already. Count in the magnets and the total cost is three and a half, maybe four bucks. When you figure in drying time for the wings, you could probably build one every weekend if you put your mind to it (much faster than I made it look here).
 It’s still a work in progress, but there’s enough paint on it to give you a passable idea what it can look like. And remember, all cardboard except for the pilot and the autocannons.
Anyway, at this point, the Hell Blade only needs one more thing before you can yell “Death from above!!” The engine. This flyer needs something to convince your opponents it’s not hanging in the air with magic. Well, maybe it is, but you don’t want them to know that...
 Cut a piece of card 2 1/4” wide by 2” long. You want to do a series of scores on it 1/4” apart, parallel to the short side, so when it’s done your piece of card has nine sections measuring 1/4” wide by 2” long. That last section’s going to be a tab, so it’s probably better if you cut the corners down. Roll this piece, glue it on the tab, and clamp it so you’ve got an octagonal cylinder 2”long. With me so far?
Next, cut a few 1/4” and 1/8” strips that are three or four inches long. Wrap them tight around your X-acto knife, a round pencil, or something like that so they get a good curve to them. Now wrap them around your cylinder and cut where appropriate. Try to make all your seams on these strips line up, because you can hide them all under the Hellblade’s tail. One of these strips should be just over 1/4” from the end of the cylinder.
 Now cut out six triangles as shown. Score them down the middle and fold. Glue each of these little “spikes” on the end of the engine (creased edge up), butted up against that one strip near the 1/4” mark so they end up with just a little bit hanging out over the end. Make sure you set them on the octagonal edges, not on the flat surface. This will help hide the angular nature of the jet exhaust. You only use six so you can leave a space at the top (where the seams line up) and make the whole thing fit under the tail better.
 Helpful Hint-- If you need to cut out a bunch of triangles for spikes (for Chaos or Orks or whatever) try this. For the ones above, mark out a strip 1/2” wide, then break it down into 1/2” x 1/4” rectangles. Sketch alternate diagonals into the rectangles (left-to-right, right-to-left, left-to-right, and so on). Now you’ve got a row of triangles going both ways, top and bottom. Nothing gets wasted and each cut is effectively cutting a side on two different triangles. Make sense?
 There’s your engine. It should butt up against the horizontal card inside the fuselage. I stacked up four discs from a 1/4” hole punch to make a set of spacers. These went from the top of the engine to the inside of the tail. Alas, unless you’ve got something really cool there’s no way to clamp this. So I just sat with it and watched an episode of The Simpsons while it dried.
The 1/16” hole punch gives me a few dozen rivets to scatter at key points. I’m a bit more conservative with them here than I would be on an Ork project. I found putting one every inch or so on the trim looks pretty nice. A few on the strips wrapping the engine look nice, too.
 Helpful Hint-- If you’re ever in doubt about rivets, try marking where you want them with a pencil first. They’ll give you a good idea what things will look like, and one way or another the marks will be covered by paint.
I haven’t built it yet but the base is going to be the standard three CDs I’ve pushed a few times. Turns out this is pretty close to the same size as the Trygon/ Valkyrie base. Mount a 10” dowel on it, put some small stones on the base for scenery/ weight/ to stabilize the dowel, a bit of sand or grass and voila.
One bit of pure geekery. Glue a rare earth magnet inside the lower fuselage. You should be able to slip it in behind the guns, under the pilot. Get it as close to the Hell Blade’s center of gravity as possible (mine fit right between the port autocannons and that wooden toothpick). Glue a matching magnet on top of the base’s dowel, but triple check polarities before putting down one drop of glue! Now your flier can come off the base for transport or to be a wreck on the tabletop.
Two last little bits. First, I took a strip of cardboard that was about 1” x 6” long, rolled it up into a tight little cylinder, and slid it down into the engine. When the cardboard unrolled, it held itself in place. This gave the back end of the fuselage a bit more weight to balance it on the stand, and also made the engine and the cockpit look a bit more solid.
 Second, I had a few small gaps in the canopy that were nagging at me. It hadn’t gone together quite right. Normally I wouldn’t mind the gap, so to speak, but the cockpit is the focus of attention so I decided to patch them and hide the work with a few more rivets.
Helpful Hint-- If you need to do a quick patch on a paperhammer project, just use plain old white paper. Trim it to the right size, make any folds you might need, and glue it in place with a generous helping of white glue. It’s not structural, but it’s more than sturdy enough for painting and general use.
Looks like explaining the details took longer than explaining how to build the flier itself, but that’s about it. If you want an air fleet for your Chaos army (and God knows dedicated Chaos players need all the help they can get these days), this is a nice inexpensive way to go. Two cereal boxes, some white glue, a few old CDs, a marble of green stuff and some bitz you can find cheap if you or one of your friends doesn’t have them already. Count in the magnets and the total cost is three and a half, maybe four bucks. When you figure in drying time for the wings, you could probably build one every weekend if you put your mind to it (much faster than I made it look here).
 It’s still a work in progress, but there’s enough paint on it to give you a passable idea what it can look like. And remember, all cardboard except for the pilot and the autocannons.