Showing posts with label Necrons. Show all posts

3.17.2015

Transcendent C’Tan

What the heck, while I’m on this little roll, here’s one other Necron unit you can make on the cheap.  Although, to be fair up front, like the Deathmarks, this one’s more “inexpensive” than flat-out cheap.

Lots of folks love that Transcendent C’Tan, but it is scary expensive.  You’re either paying for the whole Tesseract Vault (about $140) or you’re buying it online as bits (around $60 most places I’ve seen it).  Neither of these is a great option if you’re short on cash.

However...

All along, the Necron fluff has talked about how several of the C’Tan disguise themselves as other creatures.  Even with the slight retcon that the ones we meet are all “shards” of the total entity, it’s not hard to believe they could take on any form.  So any oversized model could work as a C’Tan with the right paintjob.

For example...

The Dark Elf Cauldron of Blood has a great statue of Khaine.  You can pick it up for under twenty bucks on line, even less if you get lucky with an eBay auction.  It makes a wonderful Avatar if you’re an Eldar player, or just scenery. But it could also be used for other purposes...

Here’s the complete statue.  I could cut off the topknot, some of the horns/ vanes on the head.  I could also shave off some of the spur-type horns growing along the arms and legs.  This would leave me with a pretty basic humanoid form with an elongated head.

I could also grab the control panel icon from the Necron Catacomb command barge.  You may already have one of these in your bits if you built an annihilation barge.  It fits very well right on the chest with no work at all.  With a tiny bit of filing and shaving, it would be a perfect fit.

If you can afford to pay a little more, dig around online or in your bits bins for detail pieces from the Wood Elves line.  There are tufts of weeds, blades of grass, and all sorts of small branches and such.  But if they’re painted electric blue or neon green, these would look a lot like the little energy wisps that are radiating off GW's Transcendent C’Tan model.  This would also work with really simple green stuff tentacles.

And just like that... you've got a Transcendent Star Dragon, for under twenty dollars.

3.10.2015

Necron Deathmarks

I wanted to show off another cheap and semi-cutting edge idea I had for the Necrons.  It’s an idea many people have probably had.  Although, granted, part of that cheapness does depend on already having some things.

The Deathmarks are the flipside of the Immortals. You can build one or the other with the box set.  When I found a few heavily discounted boxes, I went with Immortals. This meant I had a lot of Deathmark heads, arms, weapons, and the backs of their torsos.

Now, I found uses for some of these parts, with my cheap Crypteks and the Heavy Destroyer.  But I still had a lot left, and I wondered if there was some way to use them.  Preferably a way that wouldn’t cost me just as much as buying them outright.

As it turns out, you can usually find the legs and torsos for basic Necron Warriors for about twelve dollars if you dig around online.  Even cheaper if you can find them in your local store’s bits bins.  That’s a whole box’s worth—a dozen bodies—for less than a dollar each.  You’ll usually spend that much for half as many Deathmark/Immortal legs.  Just the legs.

So, now I’ve got heads, arms, legs, torsos, and weapons.  That all adds up to models.

I glued the legs to bases and the torsos went together as normal.  The real trick was going to be putting the arms on.  They’re made for a slightly wider torso, and they also have a very wide grip on the synaptic disruptors.  It doesn’t leave a lot of wiggle room.  But it leaves some.
 
I tried gluing the first two.  I struggled at first because I kept trying to put the “ball” of the shoulders all the way into the torso socket.  That just won’t work, and it led to much fumbling.  But they sit very nice about 1/3 out, and once the glue dries the shoulders are nice and solid.

Helpful Hint—If you go this route, I found (on the second one) that it helped a lot to glue the left arm to the disruptor first.  It cuts down on a lot of fumbling.
However, doing this got me thinking...  What if I used green stuff to fill in a bit of that socket, effectively widening the torso?  I made a tiny ball of green stuff—about the same size as the shoulder ball itself—and fitted that into the shoulder socket.  Then I assembled the arms around that and trimmed away any excess green stuff.

Helpful Hint—You’ve probably heard this before, but be very conservative when you’re mixing green stuff.  You don’t want to end up with a lot of extra sitting around.  In this case, you don’t want a lot of it sitting around drying and getting less sticky.  Mixing tiny amounts will be a bit more time-consuming, but you’ll get much better results

Once I had the weapons on the torsos, it all went quick.  I added the extra conduit to the disruptors, put the torsos on the legs, and then added the heads.  And that was it.  Even switching my build-method halfway through, it took a little over three hours, and half of that was just drying time on some of the bigger parts (arms to torsos, torsos to legs).

Now, using the Warrior bodies does mean I don’t get that “hood” the Deathmarks have, but I’m okay with that.  I think if we made a list of distinctive features of a Necron Deathmark, the hood would probably be number four or five on that list, and this model has all the elements before that.  It also means my Deathmarks are a little smaller than the GW model, but this doesn’t really bother me, either.  One of the jarring elements of the Deathmarks, for me, anyway, is that they’re a stealth/sniper unit and they’re some of the largest infantry models in the army.  Seriously, it’s like asking Jamal Duff to hide behind a coat rack...

However, there’s a dozen Deathmarks for about fifteen dollars, if I count green stuff.  Much better than the ten for $66 they cost normally.  About... 82% off retail, I think, if I’m doing my math right. Heck, even if you bought all the parts for this as bits, you could make ten of these Deathmarks for twenty bucks and a few dollars for shipping.

That's pretty cheap.

3.03.2015

Necron Obelisk

Look at that.  The Imperial Knight’s finally done and now I’m being super-cutting edge for the first time in... well, almost a year.  And, well, almost cutting edge. 

As I’ve mentioned before, I’m a long time Necron fan.  I had a Necron army that went with the old Chapter Approved army list, when all the models were metal and damn near indestructible.  In all ways.

But I wanted to talk about new stuff.

The Necron Tesseract Vault.  Even before the new rules (which, arguably, just made it better) the Tesseract was popular with Necron players.  Past that, the next best part of this kit would be the Transcendant C’Tan.  Some folks might argue it’s actually first choice and the vault is second.

Why do I bring this up?  Well, since everyone wants either the C’Tan or the Vault (which is the entire kit) the non-C’Tan parts tend to be very cheap.  And all those parts add up to the Necron Obelisk.

As it happens, I found all those parts online for around $45—about 60% the price of the kit.  And that’s a bargain for any super-heavy vehicle.

Now, granted, there’s a strong argument to be made that the Obelisk... well, sucks.  Overpriced,  underpowered, and poorly armored.  But you know what? 

Change the rules. 

Talk to your gaming group about making the Obelisk cheaper or better armored.  If the people you play with on a regular basis have any interest in a fun game, they’re not going to let a cool model sit on the sidelines.  With the new corporate guideline of no models=no rules, most of us probably have a few Apocalypse-level items that have been left in the dust.  Make up some new rules that you can all agree on and forge the narrative, dammit!!

All that being said... here’s a few quick tips on how to put your super-cheap Obelisk together.

The Obelisk is kind of unique as a Games Workshop kit in that it really is put together with leftovers.  Because of this, a few things don’t go together... well, like they normally would.  For example, once the core’s together, you actually need to cut one of the tube/hose sections apart to get the pieces that stabilize the support arms.  Which means buying those component just to cut off a half inch piece.

Or... I cut some scrap plastic down to 3/16” and it worked fine.  They aren’t perfect rods, but the braced the support arms and made them solid inside the core.  And all of this is going to be hidden inside the Obelisk, anyway.

That’s the weirdest part of assembling this model.  The only other unusual thing is how a lot of pieces interlace rather than butt up against each other or fit into simple grooves.  It’s not a completely alien mechanic, but it’s kind of new for GW (I’ve never seen it before, anyway) and it’s probably worth dry-fitting a lot of the components together once or thrice—especially the top and the big side panels--to get a sense of them. 

I assembled the four sides individually and then the top.  I made a corner of two sides, building it right onto the support arm.  Then I added the top into that corner.  Once that was all solid I added a third side, making sure everything lined up, and then the fourth and final side went on.

Helpful Hint—The side panels on this thing are a pain to put together.  As I mentioned above, even the slightest bit of warping means some really bad joins.  I wrestled with it for almost an hour before I realized I could use my big clamps and stretch them diagonally across the entire Obelisk rather than side to side.  It meant I could only work on one seam at a time, but it let me get those seams rock solid.

After this was just final details.  The four arches/ prongs went on top.  Some of the “particle” pieces went on the bottom, all angled to hint at a bit of movement.  The tomb spider heads and claws.  And finally the gauss arrays.

There you have it.  The Obelisk.  A Necron super-heavy for under fifty dollars.  And, yeah, I got the flying stand with that, too, I just hadn’t assembed it when I took the picture.

Also, shameless plug, check out Corrupts Absolutely?-- the new anthology there on the right.  It’s tales of superheroes and superpowers gone bad, and I’m proud to say I have one in there called “Bedtime Story,” about parents trying to explain the new world order to their young son.  Plus there’s cool stories by authors like Joe McKinney, Cat Rambo, Tim Marquitz, and many more.

1.12.2014

Flayed Ones, Part III

 Wanted to post some of these ages back but with the holidays and other stuff, I’ve just been swamped.

Speaking of which—new book comes out next week from Broadway Paperbacks.  Ex-Purgatory, fourth in the Ex-Heroes series.  Check it out in whatever format you like from your preferred bookseller.  It’s a (hopefully) fun read and you can passively support this page at the same time.

Anyway, Flayed Ones.  Now in color.

As I’ve said before, I’m not the greatest painter, but here’s what worked for me.  I primed them black and then hit them with an aluminum chrome spray paint I’ve used on all my Necrons.  It’s quick and fast and I like the shine white-silver shine it gives them.  I’ll probably take these guys down a bit with a drybrush of Boltgun a.k.a. Leadbelcher.

These are just base colors, mind you but hopefully they’ll give you a sense of how the whole thing will turn out.  I added Abbadon Black on the thighs, upper arms, and spine.  The skin’s all Kislev Flesh, but I’ll be making some distinctions with my next pass.  I dabbed the last of my red gore on the mouths and also under the ribcage, as if all the blood and flesh is leaking down through.  I also ran a bit of it along the edges of the skin flaps and on some of the blades.  All the assorted skulls and bones got a base of dark flesh.  I also realized most of my browns have dried up...  Good thing I'm going to the store tomorrow.

Skin is like a beer label.  The goal
is to get it all off in one piece...
With my next pass I want to add some brighter blood.  I’ll drybrush the bones, too, and bring the bases in line with the rest of my Necrons.

Next... I’m going to try to push my plastic models over to the Relictors page I set up, so here I can focus on the Paperhammer Destroyer I want to try.  Mostly because I’ve wanted to do it for ages and (if rumors are true) I might get it done just as GW releases a plastic model for it.

12.23.2013

Flayed Ones, Part II

Papa Nurgle’s been kicking my ass.  And to think... I’m one of his more devoted followers...

So, I’d used some scrap warriors from the bins and a lot of leftover blades to make some passable Flayed Ones.  But they still needed a bit more to really sell it.  Not much, but a few touches.

I’d used some of the blades and old Dark Eldar helmet crests to make spikes along the spines of these guys, but I also wanted the trophies that show up in all the art.  At first I was just going to put some extra skulls on their shoulders, but then I happened to stumble across a few of the skulls-on-spikes that are on the new Dark Eldar Raider.  They worked perfectly, so I scattered about half a dozen of them through the squad.  One guy ended up with two, just to make him stand out as an unofficial sergeant/ champion of the squad.

I also added a few skulls and bones to the base.  I’d found a bunch of Dire Wolf ribs in the bits bins, and they looked nice and creepy.  The Kroot sprue is great for stuff like this, too, and the bins always have tons of Kroot accessories.  There’s severed thigh, part of a ribcage with meat on it, and a cloak lined with bones which makes a great bit of flayed flesh and meat. 

I also used some of these pieces on the base here and there to reinforce and support some of my patched-together feet. 

Then came the big part.  Long pieces of flesh.  I knew the model needed these, but I wanted this to be a simple green stuff project.  Because I know my limits.

I just went for simple strips.  I’d make a very small ball of green stuff (maybe half the size of a pea), roll it into a snake, and then carefully flatten it and stretch it.  I needed this to be thin so it looked like skin and/or hides, but nor so thin it would fall apart if something brushed against it.


For most of the figures I just draped a long piece over the shoulders.  I’d let it hang over an arm on some, and on others it would just sit like a scarf.  On three or four of them, I tried to make loops to help hide some of the scratch-built arms.  They didn’t turn out horrible, but not all that great, either.  Overall, I’m happy with the results.

Helpful Hint—Keep your fingers damp.  Not full-on wet, but damp.  The more complicated the work you’re doing is, the more important it is to keep your fingers damp.  The moment they get dry the green stuff will cling, and when it’s this thin it’ll just tear apart when you try to peel it away (he said from experience).

A few of the dangling bits looked a little too... well, round.  They looked more blobby and melted than sliced and skinned.  So I went back with my clippers and cut a few of the ends to sharper points, and added splits in a few.  It’s a little thing, but I think it helped a lot.

As I’ve said before, I’m not the greatest painter, but here’s what worked for me.  I primed them black and then hit them with an aluminum chrome spray paint I’ve used on all my Necrons.  A drybrush of Leadbelcher actually knocks it down a bit, and then some Abaddon Black on the thighs, upper arms, and spine.  Granted, this means all of my Flayed ones came from the same dynasty, but I like having that bit of unity on the tabletop (maybe I’ll dab in other colors to hint at other dynasties).  I did a few of the thighs in Khorne Red to give the sense of lots and lots of blood that’s dripped down and dried.

Then I did the flesh in different... well, flesh tones, but drybrushed all of them with rotting flesh. Then I splashed on some blood red and red ink (yes, I still have some red ink).  I made a point of painting the hands red, and also the mouths.  The models in the codex just looked a little too neat and clean to me.  The whole idea of the flayer curse is these things are eating their victims, even if they can’t digest them.

And there you have it.  I got the bodies from the bitz bins, so I think this whole project cost me maybe ten bucks total, but it’d be a cheap conversion even if I had to buy a box of Warriors to start with.  In retrospect, I would’ve liked to add in one or two Deathmark heads, just to show some of the different Necrons who’ve fallen to the curse.  Ahhh, well.  Maybe if I find some more bits.  I may even paint up a Necron Lord in gore-colors to be Varghul of the Bone Kingdoms of Drazakh.

11.30.2013

Flayed Ones

have to admit, the original Flayed Ones never did it for me.  They felt like a unit that was missing something, both in their rules and their backstory.  I still think their rules are a little off (they’re a bit pricey, I think, and Rage or Furious Charge would’ve given them more flavor) but I think their fluff is fantastic now.  They’re essentially mechanical zombies, mindless eating machines that get nothing from what they eat.

And zombies have a special appeal to me.

Alas, nine dollars per model is a bit too steep for my taste, especially for the points cost.  Considering you need to use at least ten Flayed Ones to make a decent unit, they’re just too expensive.  And, I have to admit, it does grate on me a bit that Games Workshop theoretically created Finecast as a money-saving move, then refused to pass those savings on to the customers.

So... cheap Flayed Ones.
 
Some of you may remember from a while back, I’d lucked out and found a bunch of Necron Warriors in my local gaming store’s bits bins.  A lot of them were broken or poorly assembled.  Some had thick, gloppy paint jobs.  A few were missing arms or heads.  But I realized they’d make a good base to start from.  Heck, even if I had to buy a box of brand new Warriors for this project, it’d still make them less than half the price of the same number of Flayed Ones models.

First step was to cut off the weapons (assuming they hadn’t been broken off already).  I tried to save as much of the hand as possible, but didn’t worry about it too much if the arms ended at the wrist.  This gave me a basic Necron figure.

Some of these guys needed feet, too.  I think the thin ankles are tough for some younger Overlords to work with.  Since the Flayed Ones are supposed to be a bit deformed, I just built new feet from a few pieces of card and some small bits of sprue.  I added in some plastic rod in places where the break made them too short.

Helpful Hint – The easiest thing to do was just cut a pair of triangle This gave me a foot that looked a bit like a mechanical claw, and that works great for Flayed Ones.

Next was repositioning.  By nature of holding a rifle, all the Warriors are in more or less the same stance.  I cut some arms in the center of the upper arm and rotated them a bit.  This gave them wider and more dynamic poses.  I also cut a few Warriors across the thin part of the back, filed them a bit, and then re-attached them to give the figures a bit more of a hunch.  This helped with some of the models that had been assembled looking up at the sky.

Helpful Hint – Don’t worry too much about things lining up when you reposition them.  You want it to be solid, yes, but any odd seams can either be written off as part of the Flayed Ones mutated forms or it’ll get hidden by folds of skin (as explained in a bit).

A few of them needed arms, too.  I had a few spares that I’d picked up here and there, and in one or two places I found arms from Lychguard or Immortals that fit fine (if they looked a little oversized or distorted... all the better).  Some are Fantasy skeleton arms.  I even made one set from a zombie scythe handle and another from a skeleton spear.  I know they look really crude like this, but they’re going to be fine by the end of this.

The hands were the next part.  They are kind of the defining feature of a Flayed One.  On the old models they had very Freddy Kruger-ish fingers, but these new ones are a bit more random.  It fits their twisted, mutated nature and it makes for easy scratch-builds.  

Two or three of these guys have elaborate hands made out of blades.  Some just have a scissors-like arrangement.  A few just have one big cutting blade, set up either like a sword or a scythe.  I tried to space these out between models so the different arrangements felt a bit random.

Helpful Hint – There are tons of knives and blades kicking about the GW lines.  Tons.  Space Marines of all flavors and allegiances, new and old, come with knives.  Kroot come with extra rifles that are covered with blades.  Dark Eldar have some nice ones.  Heck, if you saved any old Dark Eldar figures, there were blades on everything (even their pistols and helmets).  This doesn’t even count the number of things you can find in the Fantasy line--swords, daggers, spears--all sorts of nastiness.

I also really like the art in the new codex that shows a Flayed One with a small forest of spikes or blades growing out of its back.  I used a few more blades for those.  These helped reinforce the spine where I’d cut it, too.


Next week I’ll add some details to the base, some skin to the spikes, and some paint to the whole model.

1.18.2013

Heavy Destroyer

Yeah, Destroyers kind of got the short end of the stick in this codex.  Games Workshop wanted to sell some more models (fair enough—it is their business).  So they came up with the Tomb Blades—which many older players have noticed look a lot like the old Destroyer design.  Of course, this new unit meant Destroyers had to become something else.  And that something else...

Well, it isn’t the best thing.  At least they work much better under the 6th Edition version of Preferred Enemy then they did when the codex came out.

Anyway... That’s a debate for some other website.

I already had half a dozen Destroyers and a Destroyer Lord (from those long-ago film industry days of disposable income), and I decided I wanted to make a Heavy Destroyer.  But—as has come up here a few times—I’m a cheap bastard.  I didn’t want to drop nine dollars on an upgrade kit on top of the twenty bucks for the Destroyer model.  That’s just too much for a single, non-character model.

So I started thinking...

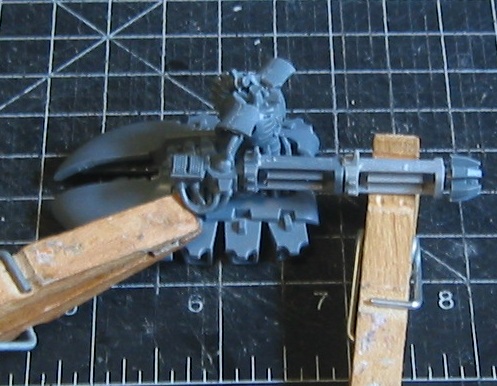
I have a lot of leftover Destroyer parts.  Some I found in bins, but there’s pretty much half a sprue leftover from my Destroyer Lord, Pophitar (bonus points if you get that reference).  This includes an entire right arm with a gauss cannon.

It struck me that the cannon is very symmetrical, and it wouldn’t take much work to stick two of them together and make it twice as long.  With the extra green rods, I thought that’d make a fine looking heavy gauss cannon.

And, as it happens, I got a Destroyer in my stocking for Christmas.

So, I built most of the model right out of the box.  I assembled the torso and the hull.  For the moment I didn’t connect the two, and I also left off both arms and the head.  These are all parts that help add a little bit of life to the model, so I generally don’t connect these until the end.


To build the heavy gauss cannon, I took the regular cannon from the Destroyer set and the spare one I mentioned up above.  Using my hobby blade, I cut the spare cannon in half right behind the barrel assembly.  I shaved and filed this until it was smooth and level.  Then, on the other cannon, I cut off the little nib that the muzzle normally attaches to.

Helpful Hint—I made both of these cuts before assembling the cannons.  It’s always easier to cut through less material, and all of these cuts were at places with very clear guides.  So why make more work?

Once all the cutting was done, I glued the cannon halves together and let them dry a bit.  Then I glued them together, front to back.  This was a bit of work, because everything needed to line up perfectly.  I triple-checked the top and bottom seams, and I also kept checking the whole assembly to make sure it was straight. 

Helpful Hint—With something this long (scale-wise) it will be really clear things don’t line up. Take your time with this, because if you don’t... that little crooked bit will be the only thing you ever notice about this model.

I gave the assembled cannon plenty of time to dry and then put the whole arm together.  Because it’s so long, that’s a lot of torque on the shoulder.  I held it in place for several minutes, and then I braced it with a few clothespins until it was dry.  That meant letting it sit overnight, actually.  I didn’t want to risk it sagging or ending up with a weak bond.

In the fluff, it mentions that Destroyers usually come from the Immortals and Lychguard, and sometimes from the Deathmarks.  Well, it seemed to me that if a Destroyer was going to have a “heavy” ranged weapon, it’d probably be a Necron already used to such things.  So I decided to use a Deathmark head on the model.  It’ll make him stand out a bit more and it ties him to the theme of “gunners” usually only having one eye.

And there you have it.  Heavy Destroyer for the price of a regular one.  I’ll probably paint his shoulders black to add to the Deathmark feel.  Overall, though, I’m really happy with how this quick little conversion turned out.


12.03.2012

Painted Stuff

I’ve been having some camera issues which have slowed down posting about my latest project.  But I have been working on stuff.  Honest.

In the meantime, I thought I’d share this quick shot of that Necron Cryptek I built a few months back.  I’m still going with Dagon of the Shadowed Matrix for a name.  Figured it’d give a nice sense how he turned out.  I got some basic colors on him – I’ve mentioned many times before that painting is not my strong point—so he could go up against Marc’s Tau. 


Which would’ve gone great if I hadn’t jumped the gun with said Cryptek and split my forces too soon...

Ah, well.  At least Marc took some good photos for the Atomic Warlords page.

Cool scenery project hopefully up by the end of this week, and then (getting back to basics here) I start work on a new paperhammer tank.

6.24.2012

Necron Crypteks

Crypteks are probably the most interesting addition to the Necron codex, in my opinion. There’ve been a lot of tweaks and adjustments (not all of them good, some openly bad), but Crypteks are a unit that live up to their fluff. Plus, I think most of us have been waiting for a chance to legitemately use a phrase like “techno-sorcerer.” However, while the model’s nice, it is rather lacking in options, especially for a unit that has so many different potential builds.  And at fifteen bucks or more each, that Necron Court will add up as fast as... well, a Dark Eldar court, really.

I’ve seen a couple conversions that used Lychguard or Immortal bodies for Crypteks, and those always felt a bit wrong to me.  Looking at the art and the existing model, Crypteks aren’t tall, powerful beings.  They’re just as small and hunched as your standard Necron Warrior.  Which kind of makes sense to me, fluff-wise.  Crypteks are in a strange place within the tombworld ranks, and I feel safe saying they probably wouldn’t rate the top-of-the-line bodies (and would probably customize them to some extent like Illuminor Szeras has done).

As such, most of these conversions are built off basic Warrior bodies.  I found a bunch of them in my local bins for about fifty cents each.  If your local store doesn’t give you that option (for shame) it’d probably be worth buying a sprue from Battlewagon Bitz or a similar place, or even just the small Necron “booster pack” GW put it out a few years back.  Out of the baker’s dozen warriors I found, about 3/4 of them were too twisted or poorly assembled to be of use.  One or two of the others joined my faceless legions.  And I grabbed a few of the last ones for this project.  All the others...

Well, I’m sure they’ll be showing up here again soon.

The rest of the bits are just extras and leftovers from assembling my Necron army.

This first Cryptek’s an all plastic one.  It’s a Warrior body with a Deathmark head.  His open hand is the optional one from the Command Barge.  His staff is the one-handed Rod of the Covenant from the Praetorians set.  I’ve seen a few folks use the Rod as a Staff of Light (or some variation thereof). 

Helpful Hint—I used my knife to cut off that little focusing array-thing that sits in the crest of the staff.  The Staff of Light doesn’t have that, so it’s a nice small touch to help distinguish the two.
 
If you can make straight cuts, use a really sharp knife to cut the little power orb off the top of the warscythes (which you’ll also probably find amidst the Praetorians/Lychguard leftovers).  Cut the lower set of “blades” off the staff and add the sphere there to give the staff another little nudge away from Rod-dom and more toward Eldritch Lance-dom.

Helpful Hint – One piece you or one of your Fantasy-playing friends probably has tons of is the Saurus standard arm (from the Fantasy Lizard Men).  I find these all the time in the bitz bins.  Two very easy cuts leaves me with a wavy piece of segmented decoration.  A few of these together make for great sashes, simple cloaks, or other decorative touches. 

I’ve found putting one or two long pieces in the front helps give the sense of a robe rather than a straight cape, which is a nice distinction for a Cryptek.  I also used the loincloth/ tabard piece from the Lychguard.  Take your time placing them so they sit right against the different carapace sections of the Necron.
Finally, I added a scarab to the base.  Fluff-wise, Crypteks control all the scarabs, spiders, and wraiths of a tomb world, so it was another character bit.  It’ll also help make the Cryptek stand out in a big squad.

For the record, at this point there was some cat-related destruction in the middle of the night.  Contrary to tombworld propaganda, Everliving protocols are not all they’re cracked up to be.  If this poor Cryptek (let’s call him Heron) looks posed a bit different... well, it’s a miracle he’s in one piece.  The same could be said of the cats... 

The next one’s also an easy conversion.  Same body/head/decorative setup.  I gave him a scarab, too.  His arms are the optional Destroyer Lord arms.  They’re resin now, but mine are still from the old metal kit.  They’re a tiny bit too big for the body, but I think it actually helps sell the “twisted old sorcerer” look for the model.  With the clear plastic rod, the Staff of Light will make a fine Voltaic Staff.  And that scarab-like thing on his arm could count as any number of Cryptek wargear items. 

The last one’s an idea I had that made me feel clever.  At least, it did until I saw someone else online had the same idea and beat me to building the darn thing.  Also, this uses a base model, so it probably doesn’t end up costing too much less than just buying a resin Cryptek.  But it looks a bit cooler and more themed toward one of the Cryptek cabals.
I bought the Fantasy Tomb Wraith.  It’s one of the new one-model plastic kits that line’s been getting a lot of (yet 40K still gets more-expensive finecast with no options...).  When you assemble the model, you’ll see there’s a “core” piece that you build the cloak around.  That little tip at the end is where the Wraith’s hollow masks/skulls hangs.  I’m using a Deathmark head, which is rounded in the back, so that little nub can go away (right at the red line).

Next I took one of the Rods of the Covenant that had two hands on it.  They’re too wide to match up with the spaces on the Wraith body, so I cut out three of the segments and added them to the end of the staff.  This kept the staff the same length but let me “move” the hand placement.  I nipped off the array at the top and added the orb at the bottom (as mentioned  above).

The “wrists” on the staff are from the stock of a Kroot rifle.  If you  know anyone who uses Kroot, they have lots and lots of spare Kroot rifles.  They’re small, but they help the staff line up against the cloak.  When it’s all painted, it’ll also be another touch of silver to contrast against the dark cloak.

I toyed with the idea of using one of the Lychguard tabards here, to add to the sense of an invisible body, but I kind of like the idea of the cloak being completely empty.  My girlfriend agrees it looks better visually, too. 

Helpful Hint—Put a little bit of thought into where you attach this guy to his base to make sure he balances.  The square Fantasy base has him a bit off center, because he kind of leans over and back, and the staff adds some weight to him on one side.   I made sure the scarab was directly opposite him.  It’s not much weight, but it’s someting.

I think he makes a fantastic Harbinger of Despair  Off one of the little bits of fluff in the codex, this is Dagon of the Shadowed Matrix.  I’ll probably use him as a fully-loaded psychomancer in larger games where I’ve got points to spare. 

There you have it.  Two cheap Crypteks and one cool conversion for about the same price as the regular model.

Next time I wanted to talk about Kroot a bit.  Because Kroot are very cool.

Really.

12.09.2011

The Doom Scythe 1.1

Hopefully everyone had a nice Thanksgiving weekend.  I’ve got one bit of shameless self-promotion and then we’ll get back to the Scythe.

My publisher’s doing a big sale for the holidays he’s calling Black December.  The ebook versions of ten best sellers and new releases are marked down to a mere $2.99 for the whole month.  That includes my own Ex-Heroes (available over in the right hand column here).  He’s also a couple ebooks for free.  No strings, no tricks, absolutely free.  Books he’s just giving away.  Go check it out. 

Oh, and the ebook version of The Eerie Adventures of the Lycanthrope Robinson Crusoe isn’t part of the sale, but it’s still marked down to half the paperback price.  Just saying...

Now, the Scythe.  Again, I’m not doing templates for this, so I may over-describe some steps a bit to make it easier to follow along.

I had the upper and lower hulls, and I needed to combine them.  The artwork shows a thin, recessed section between them.  I thought about foamcore, but that’s not something people necessarily have on hand and I wanted to keep this cheap and easy.  Then I thought about building an elaborate framework, kind of like the consummate Vs I sometimes recommend, but that seemed like a huge amount of work and not too stable.  What I finally hit on was plain old corrugated cardboard.

I cut up an old box and traced my crescent-hull on one piece.  Then I went over it and drew a second line 1/8” inside that outline.  I made about three or four dozen measurements and marked off the distance, then slowly and carefully connected the dots in a smooth arc.  Going 1/8” in makes up for any “enlargement” you get tracing around the crescents and also shrinks it enough so it will be recessed between the hull sections. 

Helpful Hint – Don’t use scissors when you cut this out.  The lever-action of the scissors will crush the corrugated board at the edges.  It takes a little longer, but just use a sharp hobby blade.  Take your time and plan on two passes—one to cut through each layer.  This gave me a much smoother edge to my shape.

I glued on the crescents one at a time so I could be sure they were positioned right.  It took a fair amount of glue and also a lot of fidgeting.  It took about five minutes to get the crescents-within-crescents lined up to a degree I felt comfortable with.  I used the front prongs as my main guideline, and I didn’t worry as much about the back.

Also, I didn’t use the gigantic books I usually do to hold things flat while they dry.  I didn’t want to crush the corrugated cardboard. 

While that was drying, I went to work on the rib for the hull.  The beveled look is very prominent in the artwork, and I wanted to bet it right.  At the same time, we’re talking about combining angles and curves which could lead to a lot of stress.  Mental stress, not structural stress.

I decided to only put the angled armor on the top of the Scythe, for three reasons.  One, more people will see the top than the bottom.  Two, the tesla destructors are going to draw a lot of the attention on the underside anyway (look at that picture up top).  Three, this is supposed to be fast and cheap.

I cut two strips of regular cardstock (not corrugated) 1” wide and 9” long.  I marked each one at the 2” mark, then drew a line from that point to the corner, giving me a long, thin triangle.  Make the two strips mirror each other when you do this, so the triangles are heading in opposite directions.

Next I used a small 1” x 4” piece to scab the two triangle strips together into a single 1” x 18” strip that tapered down on either side.  Make sure the long edge of this piece is as straight as possible.

I let this dry for a few minutes and cut some scrap into 1/2” strips.  Then I took the long piece and curved it around a soup can.  I want to give it a good bend but not crease it, if possible.  Because of the scab, it’s better to work in from each end.  If the double-thick section int he  middle doesn’t get much of a curve, that’s okay.

On which note I’m going to wrap this up.  I’ve actually got more done, but I’m waiting for stuff to dry before I take photos and the post is already overdue.  So I’m going to toss this up for now and do more—maybe even finish this thing—in a day or two.

11.18.2011

The Doom Scythe


Well, fine.  If everyone else is going to scratch-build Night Scythes and Doom Scythes, I might as well, too...

First off, this isn’t going to be spectacular, so if you’re looking for something on par with the Plaguereaper or the Rhino fleet, I’m afraid this won’t be it.  It’s a safe bet that Games Workshop is going to put out an actual Doom/ Night Scythe model when the next big Necron release happens, and a few weeks after that there are going to be a ton of great templates by people much more skilled (and with more free time) than me.  I’m looking to make something that will be a quick, decent stand-in for now.

And, as usual, I want to do it cheap.

I’m not doing templates for this, so I may be over-describing things a bit to make it easier to follow along.  Also, for most of this post, I’m just going to call it a Scythe.  We can get particular next time when I do details.

Let’s start with the basics.  I decided the outside edge of the Scythe was probably close to an 8 1/2” circle.   How did I decide this size?  Well, someone over at the Bell of (LINK) Lost Souls cleverly pointed out that the Scythe sprues would have to fit in the existing boxes.  The inside of your standard Chimera/ Rhino/ Monolith box measures 11 1/4” x 8 7/8”.  I’m also going off the assumption that the hull is going to be mostly one piece (maybe a top and a bottom section).

I drew two diagonals to find the center of a frozen pizza box.  Then, using a compass, I drew out an 8 1/2” circle.  I also drew a line that went straight through the center point.  This is going to be a front-back reference line for the model.

Helpful Hint – The model is going to need four of these shapes.  I found it was easier to do all four at once for each step, because it meant less resetting the compass.  Your results may vary...

Next, I measured down 1 3/4” from the center point and made a second mark.  Off this, I used the compass to make a  4 1/2” circle inside the first one.  Note that they don’t quite touch.  I also marked the center point.  The compass leaves a mark, but I wanted it to be clear because I’m going to be using it as a reference point. It may seem obvious, but this is the empty space “inside” the Scythe or between its wings, depending on how you view it. 

Right at the front, I went out 1 1/4” from the centerline on either side.  I made a few measurements and then made two short front-to-back lines parallel to the center line.  These are marking off the end of the wings and the gap that stretches across the front of the scythe.

Now, going off the center point of the smaller circle, I drew lines extending out over the hull and wings at 45 degree angles.   These are going to help me place the sloped armor on the Scythe.  I just want to do all the marks while this is big, flat, and solid.  Cutting’s the last thing I’ll do.

I also did a pair of lines that were 30 degrees off the center line.  These are for the cockpit section and the smaller armor sections at the front. 

This Is Important – Remember, none of these angled/ radiating lines are cut lines.  They’re just a reference for later

Once I had all this, it was time to cut.  Also, I was careful to save the center sections—they might be useful for the cockpit.  You’ll notice the Necron Warrior gives us a good sense of scale, and you can compare him to the codex art-image of the pilot up above.

Helpful Hint – These circles are big enough that you can cut the whole thing out with a good pair of scissors.  I just took my time and went slow.  It took about three minutes for each one.

Once I had all four sections cut out, I checked which pairs lined up best and glued them together.  I double-checked that they were lined up right, wrapped them in wax paper, and set them under a hardcover copy of Under The Dome and a few other Stephen King epics to make sure they stayed flat.  I let them dry overnight.

And for now, that’ll be it. 

No post next week because of Thanksgiving, but I’ll probably do two the week after just to get this done.