Showing posts with label Fantasy. Show all posts

1.12.2016

Gaming on the Cheap

It’s the new year, so I thought I’d post a few quick thoughts about this geeky blog and... well, what I feel like I’m doing here.

Yeah, I know.  I don’t do much here.  Very funny.

Anyway, on one level, this page is pretty straightforward.  Miniature wargaming can be an expensive hobby.  Bare-bones entry level can be over a hundred dollars, and that’s not even talking glue, paint, or time. A few years back I hit a long stretch of poverty—not imagined-poverty or slight-belt-tightening, but actual how-do-we-pay-rent-this-month poverty?  It was a really bleak time, made more so because my absolute favorite hobby went from a big part of my life to completely unaffordable in about a month.

Then I found Paperhammer.  It’s like finding the light of the Emperor, just... cheaper.  I’d worked in the film industry for a bunch of years as a prop guy, so I had some passable art/craft skills.  I dug around online (using the internet at the library) and found templates for Rhinos, Land Raiders, Baneblades, Monoliths... even Titans.  And there are some great templates out there.  Almost identical to the company models once they’re painted.  Suddenly 40K was affordable again!  The big expense was white glue and paper for the printer.

Alas, while I’ve managed to claw my way back into the middle class, I know there are still some folks who haven’t.  Worse yet, Games Workshop’s prices have skyrocketed over the past few years.  Thirty dollars per figure?  Fifty dollars for bare-basic tanks?  I remember when $150 would pretty much get you a solid army—and that wasn’t so long ago.  Now it’s a lucky thing if that same $150 can round out your Heavy Support choices. 

So being able to build a lot of these models on the cheap means keeping the game open and available to a lot more folks.  That’s a good thing.  And I’m glad to share my tips and experience with you.  Read another way, I’ve screwed up so you don’t have to.

On another level, though... The hobby part of this game doesn’t just mean buying the boxed set, putting it together with company glue, and painting it with company paints. In fact, there was a time when said company encouraged creativity and offered tips to players who couldn’t afford to drop a lot of money.  Making terrain out of cardboard and styrofoam used to be a regular feature in White Dwarf  articles.  Black Gobbo ran a great piece (remember Black Gobbo?) showing how to mix parts from a Basilisk and a Leman Russ to create  a very passable Salamander and Destroyer.  Heck, I remember when the Ogre line was first introduced for Fantasy, White Dwarf ran a whole article about how to convert Hero characters from basic ogres (just in case you couldn’t afford the big metal models.

(I’ll touch on this again in a few weeks)

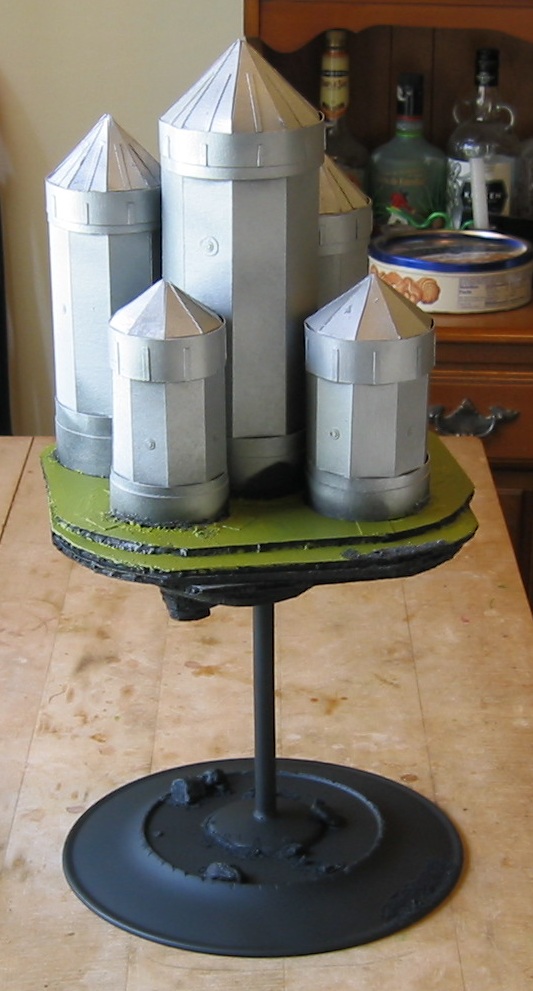
Thing is, I like making my own models and scenery pieces.  I enjoy it.  I’m proud of the fact that I turned three Tony’s Pizza boxes into a very solid Imperial Knight and some bargain-store Halloween decorations into multi-use scenery.  I like being able to turn some random pieces I dug out of my local gaming store’s bitz bins into a unique and impressive Captain for my Relictors or a character for an Age of Sigmar game.

So, that’s that this is all about.  For me, anyway.  Making the game accessible to a lot more people and giving those people a chance to do something a lot more personal and unique with the units in their army.

If any of that interests you... thanks for being here. 

I’ll try to be semi-interesting.

10.28.2015

Halloween 40,000

Wanted to do a quick post today to help make up for the long absence.

So, if you bought a Games Workshop demon set it usually comes with multiple bases. Round ones for 40K, square for Fantasy.  I ended up with a large base this way, and there were a few more that I found in the bits bins.  And one day an idea for a scenery piece started tickling the back of my mind.

I’ve mentioned before that I have a fair-sized army of Plague Zombies (almost 140 of them).  The zombie sprue comes with a tombstone you can use for... well, anything. I’ve picked some out of the bitz bins, too, so I have a lot of them.  I also have a fair number of the plastic tombstones from the old skeleton set.  And even a handful of metal ones I picked up at Games Day many years ago, back when GW would bring the “wall of bitz” with them.  And when they had Games Day.

So... large bases.  Tombstones.  Halloween.  Anyone see where I’m going with this?  Even in the grim darkness of the future, bodies get buried somewhere.

I spaced out the tombstones so they were wide enough to fit a 25mm base between them side to side.  A 40mm base can fit between them front to back.  This gives me a lot of flexibility as far as where models can be placed on the scenery piece.  I took some old, flat Epic bases, cut and shaved them down a bit, and put them in front of some of the stones . These are going to be my fresh graves that haven’t settled yet.

Helpful Hint—I used different tombstones to sell the idea of an older, public graveyard.  By the same token, using all the same tombstone would really sell this as a military graveyard, like the Cadian one Dan Abnett wrote about in his Eisenhorn books.

I did two bases “horizontally” and one “vertically.”  I can now use them as sides to mark out a larger area as a “graveyard” for purposes of special rules, area effects, and so on.  I’m hoping to find another big base somewhere for another vertical piece, just so I can make a solid square (or rectangle, as the case may be).

Helpful Hint—If you happen to be an Age of Sigmar player (especially a cheap one like me), three or four of these bases and a simple statue are a fine “counts as” for a Garden of Morr.  Instant big scenery piece with free special rules. Can’t beat that. 

I glued some dirt to the fresh graves. Just enough to give them a different texture from the rest of the piece.  And at this point they’re ready to be primed and painted.  Quick graveyard scenery from leftover bases and bits.

Happy Halloween.

10.23.2015

Kroot Encampment

Very sorry for the long delay.  As mentioned before I had copyedits. And then I was a guest at New York Comic Con.  And then I came home to a week’s worth of emails and messages and it turned out my publisher already had layouts done.  And all of that finally got squared away... well, yesterday.

Anyway...

Some of you may remember this little tent template from about fifteen years back.  Games Workshop actually just gave it away on their website at one point, no strings attached.  I went looking for it but couldn’t find it anywhere there.

(For the record, it should be up in the STC archives shortly after I post this)

This template was originally designed for the Kroot.  There’s a large one and a small one, but they don’t look that different side by side.  I think it might be a 1/2” difference, tops.  Even on this scale, that’s not much.

The template’s pretty solid and can be built as-is with no problem.  I put together five tents (two large, three small) in about two hours.  That’s printing them out, gluing them to some old frozen pizza and cereal boxes, cutting them out, and assembling them.

It’s goes together very easily, too.  My only suggestion might be to make the tab on the tent body a bit wider.  I scored the corners, pre-folded, and then clamped the tab with a few clothespins.  I let those each tent body sit for about ten minutes as I assembly-lined through them.

I glued the entryway and the front panel together as a separate piece.  I tried this template back when it came out and this is where I had trouble with it.  I decided to assemble this first, then attach it.  The tabs fit in the slots, then I folded them over and glued them for extra stability.  Again these sat for about ten minutes each with  a clothespin holding them together.

Once they were dry, I glued the flaps of the front panel, set the tent body over it, and wiggled it until everything was in the right place.  This helped me make sure that entrance sat flat on the ground and didn’t end up “floating.”  Again, maybe ten minutes for the glue to dry.  I didn’t glue them on to bases, but really any irregular piece of foamcore or cardstock would work.

Helpful Hint—If you want to do a cardstock base, stack two or three layers on top of each other, glue it, and let it dry under a stack of books for at least half an hour—preferably longer.  Wrap it in wax paper, too, in case glue squeezes out onto the books.  This will give you a heavier and much more solid base that won’t bend or flex when things dry on it.

Here’s a large and small tent side by side.  As I said, not much difference in size.  That’s a pretty solid little Kroot camp, though, and three or four can cover a good-sized space on the gaming table as an obstacle, objective, or whatever you want to use them for. With the assembly line and drying time, I ended up building four tents in just over an hour.

Now... let’s look at some options and variations.

I wanted to make the tents look a little more unique and handmade, and I remembered something from way back when the Ogre line was first released for Fantasy. There was a great article in White Dwarf (remember those days?) about how to scratch-build oversized yurt-like huts for an Ogre village.  And there was a great detail idea in there...

Get a paper towel or some textured paper.  Or get some better cotton paper (dollar store envelopes work great), crumple it up, smooth it out, and repeat until the paper has some fine texture to it.  Then trace out some simple “pelt” shapes on the material.  They don’t need to be exact, but I try to average most of them closer to 1” long.  I glued these around the tent at a few places to help hide seams and add to the “primitive” feel of the whole tent.  The texture contrasts the smooth cardstock and will look like fur or hide when it gets painted (in an appropriate color).

Helpful Hint—When you’re gluing the pelts in place, don’t put the glue on the pelt or the tent.  Put it on your finger and wipe it on the tent that way.  This will keep it from getting too thick and wet and soaking/flattening your material.

Helpful Hint II – do not do what I did.  Some of you may have already noticed the material in the above picture is actually toilet paper, not paper towels.  My paper towels had a very distinct linear pattern to their texture, so I decided to use a few squares of toilet paper.  Problem is, toilet paper’s made to dissolve once it absorbs... well, not much moisture.  So once my pelts touched the glue they turned into... well, mush.  I managed to salvage them, but it ended up taking me almost twenty minutes per pelt.

Save yourself a headache.  Do what I say, not what I do.

On a more positive note...  I didn’t do it, but it’d also be easy to cut a small opening off the top of the tent and put some round toothpicks up there as tent poles.  Just flip the tent over and glue the toothpicks into the interior creases.  It’s a tiny detail, but it’ll look really cool and makes the tents look even more handmade.

The Imperial Guard... sorry, Astra Militarium... use tents, naturally.  I’d just build the template as-is so they look more mass-produced and use a color scheme that works for your army or whatever scenery you use often.  Jungle tents, desert tents, arctic tents, or just a flat-looking canvas.  With such a big expanse of flat surfaces, it’s an easy place to practice your camo painting, too. 

Once that’s done, there are so many decals available to make this look Guard-issue.  A large aquilla or a few stencils pretty much sell it.  You could make a larger scenery piece by putting two or three of these in a row as if they were in-the-field barracks.   Or base them individually and just set them up that way.

They could also work for traitor Guard, naturally, but you’d want different symbols on the tents.  And maybe lean even more toward the primitive.  Perhaps a blood splatter or three.  And there are tons of skulls and ruinous symbols on the Chaos Marine decal sheet.

What about the Tau?  It makes sense that Fire Warriors would have temporary housing of some kind for exploration missions, but I’m sure the Earth caste wouldn’t send them out with something as flimsy as fabric and poles.  So what about using this template as a sort of pre-fabricated, lightly armored outpost?

It actually wasn’t hard to do this.  The two different sizes of tent are identical except for the scale.  I printed up one of each size and built the large one as is.  While that was drying, I cut up the small tent into its individual panels.  I mostly wanted the sides of the tent body and the top two panels from the entranceway.

Each component was centered on the corresponding panel of the larger tent (remember, it’s the same template) and glued in place.  Once they were all attached, it gave the whole thing kind of an “armored” look that made it feel more assembled.  Giving it a bright color scheme will make it look more like hard plastic than fabric.  And, again, a few spare decals will look fantastic.

Last but not least, if you’re a Fantasy/ Age of Sigmar player, I’d imagine a tent like this would work for a bunch of armies.  Brettonians peasants and Empire troops would definitely be sleeping in simple tents, if they had anything.  So would Chaos Marauders.  Even Orcs could manage something simple like this.  So they’re a quick set piece for lots of armies.

Tents. Fast, cheap scenery for almost any setting, almost any army.

7.20.2015

Age of Sigmar

Hey, there.  I’m still getting caught up on things after two back to back conventions, so I haven’t made any real progress on the Gargant.  Probably won’t this week, either, because edits are due on Friday.

However... it’s a pretty standard tradition for my friends and I to have a few (read: several) drinks the night before San Diego Comic-Con and play a game or two.  And this year, we decided to take Warhammer: Age of Sigmar for a spin.

Now, I’m not going to talk too much about the actual gameplay.  Marc’s posted a simple battle report and some thoughts over on Atomic Warlords.  But I did want to mention a few things, more from the hobby/modeling point of view.

First, Age of Sigmar was a lot of fun and very easy to pick up.  If you have any familiarity with tabletop games, you can sit down and be playing in about fifteen minutes absolute tops.  Probably much less.

Second, it’s a very cheap game.  The rules are free. The war scrolls are free.  If you were a Warhammer player before, you already have a ton of models (and the rules are extremely thorough—they cover pretty much everything).  Even if you’ve only played Warhammer 40,000 before (like me), you’ve probably got a few models kicking around that you have for conversions.  There’s also a lot of folks online selling older models or pieces from the old Island of Blood starter set. And past that, there’s probably going to be some folks rage-quitting and dropping their models in the bits bins or putting them up on eBay.  Which brings us to... 

Third, or maybe second-point-five... you don’t need a lot of models to play.  Because there’s no force organization chart or points minimum, it’s possible to play Age of Sigmar with as little as one model.  It has lots of single-model battle scrolls.  A knight on horseback.  An Ork.  A witchhunter. A Skaven warlord.  A wight king.  That’s all you need to play.  If you happen to have a small squad or unit of some sort, that’s even better.  I spent a day digging around through my random bits and discovered I had almost fifty viable units, spread over nine different races/ factions, some assembled, some in parts.  Get three or four units (or even just models) for the same army and that’s the basis of a solid game.

Fourth, (or three, depending on how you read the last one) there is paperhammer scenery for Fantasy settings.  Lots of it.  Warhammer and Mordheim both have a collection of useful templates, ranging from a burned out farmhouse to an elaborate inn.  Plus I’ve talked before about other cheap scenery ideas that would work in a Fantasy setting.  I’m thinking I might have to try a few simple ideas for a graveyard, a simple building or two, and maybe even some ancient ruins.

Now, I can see where the rules could be frustrating to an established player, especially a competitive one.  As a new player, though, without any preconceptions of how Fantasy should be played, I think it’s a great little game. And it means I’m going to get to build and play with a lot of things I’ve had kicking around for ages for one reason or another.

I’m sticking Age of Sigmar in the win column for now.  Your thoughts may vary...

3.17.2015

Transcendent C’Tan

What the heck, while I’m on this little roll, here’s one other Necron unit you can make on the cheap.  Although, to be fair up front, like the Deathmarks, this one’s more “inexpensive” than flat-out cheap.

Lots of folks love that Transcendent C’Tan, but it is scary expensive.  You’re either paying for the whole Tesseract Vault (about $140) or you’re buying it online as bits (around $60 most places I’ve seen it).  Neither of these is a great option if you’re short on cash.

However...

All along, the Necron fluff has talked about how several of the C’Tan disguise themselves as other creatures.  Even with the slight retcon that the ones we meet are all “shards” of the total entity, it’s not hard to believe they could take on any form.  So any oversized model could work as a C’Tan with the right paintjob.

For example...

The Dark Elf Cauldron of Blood has a great statue of Khaine.  You can pick it up for under twenty bucks on line, even less if you get lucky with an eBay auction.  It makes a wonderful Avatar if you’re an Eldar player, or just scenery. But it could also be used for other purposes...

Here’s the complete statue.  I could cut off the topknot, some of the horns/ vanes on the head.  I could also shave off some of the spur-type horns growing along the arms and legs.  This would leave me with a pretty basic humanoid form with an elongated head.

I could also grab the control panel icon from the Necron Catacomb command barge.  You may already have one of these in your bits if you built an annihilation barge.  It fits very well right on the chest with no work at all.  With a tiny bit of filing and shaving, it would be a perfect fit.

If you can afford to pay a little more, dig around online or in your bits bins for detail pieces from the Wood Elves line.  There are tufts of weeds, blades of grass, and all sorts of small branches and such.  But if they’re painted electric blue or neon green, these would look a lot like the little energy wisps that are radiating off GW's Transcendent C’Tan model.  This would also work with really simple green stuff tentacles.

And just like that... you've got a Transcendent Star Dragon, for under twenty dollars.

1.11.2013

The Bitz Bins

I know I mention the bins now and again.  I think most game stores have some version of the bitz bins.  People bring their unwanted bits and models into the store in exchange for credit, and the store re-sells them for a bit of profit.  The downside is it's a bit like a rummage sale and you’re working around poses, paint jobs, and leftovers.  The plus side is you’re usually getting them at a big discount.  Often 60-70% off.  Sometimes even more.

I know some people have this kind of phobia about using pre-owned models, but if you can get past that it’s possible to save a lot of money.  In the past ten years or so, here’s a few of the things I’ve found in the bitz bins of my local stores (first in San Diego, then later up here at my favorite store in Los Angeles)...

* an Eldar Avatar of Khaine—I don’t play Eldar, but I’ve always thought it would be neat to paint an Avatar like molten metal—darker on the outside, hotter closer to the core.  Kind of like the Balrog from Lord of the Rings.  He also had a Thousand Sons head in his hand, so a little glue remover and I had a spare trooper for my Thousand Sons army.  Bonus.

* three Krootoxes—a few editions back (when I had more disposable income) I had a very nice Kroot Mercenary army.  Now I just have a lot of Kroot, and the hopes that the upcoming Tau Codex will address the issue and make it a viable allied force, at least.  Still, three metal Krootoxen (Krootoxi??) were a nice bit of heavy firepower, especially at five bucks each.

* legs and torsos for about twenty-five Ork Boyz for my lovely lady, plus an unassembled Black Reach deffkopta.  If all this cost me ten bucks, I’d be amazed.

*a little over two dozen Catachans—their heads were crooked, and two or three needed their arms redone, but other than that they just needed paint.  They were put together with superglue, so on the really bad ones it just meant popping off a head or an arm, scraping it down, and then putting it back on with proper plastic glue.  I think that find cost me twenty dollars.

* a plastic Eldar Wraithlord—Again, I don’t play Eldar, but my friend Gillian does.  It was missing its weapons and posed a bit awkwardly, but other than that it was fine.  Well, it had a really awful paintjob.  She’s already salvaged it and sent it back out on the battlefield.

* parts for a solid Lizardman army – I don’t play Warhammer Fantasy, either.  I have no interest in it.  But, as I’ve mentioned before, I love the models and I have a long-time love of Lizardmen (reaching back to the Sleestak on Land of the Lost).  I found the parts to make a dozen Saurus warriors, a dozen skinks, a skink hero, an Oldblood on a cold one, a salamander, and even five of the Temple Warriors.  I just liked building and painting them.  I might do a whole post on these guys. 

* at least twenty assorted Dark Angels detail pieces for Marcus.

* a box’s worth of Bloodletters--  Alas, one had a twisted leg and two of them had one foot snapped off, so I only took home eight of them (and who wants a unit of eight Khorne demons...?).    They’ll make a great allied force for my World Eaters.  I used one of the old skeleton helmet horns and a skull to replace the missing foot on one of them.  They’re about half-painted and already itching to fight.

* probably a dozen Dark Eldar heads, arms, and detail pieces, not to mention a double-handful of the older bodies.

* a handful of Blood Angels pieces for Matt.

* parts for at least twenty zombies – These mixed with leftover Catachan parts to become a full squad of Catachan plague zombies.  Poor bastards...

* two Black Reach Space Marine captains.  One was really just the larger back half with legs and cape, but I've got a use for it.

* about fifty of the old Bretonnian bowmen, plus about two dozen detail elements from the new ones to make them pop—Even without playing it, I know enough about Fantasy to know the bowmen get mocked a lot.  I also know enough about math to know that anything is dangerous in large numbers.  Goblins, grots, Kroot, scouts, bowmen... anything.  More to the point, I just love the look of dozens and dozens of archers standing ready with their bows.

* just shy of a dozen Daemonettes.  These showed up a few at a time, usually in pieces, but I kept picking and saving them.  First it was just a few to add to my existing units.  Then it was a nice, Slaneeshi six of them.  Then nine (one with a standard).  Then eleven.  One more and I’ve got a nice group of allies for my Emperor’s Children.

* and tons and tons of bitz.  Almost anything you can imagine.  Shoulder pads, ammo pouches, canteens, purity seals, knives, daggers, bolters, holsters, sheaths, targeters, backpacks, banners, spare arms, spare heads, spare skulls, chains, spikes, tentacles, tails, wings, bases, and much, much more.

Now, don’t get me wrong.  I’m not saying your local bitz bins are going to be some kind of gold mine (again, this is ten years worth of finds), and they’re not really a place you can plan on finding something.  But for the hobbyist on a budget, it’s always worth taking some time and sifting through.  Sometimes you can find some fantastic, useful detail pieces.  Or models.  Or whole units.

And if your friendly local gaming store doesn’t have bins... why not?  It’s a win-win for everyone.

8.27.2012

Cheap Jungle Plants

We were told by our landlord that we had to clean the garage out this weekend, so a lot of work did not get done on the Thunderbolts.  However, we swung by our local 99 Cent Store for drinks and I saw this little piece of cheap scenery goodness which I thought should be shared.

One of my many armies is a Catachan force, so I have a love of jungle scenery and some of the great gaming tables Games Workshop has made along those lines.  Even though I don’t play fantasy, I also love the Lizardmen in their steamy Lustrian home.

When GW released their Jungle Plants a few years ago, though, I couldn’t help but feel a bit cheated.  Over twenty bucks for what were essentialy aquarium plants?  I decided to stick with my old plastic palm trees.  I was pretty sure another option would present itself.

Sure enough, my local discount store ended up with a whole shelf of “fake grass” in their gardening section.  It’s a good sized square with about sixty-four tufts on each one.  There are two different textures, with thinner blades on some and wider ones on thers that would be broad leaves in 40K scale.


Each tuft pops off so you can mix and match textures.  Or you can attach them to bases or other scenery pieces.  You could even pull off all the tufts in every third row and suddenly this square’s become a farm with crops growing in rows.  Set up four of them like that with a river and you’ve got a verdant agri-world just waiting to be defended, devoured, or pounded into the ground.

All for less than five bucks.

7.19.2012

Shooting Phase

Okay, this really isn’t strictly a 40K thing, but I thought it was fantastic and needed to be shared.

I love getting good pictures of my projects and miniatures, but it’s tough.  My phone camera has a fixed lens, and even my digital camera doesn’t have a good focal length for such small subjects.  I usually end up taking very large, wide photos to make sure they stay sharp and then crop them down to show the subject.

Then my lovely girlfriend stumbled across this website and realized how well it applied to my work here at In The Grim Cheapness of the Future.

Go to your local 99 Cents Store or similar merchant.  Grab a pair of +2.0 reading glasses.  Depending on the frame, you’ll either be able to pop one of the lenses out or you’ll need to give it a little snip with a pair of clippers.   However you do it, get one of the lenses free and loose.

Now, step two.  Get some regular scotch tape and fasten that lens over the lens of your camera.  Try to center it as best you can, but don’t sweat the small stuff.  If you’re pretty close to center, it’s going to work fine.

That’s it.

Helpful Hint—Really, any magnification will work, it just changes your focal length.  If you can only find a +1.5 or so, it’ll still help, it just means you might have to hold the camera back a few more inches.

The best part is, your camera’s probably going to do 99% of the work for you.  Since the new lens is outside its system, it’ll just treat it as an incoming image and process accordingly.  You may have to play around a little bit to find the sweet spot for your particular camera or phone, but not much.

Check out these two pictures of my Kroot warrior who counts as a Ssslyth.  It’s one of my first attempts, but it’s much sharper and has better resolution.


Here’s the Cryptek I made a few weeks ago.


Try it out.  You'll be amazed how much it can help.  At the worst, it’ll cost you a dollar.

7.03.2012

Sand Castles of the 41st Millennium

I thought this was worth a quick mention...

I was at my local 99 Cents Store this morning and wandered through their summer/ beach aisle.  I’m always looking for stuff there that I can adapt to my cheapskate ways.  Fortunately my girlfriend likes to look for garden stuff, so my dawdling doesn’t get me in too much trouble.

Anyway, I happened to look at a bunch of beach sets they had with sand molds and noticed that some of them were for castle sections.  Walls, towers, and so on.  And some of the manufacturers had gone all out and put masonry bits and individual stones on the outside of the molds (none of which would be represented on the castle formed from said mold).

I was trying to think if I could do anything with it and then it hit me—I didn’t need to do anything with it.  The sand mold itself was effectively a one dollar, 20-25mm scale castle section.  It even had flat sections on top for models to stand.  It just needed some sandpaper to scuff the plastic, primer, and some drybrushing with whatever grays and whites I had sitting around.  It’s not Witchfate Tor, no, but it also isn’t eighty dollars.

Then I looked at some of the other molds and realized if I added just a tiny bit of detail they’d make fantastic bunkers or bastions—again, for just a buck each.  And with interactive scenery being all the new rage, who wouldn’t want a bunch of one dollar bastions spread across their war-torn battlefield?  Heck, most of us could probably dress one up with leftover chaos or Imperial bits and make it look real nice.

So whichever system you play, go check out your local discount store, browse their summer/ seasonal aisle, and see if there’s a solid chuck of scenery there for you.

6.09.2012

Silver Towers of Tzeentch, Part VI


First off, I must bow to marketing and plug my new book.  14 just came out this week from Permuted Press.  You can buy it in paperback, for your Kindle, your Nook, and in another week Audible.com will have the audiobook version, read by Ray Porter who a bunch of you might remember from a bit part in the LOST epilogue.  This is how I pay the bills. so it's a great way to support In The Grim Cheapness and still come out ahead.

But now, to conclude with the Silver Towers.

I’ve got all the bulk stuff done.  At this point I just wanted to add a few little details here and there.  The thing is, I don’t want to overwhelm it with details.  There’s something very unnatural and appealing about the clean lines of the original Epic model.  Plus the fact that none of the towers have doors or windows...

On the original model, each tower has one or two big cannon barrels jutting out of their walls. Common courtesy (and rules) said I should have something that counts as a “fire point” for the Towers’ random Bolts of Change.  I didn’t want something as crude as a  barrel, though.  I toyed with the idea of simple gargoyles made of card triangles and also with having mystical banners hanging off the towers.

In the end, I decided on stacking disks from my different hole punches.  I did a 1/8’ on top of a 1/4” one.  They don’t distract from the sleek lines of the towers as much as gargoyles or banners would.  I can also paint them blue to help tie them to the Thousand Sons a little more.

Helpful Hint—If you wanted to drop another buck or two and had a hobby store nearby, you could get a few small fake jewels that would work, too.  Figure out if you’re going to want them as-is or if you plan on painting them so you can decide when to attach them.

Remember way back when I drew the horizontal lines on the towers?  This is why.  Now I can add these fire-points across the tall and short towers and keep them level.  It gives me a nice symmetry that helps to tie them together.  I put them all around the model since the Bolts are random and also “turret mounted,” effectively meaning they can fire in any direction.  I used the lower line on the short towers, the higher one on the tall towers.

This left the Beam of Power.  It’s a single weapon, also turret mounted.  I decided to do three more fire points for the main tower and put them higher up (on the highest horizontal line).  It makes them stand out, and my gaming group is relaxed enough for them to count as one weapon.  I also traced three small 1/2” circles and cut those out, so these points are three discs deep.  They went on the highest of my horizontal lines, which also added to the sense of “the big gun.”

I added a bit of sand (plain old sand from the alley—not modeling sand or textured earth or anything like that) around the base of the towers.  It’s a hair more support.  I left it tight around the bases because I really want a lot of the top to be grass.  Some of the sand got a little too high and I scraped it back down.  These are mystical towers, after all.  I added a bit on the underside of the plauteau as well, to break up the textures there.

I decorated the base with some sand, some pieces of broken cork, and a few big rocks, too. That will help hide the ridge of the plate.  I briefly toyed with the idea of a big Tzzentch symbol “burned” into the ground, or maybe a chaos star, but it didn’t really work with the odea of a moving tower.

I spray painted the whole thing black to start.  Base, cylinder, and towers.  The towers took two coats, because I wanted to make sure the rocks on the bottom were all done, as well as all the spaces between the towers.

Helpful Hint—I decided to leave these three separate pieces unglued.  It makes for much easier transportation, and for touch-ups if it ever needs them.

To do the silver, I used spray-paint again.  First, thought, I wrapped the entire plateau-section in paper (another use for junk mail) to mask it.  I did two coats to make sure they got covered from every angle.

Another Helpful Hint—Never do heavy coats of paint with Paperhammer models.  Getting them wet is one of the worst things you can do.  Take your time and do light coats.

I haven’t finished painting (this is an early-on photo), but when I do I’ll add a picture to the bottom.  Here’s how it’s going, though...

The plateau is just lots of Camo Green and eventually some grass.  The bottom and sides of the plateau got a few drybrushes with Space Wolves Gray and Fortress Gray.  Yes, I’m still using the old names.  Sue me, I’ve got paint to use up.  I touched a few places with different browns to give the appearance of loose soil clinging to the granite.  I did the same on the base of the stand.
           
The vents on each tower are done in black.  Nice and simple.  From a distance, it even makes them look a bit like they’re cut into the surface, not sitting on top of it.

I painted the fire points as gems, using the gem technique from the old Codex: Eldar.  On the larger ones for the Beam of Power, I made the outer ring gold to help it stand out and  look a little more impressive.  The gold also gave it another link to the Thousand Sons.

And there you have it (or them).  The Silver Towers of Tzeentch.  In retrospect, I might’ve made the island a tiny bit smaller—maybe just an inch or two across—but overall I’m pretty happy with how this came out.  It’s a bit bigger than a Monolith, a bit smaller than a Warhound, so that puts it in a good size range for 400 points. 

Helpful Hint--If you’re into Warhammer Fantasy as well as 40K, you could probably do also this all at one-third the size and make a nice Arcane Fulcrum of some sort.  Just get a square tray or plate for the base and leave off one or two towers so you’ve got room to place a figure or two.  This is a very easy model to scale down.

Final cost for this Grim Cheapness project was probably around eight bucks.  A dollar each for the plate, wine glass, pens, and glue.  Call it four dollars for the spray paint (even though I already owned both colors).  Even if I’d had to buy the foam core for the plateau, I think it only would’ve been two or three dollars more.  So we’re talking ten bucks and maybe twenty hours of work (if you count drying time) for a 400 point model.

Next time I’ve got some more simple, cheap Dark Eldar conversions to show off.  After that are a few Necron and Ork ones.  And I might try to cash in on the popularity of this whole Summer of Fliers thing with a new Paperhammer project.  Hopefully before summer’s over.

Oh, and a few posts down I added an in-progress painting shot of Gigan.

10.18.2011

Skull Rock

Hey, a quick post for whoever’s interested in cheap scenery...

It’s Halloween again, which means your local discount stores probably have a ton of cheap skulls, bones, and other odds and ends that can be used to great effect.

For example, check this out.  My local 99 Cents Store had a couple dozen skulls like this.  A seven-inch skull for a buck!  There are a lot of uses for such a thing in Warhammer 40,000 or Fantasy.  Enough that I figured it was worth reminding people to keep their eyes open for such things.

However, I was inspired by a post I’d seen at the Bell of Lost Souls.  Brent showed how he made a really nice, inexpensive skull monument with the Halloween skull he found.  And he posted it on the internet, which is pretty much akin to smacking the whole world with a gauntlet (in a good natured way).  And I found myself thinking, “heck, I could make something faster and cheaper than that...”

So, I headed out this morning to put my money where my mouth is...

11:55 – I arrive home from errands with my new plastic skull.

12:10 – With groceries put away, I scraped off the big mold line running down the center.  I also figured out the three points where it makes contact when it sits.

12:20 - I superglued it to a CD base.  A plastic plate would work well, too, and the 99 Cents Store has tons of those, too, if you wanted to go a little bigger.  I also added a few wedges of foamcore and card that I had kicking about.  I trimmed a few of them to give it more of an uneven, rocky look.  I also piled them high, because I want this to look like one big chunk.

Honest Disclosure – Okay, the CD base is a bit of a cheat because I’ve got three or four of them sitting around waiting for different scenery projects.  If you’re building one on your own, it’ll probably take an extra hour for that glue to dry and cure.

Helpful Hint – I didn’t do it, but it probably wouldn’t be too hard to put a few small lumps of green stuff or chunks of foamcore on top of this thing as “balance points.”  They’d make it look a bit more rough and uneven at first glance, but actually create a level spot where you could stand figures.

12:35 – Union-mandated lunch break.  Well, not really.  But I did need to give everything some time to dry and I hadn’t eaten yet.

2:00 -  Once the glue was dry, I hit the whole thing with some textured spraypaint.  You can buy it at Home Depot or Osh.   It’s a little pricey, so you might not want to buy it just for this, but if you use it for the right things it’s worth it.  I’ve had two and a half cans of it kicking around for a while from an old film job.  

You can also get the same effect by buying a bottle of white glue, painting the whole thing, and then just dumping some coarse sand on it—it’ll just take a while longer.  You could even leave it as is, basecoat it black, and just drybrush it with a lot of different grays.  The goal is to make it rock-like.

4:30 – Done.  The textured paint takes a while to dry, but in the hot sun it did just fine.  In less than an afternoon I have Skull Rock for less than two bucks (less than three if you went for the larger plate-base).  A perfect scenery piece or an objective.  I almost hit it with a coat of gray spraypaint and some drybrushing to make it look more like granite, but I’ve decided to go with this basic, sandstone look.  It fits the desert tabletop my lovely lady and I tend to use at home.  I might do a little work around the edge of the base, but that’s it.


If you’re a Fantasy player, it might even work as an Arcane Fulcrum, yes? Although it may need a few magic symbols painted in blood or some such thing.  Not really sure how those work...

Later this week... well, I’m going to miss the rest of week, to be honest.  I’m one of the guests at ZomBCon up in Seattle.  Maybe I’ll see some of you there.