I was struck with this idea a month or so back, and it’s
been gnawing at my mind ever since. I
would’ve shared it sooner but I’ve been having camera issues.


Also, a shameless plug.
My book 14 was named the best sci-fi book of 2012 by Audible.com
(although it was also in the top fifteen books for Goodreads Best of 2012 in the horror
category). So, for this week only, my
publisher’s knocked the price of the Kindle/ Nook version down to $2.99. That’s 80% off the paperback price. Plus, you can get the Kindle and audiobook
version together for under ten bucks and do the Whispersync thing. That's pretty much the classic "deal you can't beat"...
Anyway... Enough shameless shilling. Back to our regularly scheduled topic...
Anyway... Enough shameless shilling. Back to our regularly scheduled topic...
I’ve always been a big fan of scenery. As much as I have fun with the game itself, I
just think there’s something really appealing about a miniature city or
landscape that’s been carefully set out.
I know I sometimes drive my friends nuts as I tweak scenery pieces
before the game to make more complete buildings or visible roads and
alleys. Back in the day, I made a few buildings
from foam core and cardstock, but no matter what I did they always seemed a
little... well, flat. No matter how many
window sills or buttresses I added on, no matter how much textured paint I
used, they never had the depth of detail of real buildings. When Games Workshop came out with their own
building sets, it just pushed the bar for built-with-card scenrey that much
higher.
Where am I going with this?

If you’ve been following this page or any of the other
Paperhammer sites out there, you’ve probably heard the term flats come up a lot over the past year or so.
It’s when people try to build figures from cardstock, and they do it
with various degrees of complexity. Some
are just cut-out images, but a few folks try to do a nice job layering their
models to give them some depth and thickness.
It occurred to me, though, that there’s a wonderful place
where flat figures and scenery overlap.
Those same flats can be used to create bas-relief images on a 40K
scale. They make it ridiculously easy to
create rich detail and texture on buildings.
For example...

This rectangle is 3 3/32” tall by 3 1/2” wide. In terms of the Games Workshop building sets,
it’s two panels long and one high.
That’s a nice decorative fresco on a building. Double that and you can make a mural that
could easily be the width of an entire wall.
Helpful Hint – When I cut these rectangles,
I’m not including the last “beam” of the panel.
I’ll add one of the loose beams from the actual sets to give this a bit
more detail and authenticity.

I used this 3 3/32” by 3 1/2” rectangle as a base. I ran a 1/2” strip along the base, then
doubled that to give it some depth. I
added a 1/4” strip along the bottom edge for some detail, and then did a matching
one along the top. Once these were in
place I wrapped this whole thing in wax paper, double-checked all the
placements, and then let it dry under a heavy book or three for about half an
hour. I don't want this to bend or flex as the glue dries.

Then I cut three strips that were 1/2” by 3 1/2” each. These went on the flipside of the panel to
give it a little more thickness and stability.
They’ll also make for a degree of detail on the inside, since all of the
GW stuff is double-sided. Again, I
wrapped them in wax paper and let them dry under a stack of books. It’s very important that the base be as solid
and flat as possible.
Now, if you go here there’s a nice, layered set of
flats for pre-Heresy Terminators (I think it’s an Eli Patoroch template, put
I’m not sure—it’s in Russian). That’s a
good subject for an Imperial mural. I
could say it’s a Space Marine of legend like Captain Orar or perhaps Konvak
Lann (my new favorite 40K badass). Add
enough details and it could even be a Primarch, although personally I’d feel odd
about representing a Primarch with such a small mural...
Alas, these templates are a little too detailed and are intended
to stretch into three dimensions, so the arms are all side-view. This means my mural-figure is going to be a
bit splayed, but I’m okay with that in a symbolic image like this. If you’d really prefer the edge-on elements,
jump over here and you’ll find some "modern" Terminator flats that use a
forward view of the arms.

Helpful Hint—I didn’t use all the detail
pieces from this set. I think if this
cardstock mural goes more than three or four layers deep (not counting the
base) it’s going to get a bit thick and unwieldy. Plus there’s more chance the glue will warp
things. So I did a bit of
pick-and-choose to get the elements I thought would work best in four layers. There might be something you like that I didn't use, depending on how detailed you want your bas-relief.

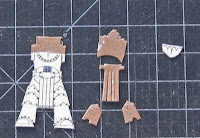
While the base was drying I started cutting out the
components. I used a new blade so it
would be as sharp as possible and tried to make the cuts as clean as I
could. Don’t worry about all the fine
detail that’s drawn on. This is a
bas-relief, so all we’re really worried about is the outlines and the edges.
Helpful Hint—By doing just one pass on the
tabard with my knife (not hard enough to cut through) I made indents for the
leather straps. Easy bit of detail.
And this is getting a bit long so I’ll finish it up in a
couple of days.
