Showing posts with label Orks. Show all posts

9.09.2015

Gargant X-Ten

One last, quick post to show some basics with the painted gargant.  It’s by no means done, but I wanted to give the seven of you who follow this (thanks for sticking around, Mom) a quick idea of how it turned out.

So, first things first...
  
Helpful Hint—Foamcore and spraypaint do not play well together.  The aerosol will eat away at the Styrofoam(TM) like acid and make things, well... a lot less stable.  Always coat and/or cover exposed foamcore.  Several times while I was building the gargant I would either add cardstock edging or coat exposed foam with white glue.  And even after all of that, I went back and covered most of the foamcore with black acryllic paint.

Don’t let all your hard work go to waste!

Once the acrylic paint was dry, I primed the arms, shoulder weapons, and head.  Then I traded them out and did the assembled body.  It’s worth noting this ate up a lot of black spraypaint.  About a can and a half.  Used up all the black I have and there’s still some unprimed bits below the skirts. 

Once all the black had dried, I did a very light dusting with the silver-aluminum paint I normally use on my Necrons.  Since this model is so big, the idea was that the dusting would act a bit like drybrushing and give me a bit of metallic texture across some of the big, wide spaces.  Alas, it didn’t work quite that way, mostly because it was very easy for “a light dusting” to become “Ork tagging” if the can got just slightly too close.  It isn’t horrible, but if I could do it over again... I’d probably skip this step.

I also used the silver spraypaint to give the jaw, horns, and deffkannonz a good base.  They’re all going to end up some version of steel/gunmetal, so this was a way to get ahead quickly.

I let these base colors dry for almost two hours and then dove in with some other colors.  I painted the big skull icon blue to tie the gargant to my DeathSkulls.  I also made a few random panels on the sides and back blue as well.  They do love painting things blue to show ownership.  What do you mean, one of the Goff gargants went missing a few hours ago?  I find your insinuation insulting, sir.  Highly insulting.  It reeks of low character...

I did some dark red on all the rokkit tips and covers.  Eventually there’ll be some brighter red over that to make them really pop.  Maybe a few ork glyphs, too.  And names for all the supa-rokkits.  I also used the red on that little “horn” at the center of the head and to pick out a few engine details.

I used a bunch of brass and some old Tin Bitz across the engine, the megakannon, and the gaze of Mork.  I drybrushed it onto about 80% of the rivets, which made them stand out a bit against the dusting of silver spraypaint.  Also used it on the “hydraulics” of the bamboo skewers on the arms.

For the record, this was the stage that convinced me the silver spraypaint had not been the best idea.  It did give the gargant a nice, metallic sheen, yes.  But one thing I discovered is that on this scale detail can vanish against the sheer size of the model.  That “dusting” is lots of tiny dots of silver, so a lot of the rivets are almost invisible against it—one brass dot in a cluster of ten silver dots.

Might be worth mentioning that I bought a little pot of GW’s “drybrush” paint and, well, it really did nothing for me.  Maybe I just got a bad batch of Necron, but I felt it really clumpy and overly dense.  I haven’t been terribly impressed by any of the new function-specific paints—bases, drybrush, and so on—but that may just be me. I’d hoped to use it on the remaining rivets and weapons.  All things considered, it’s probably worth adding another ten or fifteen bucks just for paint to the overall price tag for the gargant.

The last touch before marching off to the Labor Day war was to paint the faceplate white.  Yeah, I know it looks a bit silver in the picture, but it’s classic Skull White.  This is another visual link-up with the color scheme of my Stompa.

And that was all I had time for before the Imperial Guard and the Blood Angels showed up with a Knight company backing them.  But you can read about all of that over at Atomic Warlords, and learn how the gargant was dubbed Great Morkzinga.  I’ll probably still do a lot of touch-ups and more detail work, so expect to see it again in the future.

Next up...  a smaller project.

9.02.2015

Gargant -- Part Nine

 Okay, to paraphrase Mark Watney... let’s mekanik the Gork out of this thing.
  
When I left off, I’d just made some basic exhaust pipes/ smokestacks.  They had some patches, but I wanted to do a little more to make them each stand out.  I cut some narrow triangles, gave them a bit of a curl, and glues those around the end of one.  For another I made a slightly larger cylinder and glued it on a bit crooked (which also made this smokestack about two inches taller).

In a moment of inspiration, I repeated the grid I’d done for the rokkit launcher.  This time, though, I used the hole punch on every other section rather than gluing pieces there. The result was the nice little ventilator topping the last pipe.

Helpful Hint—As I’m adding all these patches and decorations on the smokestacks, I want to keep in mind which way they’re going to be facing.  About 3/4 of each cylinder will be against the gargant’s back, so I’m going to have the seam face that way.  What this means, though, is that’s the side that will be visible at the top. So decorate (and hide things) accordingly.

I put a cross-tab in the base of each smokestack (just like I’ve done for gun barrels) and then glued them in place on the engine piece I built last week.  I let this whole thing dry for a bit.  I wasn’t super-worried though—these would be straight up-and-down joins, so there wouldn’t be a lot of stress on them.

In the meantime there was something else I wanted to do with the back.  Forgeworld put out their Warlord Titan a few months ago (don't look at the price tag), and one of the things I really love (well, I love all of it, but...) is the whole beautiful boarding port with a doorway, catwalks, sentry guns, and more.  Very Pacific Rim.  It’s a fantastic piece of detail, and I decided to copy it here.  Sort of

First, though... that means it’s time to glue the two body sections together.  Which also means it’s time to glue the feet in place.  I put the arms in place and played with the feet a bit until I found a good, solid balance point.  I glued the feet first. A few books on top of the abdomen let them dry flat and solid.  Then the torso went on top of that—again with the books pressing down.  With that done... back to our boarding area.

The doorway was a  pair of cardstock panels  I gave them some detail strips and rivets.  Normally I’d do this a bit later in the process, but I knew this would be a little tight and awkward once it was all in place, so I just did them now.  Then I made a foamcore arch by cutting a 5" x 3 1/2" rectangle and then cutting out the inside of it.   This was edged and glued over the door panels.  Solid entranceway, just like that.  I glued the whole assembly in place down at the base of the thorax’s back, right next to the engine sections.

I made a simple catwalk with some foamcore and a few triangles.  I edged these with cardstock and added some plates and patches along the surface.  I considered adding a safety rail.  But the more I thought about it, a safety rail seems like a very un-Orky thing.  I’d buy it in something they looted, but not something they built pretty much from scratch.

I placed the catwalk so it stretched from where the engine section will sit to the natural walkway along the gargant’s “hip.”  Now it’s all one long walkway.  If the boss needs to kick someone out to do repairs, this entrance gives access to both arms and even some front sections.

I liked the look of this area so much that I used the inside piece from the arch to make another, slightly smaller arch and add a door to the back of the gargant’s head.  I built it the same way except I designed this one as a single door not a double.  Again, all the rivets and edging was done before I attached it to the head.  Now the meks and grots have easy access to the shoulders and upper weaponry. 

By this time the smokestack/engine assembly was pretty solid.  I glued it to the larger foamcore piece on the back of the abdomen.  Then I added a few “straps” across the different stacks.  They looked good and actually added a degree of support.  A few big cardstock circles below the engine block finished this off and gave it a nice look.
 
You may remember earlier this year I built a nice little promethium pipe scenery piece to make up for the very limited GW one.  I haven’t used that piece for anything, so I decided to add it to the gargant, too.  I put a “patch” on it to give it a more Orky look, then glued it in place next to my engine piece.  The last smokestack went on top of that.

A few last details...

I added on some random plates here and there to visually fill up some of the bare space.  I also added a few bamboo skewers to the arms as pistons and on the back as thin pipes.  It was all more texture than detail.

I decided to make another supa-rokkit.  But I decided to cheat a little bit.  Rather than making a full rokkit like I did before, I decided to make a “sheathed” rokkit in  a launch pod, like the extra one I used on the Skullhamma.  This meant the rokkit was just a rectangular box with circles on either end and an extra panel or three.  To be honest, this worked well enough—and was so quick—that I might make a second one for the other arm. We’ll see...

I also felt a little odd about the deffkannonz not having an ammunition belt like the Stompa model does.  I’d been mulling over way to make twin belts, and I came up with a pretty solid (if time-intensive) way to do it.  But the more I thought about it, the more I felt it wouldn’t look quite right.  Something like a belt needs to hang just right to get the sense of mass across, and I didn’t think I could manage it

What I could do, though, was a big pair of drum magazines, one for either side of the deffkannonz. To make them stand out a bit (and to add to that Orky sense of asymmetry), I decided to make one round and one octagonal.  Also, clearly, because I hate myself and feel the need to suffer more...

The octagon was the harder of the two, just because I had to do a bunch of math and measurements to get it all just right.  Geometry wins again, even if a few of my measurements were a bit off... Hey, Orks, am I right?  I glued tabs around one of the octagons, putting a tab on every other edge.  Then I cut a 1 1/4” strip of cardstock for the body, measured and scored it, and glued it onto the tabs.  All of this got clothespins to keep it tight and solid.  While it dried I added tabs to the other octagon and connected them.

The round drum was pretty straightforward.  Two discs about 2” in diameter (I traced the lid from a baby food jar), each with the same notch cut out. Well, mirror-cut on one.  Once I had those, I put the drum together just like the octagon.  I attached both of them, and then put the new supa-rokkit on top of that.  What was once the scrawny arm is starting to look a little bulked up.

And now, it’s time I grew up and admitted something to myself. 

The rivet fairy isn’t showing up.  I’m going to have to put all these on by myself.

I used my 1/16th hole punch to make about four hundred or so rivets and... well, got to work.  The engine.  The weapons.  The odd panel here and there on the body.  Lots on the head.  I spent about six solid hours on rivets (four SyFy movies worth).  They’re definitely the big time-suck in a project this size.

Helpful Hint—I’ve mentioned this before, but it’s worth repeating.  Rivets add so much to these Paperhammer models, but there’s something worth keeping in mind.  You’re making a piece that’s not much wider than it is thick, so the cardboard  tends to “flake” a bit.  It’s not unusu

al for a rivet to peel apart into two or three sections of paper, only one of which is glued to the model.  It happens I’d say it happens to about one out of five.  Make extra rivets, use a little extra white glue so it soaks through, and be patient.

And I think... that makes this done. 

Three-fourths as many posts as the Imperial Knight, but about 1/3 the time.  Maybe actually one fourth.  The joy of going fast and loose with Ork engineering.  I think this was really a solid week of work, maybe ten days, tops, interrupted by a lot of editing and a few conventions.

Total cost... Well, there was about twenty dollars worth of foamcore. I went through three bottles of white glue at a dollar and change each—call that four dollars.  The bamboo skewers were leftover from another project, but even if they weren’t they were a dollar at the 99 Cent Store.  All the cardstock was pizza and cereal boxes which were bought for their contents.  So altogether, the Gargant cost around twenty five dollars (and the bulk of it was foamcore which you might have better access to than I did).  I think that makes this my most expensive project here at In The Grim Cheapness of the Future... since the Grotesques.

Now... I need to get it primed and painted for this weekend.  I’ll try to get some in-process shots up before then, and maybe one last post about names and color schemes next week.

8.24.2015

Gargant -8-

So... more dakka.  And some other stuff.  This one’s going to be kind of huge.  I had a week off and I did a lot...

I mentioned before, I built a simple arm for the rokkit pod based off the same design as the gargant’s actual arms. I fastened it to a square plate on the bottom and a round plate (a “swivel joint”) on the top. 

Then, back to the flakkgunz.  
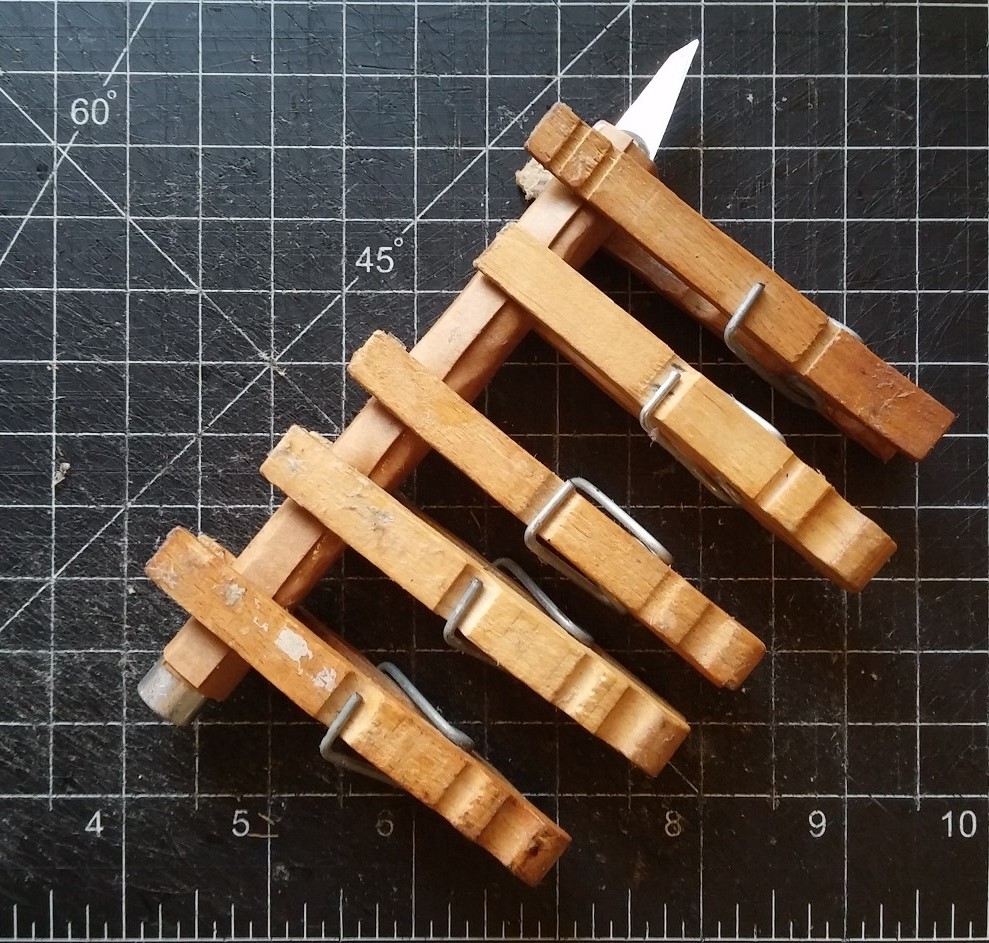
I tried something new and actually wrapped the cardstock barrel sections around my hobby knife when I glued them.  There were plusses and minuses to this, as I discovered.  On the plus side, it let me put clothespins right on the seam without deforming the barrel, so the seal here was very solid.  Minuses, they were clamped so tight that every non-clamped area became loose almost by default.  Also, I realized this meant the knife and clothespins kept getting tied up on single items while they dried.  Needless to say, this slowed production down a lot.

So... maybe only use this method on single, specific things.

While the barrels were drying, I  sketched out two simple boxes to be the bodies of each flakkgun.  It’s not far off from the way I made the deffkannons, just smaller.  I put these together and then made a slightly more complex shape—think of it as a cube with a triangle on top of it.  This is going to be the central “mount” for the flakkgunz.  I’m sure someone reading this knows the real term—feel free to put it in the comments.

I glued the barrels to each other, turning them so the seams were between each pair of barrels.  Once they were dry, I mounted them on the bodies.  And while those were drying, I added a few details to the center of the mount.  Once the guns were in place, it was going to be tough to reach between them, and I’d rather do it now when it was easy.  So I put on some rivets and plates, made a simple Orky targeter, and glued the whole thing to a foamcore base made out of a square piece of scrap.

Once both of the flakkqunz were dry, I attached them to the central mount.  I didn’t want to dig out my larger clamps, so I just walked around holding the whole assembly for about ten minutes, checking it now and then to make sure nothing slipped.  I wanted them to be as close to aligned as possible, but I wasn’t sweating it much.  Like much of Ork technology, their anti-aircraft guns don’t work on accuracy as much as volume...

Then I cut some long strips of cardstock for the scaffolding/gantry that’s going to hold up the flakkgunz.  The wider ones are going to be uprights, the narrower ones will be diagonals.  I doubled these up, clamped each of them, and once they were fairly dry I stuck them either under books or the cutting board itself.  These need to be solid and straight.

Once they were all dry, I set them out and built one side of a 2” wide scaffolding gantry.  I used my steel ruler/straight edge to keep all the connections pressed flat.  At this point, there’s a lot of glue and cardstock here, and it’d be very easy for it to warp or bubble.  So, pressing flat and straight the whole time.  I let this all dry, then flipped it over and built the other side.  I added a foamcore square as a top platform and let that dry.

Alas, my three-legged scaffolding was not as stable as I’d hoped.  The triangle it makes is strong, but not enough to counter the leverage of the square platform.  So, in true Orky fashion, I rolled some cardstock into a tube, glued it, held it tight with rubber bands, and then stuck it on the side when it dried.  Done.

Except... well, now I had a new problem. I’d been thinking I’d leave the gargant’s head unattached to make it easier to transport.  But if I’ve got two towers growing off each shoulder, the head’s kind of a moot point, isn’t it?  Plus, that means the towers are going to be subject to a lot of stress riding in the back of my car—odds are they’ll tear off the first time I make a turn.  So I needed to figure out a way to make them solid, but also make them removable.  Like the arms.  Except I’d planned to build the arms that way...

After a bit of fret and worry and a few discarded ideas with magnets (which are too expensive for a cheap project like this) I came up with... gravity.  The gargant’s shoulders are flat enough, and it’s not going to move that often on the tabletop.  Really, once it’s placed it’ll probably just blaze away.  So if I can make these shoulder-mounted weapons stand on their own, they should be fine.

I ended up taking two pieces of foamcore and cutting them to fit across the back of the gargant’s shoulders.  There was some deliberate overlap where the pauldron connected with the torso.  I added a small foamcore block at the overlap point.  It’s going to fit right in the corner behind the pauldron and make sure these “baseplates” always sit in the same spot, so I can build around them.  The weapons mount to the baseplates and these are done.

Fun Bonus –It also struck me that all four weapon systems are removable, which means they could be swapped out if I decided to build something else.  The gargant is unexpectedly modular.

With that taken care of, next up was the Gaze of Mork (or possibly Gork).  I knew I wanted it to have a vaguely Zzap gun look to it.  It also needed to fit inside one of the eye sockets, but I also didn’t want it sticking drastically out.  I made a small cylinder about an inch and a half long and maybe 3/8” wide.  It was wrapped in a few strips of cardstock, and then I wrapped narrower strips on top of those. It gave me a nice, simple, Tesla-coily look.  I glued a 1/4” disk from my hole punch in the front as a lens, then added a simple hood over that, and the Gaze was done.

Actually, one other thing.  Because of how I’d built the head, the surface behind the eye socket is at an angle.  So I needed to build a little base for the Gaze of Gork that would be able fit through the socket and counter that angle.
Once again... math and science pay off.

The head is a hexagon.  That means each of the outside angles is 60 degrees (360 divided by six sides).  My tiny little craft toolkit comes with the standard 30-60-90 triangle.  Even if it didn’t, 60 is such a commonly-used angle it’s even marked on my cutting board.  So I sketched out a quick triangular box that was also 30-60-90.  It was small enough that I just held the whole thing together in one hand while it dried.

Now, with all the weapons done, it was time to think of some details for the back.   Most Ork walkers, from killa kans up to stompas, have some degree of exposed engine workings in the back.  I didn’t see why the gargant would be any different.  So I wanted to do something that gave the appearance of half-covered machinery.  But I also wanted to keep it simple—In The Grim Cheapness of The Future... has never been about super-insane-realistic detail that takes days of work.

I plotted out a few simple shapes on cardstock.  Two triangular boxes and another one that could be described as a cube with another triangle beneath it.  It’s lot like the one above I made for the flakkgunz, but I assembled them a bit differently because of how they were going to attach to the main model—that one sits on its square base, this one will essentially hang by its rectangular back. 

Question—At some point I may do a post just on how to build some basic shapes.  I skim over that a lot because it seems basic to me, but that might just be me.  Would anyone be interested in a quick geometric shapes post?

I cut out the sections, glued them together, and let them dry.  Again, simple forms, not much measurement past making sure the sides lined up.  Then I actually glued the three of them together to make a larger, engine component-ish-looking thing, then slapped on a few simple detail "plates" that also helped hold it together.  A good block of tech for the back of the gargant. And it gave me a broad horizontal surface for smokestacks to come out of...

Helpful Hint—Here’s another little quick geometry tip.  If I want to make a cylinder and it doesn’t need to be exact, figure that it’s going to be about 1/3 the size of my piece of paper or cardstock.  A three inch piece of cardstock will roll into about a one inch cylinder.  A six inch piece of cardstock will make a two inch cylinder.  If I need it to be exact, do the math, but this is a good rule of thumb for this scale.

Another Helpful Hint—Don’t forget to leave a little extra space for tabs, too.

All that being said, I cut some 4” wide strips of cardstock, trimmed one side into a tab, and rolled them into large smokestacks.  Because of their length, I couldn’t put clothespins on the middle, so I ended up wrapping them with rubber bands.  And—much to my surprise—it turns out I don’t have a lot of rubber bands in my house.  So things kind of ground to a halt as I essentially did one smokestack at a time.

At which point, as I mentioned at the start, I realized how much stuff I’d done.  This is going to be a huge post as is, so I’m calling it done.

Next time... everything gets assembled and the rivet fairy shows up!

(the rivet fairy probably will not show up—it’s just going to be me)

8.13.2015

Gargant--Seven

Okay, so, ready to apply logic and geometry to a problem?

I want a jaw that sticks out an angle, kind of like the one on the Stompa.  Now, If I have a straight line and wrap that around the base of the head, it’s going to stand straight up at a 90 degree angle to the table.  Likewise, if I trace the outline of the base and wrap that around... well, it’s going to lay perfectly flat.  Zero angle.  Make sense?

So, what I need is an arc that’s between a straight line and the curve of the base.  And I’m willing to bet—based off my great scores in high school geometry—that if I make my arc halfway  between those two extremes, it should connect in a way that gives me a 45 degree slope to my jaw base.  Or something very close to that...

HOLY CRAP! GEOMETRY WORKS!!  I guess math and science are still the way to go...

I glued my new jaw base in place.  A few cardstock strips helped make the whole thing a bit more solid.  I put some clothespins around the jaw to help hold it in place, but to be honest it was pretty solid from the moment I attached it. i still gave it plenty of time to dry, because I need this to be solid if it's going to hold the weight of the teeth at that angle.

Helpful Hint—Just another reminder—because this is an Ork project I didn’t do a lot of measurements.  If I did measure things, it was more to make sure angles matched than anything else.  The joy of Orks is that 99% of mistakes look like planned details.

Next I took apart that whole daisy-chained tooth construction I’d put together at the end of last week’s post.  Someone also pointed out that all the teeth I made were pretty even, size-wise (which isn’t very Orky), so I also made a new tusk for one side of the jaw.

Once this was done I went through and added a bunch of detail to the jaw.  A lot of it was edging-pieces, because I want these teeth to look clean and sharp.  There were also some random armor panels here and there. I also cut out any excess material from the cardstock base that showed between the teeth.  I used a pair of scissors for most of it, and some of the fine stuff I cleaned up with my sprue clippers.

I also added some pieces onto the head itself and the horns.  More cardstock plates, some foamcore scraps, stuff like that.  And there’s still at least a hundred rivets in the future.  For the moment, though, I let the whole thing sit and dry.

Now... I mentioned last time the need for shoulder-mounted dakka.  That need still exists.  And these magnificent horns, even cut down, still eat up a lot of shoulder space.  This bothered me for a bit until I remembered how much of the old gargant art shows weapon emplacements mounted up on gangly scaffolding or scrawny mechanical arms.  All of that suddenly made sense...  I’d already planned on some flakkgunz  for one shoulder and a missile pod for the other.  I decided to put the flakkgunz on scaffolding and the missile pod on a smaller version of the arms I’d built as, well, arms.

I did the rokkit pod first, just because it’s easy.  I wanted to make it look kind of like a real-world multiple rocket launcher (or a big Whirlwind, if you prefer).  It’s really just a basic box, very easy to lay out and assemble.  Wider than it is deep, deeper than it is tall—about 3 1/2" x 3" x 2" .  The only measurement I cared about was the front, because I wanted to try something clever there.  We’ll see if it works in just a few moments...


I plotted out a 3/8” border inside the front panel, then marked off what was left into a 1/4” grid.  This will let me place rokkit covers/ tubes in a more or less regular pattern.  I don’t mind if there’s a little variation, but if there’s too much it won’t be clear what this is.  I tried to shade it a bit to make it clear which grid squares were which, and to give me an alternating pattern.  I used my 1/4” hole punch to make a bunch of disks, dabbed some glue, and then put them all in place.

Helpful Hint—Probably goes without saying, but a hobby knife is perfect for this sort of positioning.  A sharp pencil works well, too.  Fine point, solid, easy to direct.  It helps get these little pieces right in place.

Once the disks were on and mostly dry, I assembled the box.  I clamped the tabs with clothespins at the early points, then just held it together with my hands as it neared the final joins.  Once I felt confident it was solid,  I added on a bunch of detail pieces.  I made a simple  “sun screen” to overhang the rokkit silos.  Also some cardstock plates and panels that gave it a little more structural integrity.  This whole thing will also need to get a few hits from the rivet fairy.

(The rivet fairy is a magical creature who lives about one week in the future.  I keep hoping she’s going to do all these rivets for me.  So far... no luck with that.)

With that together and drying, I turned to the flakkgunz.  If you remember the first Apocalypse book, there was a nice flakktrukk in that, and I decided to use it as my basis for the gargant’s flakkgunz.  I cut four pieces of cardstock about 4 1/2” long and 1 3/4” wide, then put a good curve in each one, lengthwise, by working them around my hobby knife.  These would be my barrels.

But I’ll talk a little more about them next time. I’m running a little bit behind and I want to get this posted.

Next time, flakkgunz, the Gaze of Mork (or possibly Gork), and some engines for this beast.  We’re closing in on the end.

8.04.2015

Garagant: Part VI

Many, many thanks for all your patience.  There were conventions and edits and then an anthology.  But now I’m back.

Speaking of anthologies, check out that new one over on the right.  I now get to call myself a canon X-Files writer with my story “The Beast of Little Hill.”  It’s fun, you’ll like it.

But let’s head back to the Gargant...

To be honest, I’ve avoided the head until now because it’s going to need a lot of work.  Like any vaguely-humanoid model, the head’s going to be the first thing anyone sees—people look to the eyes.  So if I’m going to focus my attention on any part of this, it needs to be the head.

First thing was a face plate, much like the ones on the Stompa.  I’m keeping it simple and just going with the more blocky one.  I cut a foamcore rectangle that was about 3 3/4” by 6 3/4” wide.  Then I cut a 1/2” x 1” rectangle off each of the bottom corners to give it a stylized skull look.  The two eyes.

Helpful Hint—Mentioned this before, but foamcore is always two cuts, at least.  Always.  When you try to go through foamcore in one cut, that’s when you get all those beads and tears and rough edges.  Use a fresh blade in your knife, do one light pass, then one final pass. I usually do a third pass just to make sure I’ve cut through the bottom side of the foamcore.  It takes a little bit longer, but it makes all of this so much cleaner.

Now, once I had these little bits carved out of the face, I made a very shallow trench down the center of the back.  Not even halfway through the foamcore.  It was one pass with the knife, then one or two leaning the blade either way and just letting gravity do the work.  The point is to remove a thin wedge so I can bend the foamcore just a little (maybe 15 degrees) without leaving a harsh wrinkle or crease in it.

I glued the faceplate on the front of the head and added two spacers out on either edge to help keep everything solid.  Then I balanced the head on its back and set a bag of lentils across the plate.  That sat and dried for about half an hour while I went to work on the horns.

Helpful Hint—A bag of lentils or split peas is a great, cheap way to help stuff dry in place.  It has a good amount of weight, plus it’ll bend and flow over whatever you put it on like a not-quite-full beanbag—letting you keep pressure on almost any surface.  Plus, the lentils are good for you.

Most gargants don’t have horns.  I don’t know why, because horns seem to spill over to every other Ork vehicle.  And I wanted them to help balance out the squatness of the head..  Probably wider, blockier ones to go with the usual Deathskull esthetic.  So I sat down with a piece of foamcore and plotted them out, shooting for about 7” so they’d be twice the height of the head itself.  I liked how they turned out, but realized one problem as soon as I held them up to check the look.  They were too wide.  The horns covered the entire torso and pauldron area—and there’s supposed to be some shoulder-mounted dakka up there.  So, I immediately trimmed about 3/4” off the inside of each horn.
 
Next I took the triangular scraps from cutting the horns out and glued them on to the front and back of the horns themselves.  I made sure front and back pieces all lined up with the side edge.  It gives the horns some bulk, plus it means there’s more area for the glue to grab and hold them in place.  I made sure everything was lined up and then set a book on top of these for about ten minutes.

I glued the horns in place.  I had to hold them for about five minutes.  They sit a little forward on the head, not quite halfway back.  I also used the scrap pieces from the faceplate to make a nice solid block between the horns, the head, and the base piece for the head.  I’m really happy with how they look.  To be honest, it’s got me thinking of some punny Japanese robot names for the Gargant.  Gorkdizer.  Great Morkinga.  Gorking.  Dangork Ace.

Anyway...

It struck me while I was thinking of names, though, that the horns almost look too good.  For an Orky creation, they’re just too symetrical.  I’ll make a point of trying to set them apart when I add the detail next weekend.

Next up was the jaw. I thought about how to do this for a little bit.  I briefly toyed with the idea of cutting the jaw as one piece and curving it with the same “wedge” method I used up above with the faceplate.  Thing is, I’m running low on foamcore and I’m trying to keep costs down on this, so I didn’t want to risk wasting a piece.  I decided the best path would be to cut out the “teeth” individually and then work them together into the jaw.

Thing is... this turned out to be a lot harder than I expected.  Because they’re flat, the teeth don’t get a lot of contact against the head’s curved base.  They also don’t get a lot of contact with each other because the angle-out means they actually lean away from each other.  What little contact they make isn’t enough to counteract the angle.

I tried three different versions of this and couldn’t get any of them to work.  Things kept falling apart.  And I was running out of glue.  My last attempt was to create a sort of “belt” of teeth, with the hopes I could bend it into position.  It didn’t work, either.  Not in a way I liked.

But it got me thinking...

7.03.2015

Gargant Add-Ons

Just realized I didn’t include some of those larger pictures of the Gargant I mentioned last time. Soooo... here they are. 

All this should look very nice once it gets painted.


6.30.2015

Garagant: Part Fifth

I know I said I was going to work on the head, but I ended up a bit detail-focused this weekend.  Plus, the head’s something I don’t want to rush.  So for now, I’m going to build some rokkits. 

If you check over on our battle-sister site, Atomic Warlords, there are some test rules for the Gargant.  One of the options is supa-rokkits, and as a secondary weapon they can go pretty much anywhere.  For the moment, I’m going to put two on each arm to help bulk up the weapons a bit.  Depending on the final rules, I may add more...

Rokkits are simple, believe it or not.  They’re just little towers, which are just a variation on gun barrels.  You may remember I made a lot of towers a while back of the silver variety.  It’s a simple procedure, so I won’t repeat it here.  I will point out that I want a few different sizes and lengths,

For this, I made two rockets with 1/4” panels, one with 3/8” panels, and the last one was 1/2” on each side.  This gave me some variety in circumference.  I also had different length and cone measurements for each one, just because Ork weapons are known for having such great variety.

Helpful Hint—I didn’t put tabs on any of the cone sections.  These are small enough that I just used some scrap paper and glue to bind them.  I held them with my fingers until the glue died.  I took a little longer, but I think it was still less than fiddling with eight tabs on each rokkit.
 
Once I have the basic shapes, I want to add some detail. As I’ve mentioned before, weapons tend to draw the eye on a model, so they’re worth a little extra work.  Maybe one or two rings to help sell their circular nature.  A curved armor plate will do that, too.  Plus, if I line them up right, each of these will give me something extra for the fins to grab.  Like the rokkits themselves, the fins are just a collection of random triangles, some with the tips cut off for “streamlinin’.”  A few of them are doubled or tripled up. I took a few of the triangles left over from cutting the nose cones and used them for Orky jags/teeth on some of the rokkits.

Oh, and more rivets.  Always rivets with Orky stuff.

While those were drying, I made a few quick supports for the rokkits (stands? gantries?).  They’re just a basic M shape kept narrow so the rokkit can be glued on two long edges.  I added a few lengths of thin card on the sides to give it more of an industrial/ scaffolding look.  And more rivets.

I debated how I should glue these on.  Supports to rokkits and then to arms?  Or supports to arms and then add on the rokkits?  In the end, I went for supports to rokkits.  It gives me more control about the position of the rokkit itself once it’s mounted.

When I glued them onto the arms, I tried to keep them towards the back. There’s more space, plus I didn’t want to distract from the different kannons. 

And, as I predicted before, they help a lot. The arms look more significant and substantial.  And more Orky. “Adding on” is a big part of the Ork esthetic, and it’s definitely something to keep in mind when building... well, anything for them.

We’re also really hitting a funny point, I’ve noticed. The gargant’s so big it’s really hard to put things together and... well, get a sense of them.  I either need to do close-ups or wide shots where a lot of detail gets lost.  I’m sure things will stand out better once it’s all painted, but for now it’s easy to get lost in the wider shots.

Next up... the head.

Before that, though...  I’ve got two conventions back to back and it means I’m not going to get anything done, building-wise, for another two weeks.  I might try to revisit an old, recently-relevant post if I have time, but that’s about it.

On the other hand, if you’re already planning to attend Westercon or the San Diego ComicCon, please try to find me.  I’m doing three different signings at SDCC for the Ex-Heroes series and my new book, The Fold, plus a couple of panels.  You can find me (or my schedule) at the Random House booth, or on Twitter.

Hopefully see you there. And if not, see you back here soon.

6.23.2015

Gargant, Part Four

Okay, time to build some arms and mount some dakka.

So, you may recall I built two sockets in the thorax so I could make removable arms.  This means I needed 2” square “posts” to fit in those sockets.  These were pretty straightforward to build. They’re two inches on each side and five inches long.  I braced them with glue bottles and random things on the table to make sure they stayed as square as possible.  Square hole—square peg.

Helpful Hint—Mentioned this before, but foamcore is always two cuts, at least.  Always.  When you try to go through foamcore in one cut, that’s when you get all those beads and tears and rough edges.  Use a fresh blade in your hobby knife, do one light pass, then one final pass. I usually do a third pass just to make sure I’ve cut through the bottom side of the foamcore.  It makes all of this soooo much easier and cleaner.

While the two pegs dried I cut two 3 1/2” squares.  These are going to be the base of the posts—the shoulders, if you will, once they’re in place.  They’ll sit right beneath the pauldrons and everything will mount to them.  So when I glued them to the posts I balanced a book on them and made sure they dried solid.  These are going to be taking all the weight from the arms and weapons, so I wanted them to be as strong as possible.

Next up was arms themselves.  They needed to have a certain level of bulk so they’d look good for the scale.  They also needed to work (or look like they worked) believably with the assorted joints and hinges I’d be adding to them.  I toyed with the idea of building them as boxes, like the posts, but then I realized that was Papercraft talking.  Since I was working with foamcore, I could just layer two or three pieces together and get a good, solid arm—especially if I added some detail on top of it.

I decided to go three layers thick, which was about 5/8” altogether.  I cut six pieces at 2” x 6 1/2”.  It’s a bit of an odd length, but I'm still trying to be efficient about my foam core use.  This gave me the longest, widest arms with the least amount of waste.  I also cut 1/4” off each corner to round them just a bit.

Helpful Hint—Again, this is an Ork project, so exact measurements are not needed.  I measured and cut the corners on one of the six pieces, then just used it as a template for cutting the other five.  They’re not 100% perfect, but they’re good enough for a Big Mek and a lot of this will be hidden in the joint anyway.

Once all six pieces were ready I glued them together and set a book on them.  I then checked twice to make sure they hadn’t slipped under the book (and was glad I did).  When they were safely squared away, I let them dry and turned to the hinges.

The shoulder piece I mentioned before was 3 1/2”, so I dug around in the kitchen cabinets until I found a jar lid with a diameter that was almost exactly that.  I traced four circles on my foam core (front and back of two shoulders), each one touching the edge and the last circle.  Then I drew a line across the opposite edge of the circles and another, perpendicular line between each circle.  I cut these out so they were round on one side and squared off on the other (check the pictures below).  Then I added some cardstock discs (some large, some from my holepunch) to add some detail and make it look like a large pivot point.

Now that they were dry, I added a long strip to the center of each arm as a bit of base detail.  Superstructure, support, it could be anything.  But it looks good and adds some more to the thickness of the arms.  At this point, I had the entire upper arm structure pretty much done.

Next was elbow joints.  I built them just like the shoulders, but this time I used a 2 1/8” can to trace the circles with.  Again, you can use whatever size looks right to you.  I added some of the same cardstock details and called these good.

As a final step, I cut a 3” x 2 1/8” piece of foamcore which would essentially serve as a weapons mount.  This will be at the end of the elbow joints.  It gave me a big area to attach the weapons to and also helped bulk them up a bit.

Just before assembly, I added a few more armor plates and rivets to the arm sections.  A lot of these are going to be hard-to-reach places, so I needed to add this detail now.  I also didn’t want to risk breaking a seam later on because I tried to press down on a rivet at a key place.

So... let’s put it all together...

I started at the shoulder.  The two shoulder joints went on either side of the arm.  Note that the front side will really just be attaching to that center detail strip, so make sure it’s on far enough to hold.  Then line up the back piece. Make sure the flat edges are flush by checking them against a flat surface.

While the shoulder was drying, I added the elbow joints to the end of the arms.  I tried to make their edges close to perpendicular to the shoulders, but I didn’t sweat it too much.  If the weapons end up a little off, it’ll either end up looking dynamic or (again) Orky.

I glued the two weapon mounts onto the weapons, then, once these were solid, I glued them to the elbows.  Megakannon on the right arm, twin deffkannons on the left.  No particular reason, that’s just what felt good to me.  Some more armor plates added detail and helped glue things together.

I decided this would be a good time to add on the gutbuster kannon, too.  First, though, I needed to add a big skull icon to cover a lot of the abdomen.  The front panel is 14” x 11” so I marked off a piece of foamcore that was about 12” x 10”.  With that basic  area mapped out, I sketched an Orky skull icon (complete with horns) that would work well for my Deathskulls.  I briefly toyed with putting the kannon in one of the eyes, but it just didn’t feel right.  So I made sure the teeth were spaced so the kannon would fit well between them (without being too low on the abdomen).

I added a bunck of detail to the icon.  More cardstock to make brows and accent the teeth, and then a ton of rivets.  Some of them I even put right down on the foamcore.  I wanted there to be clear lines between the skull and the horns.  Once that was done, I glued some scrap foamcore to the back so the icon would be “mounted” just above the surface of the hull.  I mounted it so about half an inch stood up above the abdomen.  If I’ve done this right, the cumulative effect of these little touches that will add a lot.

While the icon was drying in place, I added a small support to the back of the gutbuster kannon, just like I’ve done on other cannons. I set it as close as I could to the icon’s teeth (without touching) and glued it in place.  I’ve never liked it when I see scatchbuilt gargants and stompas with a very low belly kannon.  This thing has an engine somewhere, but it definitely has a lot of drive mechanisms right there by the feet.  The overall design should account for that.

Next time, I finish up the head and we get this big guy ready to rock.