Showing posts with label Silver Towers. Show all posts

6.22.2016

Cultists and Marauders

Hey, I haven’t had a chance to get back to the Leman Russ/ Destroyer (got a pile of edits that needed my attention) but I wanted to share something else I’ve been working on. Sort of an ongoing background project.

As I’ve mentioned here once or thrice, my biggest 40K army is the Alpha Legion.  I was a fan and follower of the 20th Legion since back when they were just the Napoleons of Chaos, long before THQ and  Dan Abnett made it cool to like them.  And as such, I’ve always had a place for cultists in my army. 

Alas, for years, the only cultist models were half a dozen or so metal ones, half of which were leaders or special weapons.  That’s not a lot of options.  Plus, they were metal, so they could cost three or four dollars apiece!  Can you imagine that?  Paying four dollars for a single GW figure?  What craziness.  Thank goodness for Finecast, am I right...?

Anyway...

Like most folks, I solved the problem by mashing things together. A good mix of Catachan parts and Fantasy Marauders gave me a nice group of post-apocalyptic looking cultists.  Mix in a few Kroot accessories and they looked great.  And these guys worked fine for many years.  Then Dark Vengeanceshowed up and there were real cultist models. Not too posable, but lots of variety. Also space to add on the odd bit of individual detail here and there. Plus, through the miracle of eBay, I was able to get a bunch of them for less than two dollars each...

But this still left me with all my old, homemade cultists in their horned helmets and headbands.  They just don’t mesh well with the new ones.  Sooooo... what to do with about forty figures?  And then it struck me that, in Age of Sigmar, it’s possible to field just one or two units and play like that. So what if I just turned the mostly-Marauder ones back into regular Chaos Marauders?

I went through all of the old cultists and sorted them into mostly Catachan and mostly Marauder.  In a few cases, I found complementary pairs where I could swap legs and they’d make a more-complete figure.  Then, I began to disassemble them.

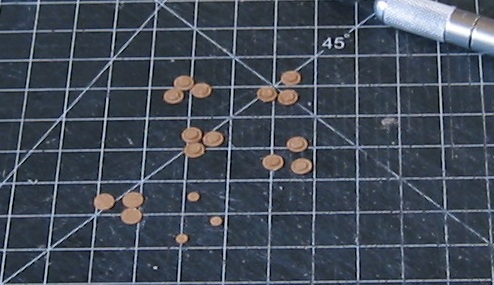
Helpful Hint—The idea of cutting up figs like this might seem intimidating.  Just make sure you’ve got a really sharp, clean blade, a good cutting surface, and plenty of light (the seams can vanish in shadows, and I want to be cutting between components, not through components).

It took about an hour to separate them all and scrape off any of the white “soft spots” left from the glue.  Then I dug up all the leftover Marauder parts and made a good-sized squad of fifteen armed with axes and shields.

I also discovered I had enough bits sitting around to make one more figure, and after a bit I decided I might make someone I could use as a Darkoath Chieftain, using the Age of Sigmar rules that GW put up to go with some of the Silver Tower figures.  More on that later, depending on how it turns out...

And as for the leftover, mostly-Catachan models...  Well, as it happens a while back I also ended up with a bunch of the hooded Adeptus Mechanicus heads.  A few head swaps, a few details from the Marauders and the Kroot, and now these figs will blend in much better with the newer Alpha Legion cultists.

So don’t be afraid to cut up old figs and repurpose them. It can save you a couple bucks and turn units you don’t use into units you do. Heck, it might even give you something to play a new game with.

And I'm just adding this one last guy with the flagellant body and a flamer because I really liked how he turned out...

6.09.2012

Silver Towers of Tzeentch, Part VI


First off, I must bow to marketing and plug my new book.  14 just came out this week from Permuted Press.  You can buy it in paperback, for your Kindle, your Nook, and in another week Audible.com will have the audiobook version, read by Ray Porter who a bunch of you might remember from a bit part in the LOST epilogue.  This is how I pay the bills. so it's a great way to support In The Grim Cheapness and still come out ahead.

But now, to conclude with the Silver Towers.

I’ve got all the bulk stuff done.  At this point I just wanted to add a few little details here and there.  The thing is, I don’t want to overwhelm it with details.  There’s something very unnatural and appealing about the clean lines of the original Epic model.  Plus the fact that none of the towers have doors or windows...

On the original model, each tower has one or two big cannon barrels jutting out of their walls. Common courtesy (and rules) said I should have something that counts as a “fire point” for the Towers’ random Bolts of Change.  I didn’t want something as crude as a  barrel, though.  I toyed with the idea of simple gargoyles made of card triangles and also with having mystical banners hanging off the towers.

In the end, I decided on stacking disks from my different hole punches.  I did a 1/8’ on top of a 1/4” one.  They don’t distract from the sleek lines of the towers as much as gargoyles or banners would.  I can also paint them blue to help tie them to the Thousand Sons a little more.

Helpful Hint—If you wanted to drop another buck or two and had a hobby store nearby, you could get a few small fake jewels that would work, too.  Figure out if you’re going to want them as-is or if you plan on painting them so you can decide when to attach them.

Remember way back when I drew the horizontal lines on the towers?  This is why.  Now I can add these fire-points across the tall and short towers and keep them level.  It gives me a nice symmetry that helps to tie them together.  I put them all around the model since the Bolts are random and also “turret mounted,” effectively meaning they can fire in any direction.  I used the lower line on the short towers, the higher one on the tall towers.

This left the Beam of Power.  It’s a single weapon, also turret mounted.  I decided to do three more fire points for the main tower and put them higher up (on the highest horizontal line).  It makes them stand out, and my gaming group is relaxed enough for them to count as one weapon.  I also traced three small 1/2” circles and cut those out, so these points are three discs deep.  They went on the highest of my horizontal lines, which also added to the sense of “the big gun.”

I added a bit of sand (plain old sand from the alley—not modeling sand or textured earth or anything like that) around the base of the towers.  It’s a hair more support.  I left it tight around the bases because I really want a lot of the top to be grass.  Some of the sand got a little too high and I scraped it back down.  These are mystical towers, after all.  I added a bit on the underside of the plauteau as well, to break up the textures there.

I decorated the base with some sand, some pieces of broken cork, and a few big rocks, too. That will help hide the ridge of the plate.  I briefly toyed with the idea of a big Tzzentch symbol “burned” into the ground, or maybe a chaos star, but it didn’t really work with the odea of a moving tower.

I spray painted the whole thing black to start.  Base, cylinder, and towers.  The towers took two coats, because I wanted to make sure the rocks on the bottom were all done, as well as all the spaces between the towers.

Helpful Hint—I decided to leave these three separate pieces unglued.  It makes for much easier transportation, and for touch-ups if it ever needs them.

To do the silver, I used spray-paint again.  First, thought, I wrapped the entire plateau-section in paper (another use for junk mail) to mask it.  I did two coats to make sure they got covered from every angle.

Another Helpful Hint—Never do heavy coats of paint with Paperhammer models.  Getting them wet is one of the worst things you can do.  Take your time and do light coats.

I haven’t finished painting (this is an early-on photo), but when I do I’ll add a picture to the bottom.  Here’s how it’s going, though...

The plateau is just lots of Camo Green and eventually some grass.  The bottom and sides of the plateau got a few drybrushes with Space Wolves Gray and Fortress Gray.  Yes, I’m still using the old names.  Sue me, I’ve got paint to use up.  I touched a few places with different browns to give the appearance of loose soil clinging to the granite.  I did the same on the base of the stand.
           
The vents on each tower are done in black.  Nice and simple.  From a distance, it even makes them look a bit like they’re cut into the surface, not sitting on top of it.

I painted the fire points as gems, using the gem technique from the old Codex: Eldar.  On the larger ones for the Beam of Power, I made the outer ring gold to help it stand out and  look a little more impressive.  The gold also gave it another link to the Thousand Sons.

And there you have it (or them).  The Silver Towers of Tzeentch.  In retrospect, I might’ve made the island a tiny bit smaller—maybe just an inch or two across—but overall I’m pretty happy with how this came out.  It’s a bit bigger than a Monolith, a bit smaller than a Warhound, so that puts it in a good size range for 400 points. 

Helpful Hint--If you’re into Warhammer Fantasy as well as 40K, you could probably do also this all at one-third the size and make a nice Arcane Fulcrum of some sort.  Just get a square tray or plate for the base and leave off one or two towers so you’ve got room to place a figure or two.  This is a very easy model to scale down.

Final cost for this Grim Cheapness project was probably around eight bucks.  A dollar each for the plate, wine glass, pens, and glue.  Call it four dollars for the spray paint (even though I already owned both colors).  Even if I’d had to buy the foam core for the plateau, I think it only would’ve been two or three dollars more.  So we’re talking ten bucks and maybe twenty hours of work (if you count drying time) for a 400 point model.

Next time I’ve got some more simple, cheap Dark Eldar conversions to show off.  After that are a few Necron and Ork ones.  And I might try to cash in on the popularity of this whole Summer of Fliers thing with a new Paperhammer project.  Hopefully before summer’s over.

Oh, and a few posts down I added an in-progress painting shot of Gigan.

6.01.2012

Silver Towers of Tzeentch, Part V

Okay, very overdue.  Thank you all for your patience.  I ended up with a whole new concept for my base, and it forced me to rethink a few elements.  And then I had a ton of work to do in the real world which forced most of my 40K stuff to the back burner.  What little time I did have was spent getting my ancient Tyranids ready for the non-human, non-power armor league my friends and I did this spring.

Anyway...

So, I’ve got a plastic plate and a Halloween wine glass.  I flipped the plate over and scuffed it up with some sandpaper to make it easier for the superglue to grab.  I didn’t worry too much about the ridge because the whole thing’s going to be based and painted, but I hit it with my clippers just to make it a bit more irregular. 

Helpful Hint—These plates aren’t made from soft plastic like polystyrene (the stuff models are made from).  It’s hard and much more brittle.  Don’t try to do anything big with the clippers because you’ll risk shattering the whole plate.  Tale your time and do small bits of it, or use a large file if you have one.

This Is Important—It probably goes without saying these days, but be a bit careful with a plate made in China.  If it’s not microwave safe, dishwasher safe, or food safe, you probably don’t want to breathe any of the dust that comes off it while you’re sanding, clipping, and grinding.  Work on it outside or in a very well-ventilated area.

I used the saw blade from my hobby knife set and trimmed the bell off the wine glass.  This gave me a solid base with a stem to glue in the center of the plate.  I saved the bell for a potential later project.

The path to Chaos is very, very dark.
Now, this is one of the big changes I made.  I went back to the 99 Cent Store and bought a pack of “jumbo pens” (bringing the grand total for this project up to about four dollars).  They usually have sports teams or Disney characters on them.  These particular ones are from the film Camp Rock.  Once they’re disassembled (they just unscrew) they give me a perfect cylinder of plastic.  And they’re fun to deface.

Helpful Hint—Play around with the pens a bit once you’ve taken them apart.  The quality is pretty crap, but odds are two of them will screw together to make one long cylinder.  Add a little superglue on the threads and you’ve got a solid flying stand post.

I worked the cylinder on the base of the flying plateau a little more to give me a solid, deep socket.  This meant a tiny bit of carving with my hobby knife to make sure it sat straight.  Once I had the socket, I put some white glue on my finger and ran it along the inside, just to make it a bit more firm. 

The pen- cylinder slots into the socket (once the glue’s dry) and then slips over the post of the wine glass.  And there’s a giant flying stand.

Now it was time to attach the towers to the plateau.  I started with the main tower and centered it as best I could.  I glued all the tabs and also the edge around the base.

Once the main tower felt pretty solid, I put the four other towers around it.  The trick is to hide as many of the seams and gaps as possible.   I’d built the towers so all the best sides were marked as the front or outside, so I knew which edges to  turn inward.  Then I needed to locate the matching points on the main tower and place the others accordingly.

Helpful Hint—I used shot glasses and mason jars to help keep pressure on the towers while they were drying.  The overall round shape of the towers means they’ll sit solidly, and the tops are tall enough that the glasses won’t tilt or slip off. 

Terminator Sorcerer shown
for scale purposes.
I put the two short ones together and the two tall ones behind.  This gave me something very similar to the classic Epic model for the Silver Towers.  Alternately, if you wanted, they could alternate around the main tower (tall, short, tall, short).

Next week, I’m going to do a last few details and add some paint to finish this thing off.  And, yes, I do  I realize I said the same thing a few months back.

1.14.2012

Silver Towers of Tzeentch, Pt. IV

First off, I got a lot less done on this model than I’d planned to.  My gaming group is starting a non-human, non-power armored campaign this weekend, and I’ve decided that after years of waiting it’s finally time for Swarm Tiamat to take the field.  I highly recommend something like this if you think your group would be up for it, by the way, because it’s very interesting to see how people’s army composition has changed when they the players know they’re not going to be facing any kind of Space Marine.  Anyway, I’ve been trying to get a last few Tyranids built and painted and so not as much has happened with the Silver Towers.

Still, I’ve gotten a few things done.

Helpful Hint—This hit me after the fact and I felt like an idiot.  Remember the long strips around each tower?  Rather than holding them, wrap them with hair elastics.  You can usually find a bag of them at your local 99 Cent Store (or similar establishment).  They’re strong enough to hold things in place, but gentle enough so you don’t have to worry about them crushing anything like some over-powerful rubber bands might do when you double or triple them up.

Now, a quick onward and upward.

The short towers still need vents, but like in the classic model, I wanted these to be on the towers themselves rather than their peaks.  So I cut some more 1/8” strips and cut those down to 3/4” lengths.  These were spaced out around each of the shorter towers, and I was happy with how they came out.  It also made me realize the taller towers and the main tower should have a lower level of vents, so I cut some 1/2” pieces and had those line up on the bands beneath the longer pieces.

I was pretty happy with this, because it gave me a nice throwback to the original without looking like I was trying to give it that slightly cartoony quality a lot of stuff had back then.

Next, each of the towers needed a tab where they’d connect to the flying island.  I cut about two dozen strips that were about 1 1/2” long and 3/4” wide and scored them at the halfway point.  The measurement doesn’t have to be exact because they’re not going to be seen.  I glued and clamped three of them around each tower, fastened to the inside with the tabs out. 

On the tall towers and the main tower, I also did two or three extra tabs facing in, but still fastened on the inside.  These towers are going to be top-heavier than the short ones, and the main tower is just bigger in all dimensions (I can fit any of the other towers inside of it). So the main tower has six tabs altogether on it--three in and three out. 

Speaking of the 99 Cent Store, while those tabs were drying it was time to think about the base for this thing.  While I was there looking at hair elastics, I grabbed a 10.5” plastic plate from their housewares section.  I also got a large plastic wine glass.  So, add two more dollars onto the cost for the Silver Towers. 

By the way, it’s not hobby-related, but try not to get freaked out by how many of the plates there say “do not microwave” or “do not use with food” on the back.

Okay, I need to go finish painting another dozen or so gaunts for tomorrow, but I swear to God these towers are going to get finished (and posted) very soon.

1.06.2012

Silver Towers of Tzeentch, Pt III

Okay, I kind of left things hanging back in 2011.  When I last spoke of this project, I’d cut a bunch of strips of card.  Now, what to do with them.

Helpful Hint – Okay, two of these strips  (one 1”, one 3/4”) need to be extra-long to go around my main, central tower without any gaps.  Where could I get a piece of cardstock long enough?  The Post Office.  Priority Mail envelopes are 12 1/2” x 9 1/2” and they’re free (just don’t get greedy).  The cardstock they’re made from is a hair too thin for building, in my opinion, but it’s perfect for detail work.

For convenience sake, by the way, I’m going to talk about the elements as the main tower (1), the tall towers (2), and the short towers (also 2).  Each of them is going to get a couple strips of card.  I made sure the strips had a good curve to them.  In fact, after wrapping them around a spraypaint can, I wrapped them again around a vitamin jar so they’d have a good tight curve.  Also, I checked each one first and did a quick eyeball trim to each piece as needed.  If some were a bit short, I wasn’t too worried...

This Is Important – Before adding any of the detail strips, I figured out what was the best side of each tower.  This was the “outside,” and all the detail seams went to the “inside.”  Once the towers are placed on the island, the seams (and possible gaps) will get hidden between the towers.  On the main tower, put the seams and gaps off to either side but not front or back.

So, the breakdown went like this.  The main tower and the two tall towers each got the 1 1/2” strips wrapped around their bases, flush to the ground.  Then they got a 1” strip over that, also flush to the ground.  At the top, they got a 1” strip with a 3/4” strip over that, both flush to the seam where the tower tops begin.

Also, not so much a helpful hint as a heads up... Unless you’ve got some really long, narrow clamps, the only way to fasten the top strips is by holding them.  Just be prepared and have the television on, your earphones in place, or whatever will help you pass the time.

This Is Also Important The top detail on the main tower is what uses those two extra-long strips I mentioned above.  This is the only tower that gets seen all the way around, so it needs to have a nice, clean seam.  I actually wrapped the two strips in different directions to help hide it.

The two short towers got a 1” strip around the base with one of the 3/4” strips wrapped over it, both flush to the ground.  At the top, they just got a 1” strip and nothing else.  I’ll be giving that band some different detail in a little bit.

Looking at the original Epic 40,000 model again, the peaked towers had a series of vents or slots or some such thing on them.  Magical arrow slits maybe.  Whatever they are, I liked the look of them and wanted to give that design aspect a nod with this model.  

I cut a few long strips that were 1/8” wide, and then cut them to make nine pieces 1 1/2” long each.  I placed one on each triangle of the top of the main tower, running from the base right up the center line.  This was another one of those “take your time” things.

Helpful Hint – I used my hobby knife a lot to nudge these pieces a hair one way or another.  It’s got a strong point which makes it better for fine adjustments than my (relatively) huge fingers.

Then I cut another eighteen pieces at 1 1/4” each.  These went on the triangles for each of the tall towers.  Same process—I took my time and used the knife to nudge things to center.  I’m going to do vents/ slots around the edge of the short towers, too, but I’ll put all that up next week.  For now I’m trying to aim for shorter, more frequent posts than really long ones that only go up every other week or so.

Next time, final details and assembly.

12.31.2011

Silver Towers of Tzeentch, Pt. II

Okay, last week I built the flying island base.  Now for the towers themselves.

Looking at the classic model, there are three main towers—the tallest, most prominent ones—and two shorter ones in the front.  I’m going to stick to this basic design, although I’m going to tweak the style a bit.

Because that central tower is so big, I’m going to put it together a bit differently than I’ve made cylinders in the past. I built it in two halves so I’d be able to make it from my existing cardstock (big cereal boxes).  One piece was 6” x 11” and the other was 7 1/4” x 11” tall.  Then I made a series of scores on each one 1 1/4” apart, parallel to the short side.  This gave me one piece with four sides and one with five.  Each one should also have an extra inch to be the gluing-tab.  I marked the tab with a couple X’s so it’s easy to keep straight.

And, yes, these towers are going to have nine sides each.  It’s important.  Really.

This is Important—Make sure the tab is on the same side for both pieces.  It can be to the right or the left, but they both have to be on the same side or the tower won’t go together correctly.

Now, I drew a line across the card 2 1/2” inches from the top.  Then I went through each section and drew two lines so I had a row of triangles.  On this scale they’re going to need some bite, so I also put a small tab on each one.

Once that was done I scored that original cross-line and all the lines for the long sides. This was also when I trimmed the corners on the tab—it’s going to be an inch shorter so it’s beneath the triangles. Then I connected the two sections.  Because it was so big, I put clothespins on each end and used my fingers to keep it pressed flat in the middle.  The tab itself is pretty wide, so I made sure the inside and outside edges were flat.  Once this was one big piece I could work with it just like any of the others.  Speaking of which...

Helpful Hint – Before cutting out any triangles or assembling the towers, I drew two or three horizontal lines across each card.  Once they’re assembled, this will give me a good level-line to use for fire points, banners, and other details.

The other cylinders I could build in my usual manner.  I made four more, and on each one I varied the height of that cross-line to give me a few different looks for the towers.  I ended up doing three towers with 1” sides.  One was 9” tall with a 2” section for the top.  The next one was 8” tall with a 2” top.  The last one was only 6” tall and had a 1 3/4” top. The final tower had 7/8” sides.  I made it 6” tall with a 1 1/2” top section.  This shouldn’t be much of a spike, but almost flat, kind of like the vats on the Plaguereaper.

I glued each tab so the cylinders were complete.  It’s a little tricky working around the triangles at the top, but not that difficult.  I used a pencil to push on the seam for the smaller towers.  The short ones I could reach a finger in, and the central tower’s large enough to put my whole hand in.  Because they're so large, I triple-checked that everything was lining up right.  On this scale, a crooked line could make a real mess.

Once the cylinders were dry, I started working on the tower-tops.  After building the vats on the Plaguereaper, I’ve found it’s best to join two triangles together, let them dry, then add the third, let it dry, and so on.  Because I’ve got five towers, I can clamp one, move on to the next, and by the time they’re all done I can start moving forward again on the first one.  This also helped to even out the cylinder-tower and make it even all the way around.

Helpful Hint – When you start doing the tower tops, make sure all the corners are sharp and the scores do all the way from edge to edge.  If they don’t, there will be odd gaps and wrinkles where the folds don’t sit right.

I finished up by dropping a bead of glue down into the tip and moving it around with gravity.  This gave me a solid point.  Although I’m debating if these points are tall enough, going off the original model.  I may decide to cap them.

While the towers were drying, I cut a few long strips of cardstock.  I did three at 1 1/2” wide, ten at 1”, and five at 3/4” wide.  I wrapped each of these around a spraypaint can to give them a good curve.  These are going to be detail at the top and bottom of each tower.

But that’s for next time.  Or, to be more exact, next year.

12.23.2011

Silver Towers of Tzeentch

Yep.  It’s time to dip back into Chaos and into the Apocalypse-sized side of Warhammer 40,000.

Back when I was finishing up the Baneblade, I was struck with a sudden inspiration.  These cylinders I keep making for weapons and engines and pivots... what else could they be used for?  Was there a way they could be even bigger?  I was making the pivot for the Baneblade’s main turret and it struck me that if I cut the edges of the “flower” on the other side, they would all fold in and make a point.  But what could I do with that?  Large spikes?  Missiles?  Towers?

And then I remembered a datasheet that GW put out a while back...
           
First, I needed to build the floating “plateau” the towers stand on.  Foamcore’s nice and cheap for this sort of thing.  If you look around, you may even find people throwing out sheets of it.  The stuff I used had been cue cards and signs.  Even if you have to buy it, one three or four dollar pack will give you more than enough.
           
I measured out a rough square about 10” x 10”.  Then I measured two more shapes at about 10” x 9”, and another one around 9”x9” or so.   Any time I ended up with scrap pieces I’d cut those into squares, too.  Or as close to square as I could get.  This worked down until I had a pretty good sized pile.

Helpful Hint - I did all these by eye, just using the ruler to get quick measurements.  I knew I was going to be cutting and chipping this to make them rough and uneven, so there wasn’t much point in being precise and straight to start with.  It was also a lot faster.

I went over each square and cut down corners and edges.  I glued the 10”x9” shapes on either side of the 10”x10” one and set them under a book to dry.  I wasn’t that concerned about them lining up or being straight.  My only concern was that the smaller ones were within the edges of the larger one..

Once this piece was done I set it down and started using all the other shapes to build up one side.  I ended up rounding them even more and split it into two small towers.  One big one would work, too.  Whatever appeals to your personal “flying island aesthetic” will work.

Helpful Hint - You can mix some cardstock in there, too, if you want.  It would give even more  variety to the layers.  You could also use tissues soaked in white glue to coat everything and make smoother rocks.  I kind of like the layered look, though.  It’s as if some sorcerer ripped the whole complex out of the ground and we’re seeing the strata of stone.

I coated this whole thing with black paint and glue.  The goal is to make sure there’s no exposed styrofoam anywhere.  As the GW scenic guys have pointed out many times, spraypaint and styrofoam do not mix (the aeresol eats away at the foam).  So I took my time, made sure the edges were covered, and let it dry.

Once that was done, I took this piece outside and flipped it over, so it’s resting upside down (on the side the towers will attach to).  Now I hit the whole thing with some textured spray paint.  I happen to have two cans of this stuff left over from a job I did.  It’s a little pricey, so you might not want to buy it just for this.  You can get the same effect by buying a bottle of white glue, painting the underside, and then just dumping some coarse sand on it—it’ll just take a while longer.  You could even leave it as is, basecoat it black, and just drybrush it with a lot of different grays.  The goal is to make it rock-like, so again that’s whatever your personal preference is.

Helpful Hint – You can also use all these steps just to make a nice hill for your game table.  If you decide to, though, I’d measure out the open spaces and make sure you’re leaving areas large enough for two or three models (or one large one).

Okay, next bit’s a little tricky.  I needed to find the balance point of this little flying plateau I’d built.  I flipped the piece over so it was flat-side down and put it on my hands with both fingers out.  The object is to get as much of it on my two fingers as possible.

Then, very slowly, I slid my fingers together.  Through the wonders of science—namely physics—the plateau moves and shifts so my fingers end up at the balance point.  I marked that point and then did this a few more times from different angles.  It’s not going to be exact, but it’ll be pretty close.  Close enough for what I’m doing.

Last but not least... some power tools work.  I used my DeWalt and very carefully put a hole through the center mark of the plateau.  I took my time with this and also used a square to get the hole as close to perpendicular as possible.

This Is Important--   Power tools are no joke, and I’ve seen a lot of people get hurt by them.  Yeah, everyone says that but I mean it.  I have seen lots of gouged thumbs.  On the off chance you’re under twelve and you want to try this—or even if you’re an adult who’s never used power tools before (it’s okay, there are a lot)—ask someone for help.  Dad, Mom, your older brother or sister, a friend, somebody who knows how to use the tools correctly.

At which point I need to stop and go apply my paper skills to wrapping presents.  But I’ve got the week off so expect the next update in a couple days.

Merry Christmas and a Happy Holidays to the six or seven of you who read this.  Hope you've got all your shopping done.