Okay, very overdue.
Thank you all for your patience.
I ended up with a whole new concept for my base, and it forced me to
rethink a few elements. And then I had a
ton of work to do in the real world which forced most of my 40K stuff to the
back burner. What little time I did have
was spent getting my ancient Tyranids ready for the non-human, non-power armor league my friends and I did this spring.
 This Is Important—It probably goes without
saying these days, but be a bit careful with a plate made in China. If it’s not microwave safe, dishwasher safe,
or food safe, you probably don’t want to breathe any of the dust that
comes off it while you’re sanding, clipping, and grinding. Work on it outside or in a very
well-ventilated area.
So, I’ve got a plastic plate and a Halloween wine
glass. I flipped the plate over and
scuffed it up with some sandpaper to make it easier for the superglue to
grab. I didn’t worry too much about the
ridge because the whole thing’s going to be based and painted, but I hit it
with my clippers just to make it a bit more irregular.
Helpful Hint—These plates aren’t made from
soft plastic like polystyrene (the stuff models are made from). It’s hard and much more brittle. Don’t try to do anything big with the
clippers because you’ll risk shattering the whole plate. Tale your time and do small bits of it, or
use a large file if you have one.
 This Is Important—It probably goes without
saying these days, but be a bit careful with a plate made in China. If it’s not microwave safe, dishwasher safe,
or food safe, you probably don’t want to breathe any of the dust that
comes off it while you’re sanding, clipping, and grinding. Work on it outside or in a very
well-ventilated area.
I used the saw blade from my hobby knife set and trimmed the
bell off the wine glass. This gave me a
solid base with a stem to glue in the center of the plate. I saved the bell for a potential later
project.
 |
| The path to Chaos is very, very dark. |
Now, this is one of the big changes I made. I went back to the 99 Cent Store and bought a
pack of “jumbo pens” (bringing the grand total for this project up to about
four dollars). They usually have sports
teams or Disney characters on them.
These particular ones are from the film Camp Rock. Once they’re disassembled (they just unscrew)
they give me a perfect cylinder of plastic.
And they’re fun to deface.
Helpful Hint—Play around with the pens a bit
once you’ve taken them apart. The
quality is pretty crap, but odds are two of them will screw together to make
one long cylinder. Add a little superglue
on the threads and you’ve got a solid flying stand post.
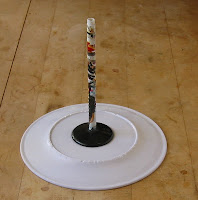
I worked the cylinder on the base of the flying plateau a
little more to give me a solid, deep socket.
This meant a tiny bit of carving with my hobby knife to make sure it sat
straight. Once I had the socket, I put
some white glue on my finger and ran it along the inside, just to make it a bit
more firm.
The pen- cylinder slots into the socket (once the glue’s
dry) and then slips over the post of the wine glass. And there’s a giant flying stand.
Now it was time to attach the towers to the plateau. I started with the main tower and
centered it as best I could. I glued all
the tabs and also the edge around the base.
Once the main tower felt pretty solid, I put the four other
towers around it. The trick is to hide
as many of the seams and gaps as possible.
I’d built the towers so all the best sides were marked as the front or
outside, so I knew which edges to turn
inward. Then I needed to locate the
matching points on the main tower and place the others accordingly.
Helpful Hint—I used shot glasses and mason
jars to help keep pressure on the towers while they were drying. The overall round shape of the towers means
they’ll sit solidly, and the tops are tall enough that the glasses won’t tilt
or slip off.
 |
| Terminator Sorcerer shown for scale purposes. |
I put the two short ones together and the two tall ones
behind. This gave me something very
similar to the classic Epic model for the Silver Towers. Alternately, if you wanted, they could
alternate around the main tower (tall, short, tall, short).
Next week, I’m going to do a last few details and add some
paint to finish this thing off. And, yes, I do I realize I said the same thing a few months back.


No comments:
Post a Comment