 Yeah,
Destroyers kind of got the short end of the stick in this codex. Games Workshop wanted to sell some more
models (fair enough—it is their business).
So they came up with the Tomb Blades—which many older players have
noticed look a lot like the old Destroyer design. Of course, this new unit meant Destroyers had
to become something else. And that
something else...
Yeah,
Destroyers kind of got the short end of the stick in this codex. Games Workshop wanted to sell some more
models (fair enough—it is their business).
So they came up with the Tomb Blades—which many older players have
noticed look a lot like the old Destroyer design. Of course, this new unit meant Destroyers had
to become something else. And that
something else...Well, it isn’t the best thing. At least they work much better under the 6th Edition version of Preferred Enemy then they did when the codex came out.
Anyway... That’s a debate for some other website.
I already had half a dozen Destroyers and a Destroyer Lord (from those long-ago film industry days of disposable income), and I decided I wanted to make a Heavy Destroyer. But—as has come up here a few times—I’m a cheap bastard. I didn’t want to drop nine dollars on an upgrade kit on top of the twenty bucks for the Destroyer model. That’s just too much for a single, non-character model.
So I started thinking...
I have a lot of leftover Destroyer parts. Some I found in bins, but there’s pretty much half a sprue leftover from my Destroyer Lord, Pophitar (bonus points if you get that reference). This includes an entire right arm with a gauss cannon.
It struck me that the cannon is very symmetrical, and it wouldn’t take much work to stick two of them together and make it twice as long. With the extra green rods, I thought that’d make a fine looking heavy gauss cannon.
 And, as it
happens, I got a Destroyer in my stocking for Christmas.
And, as it
happens, I got a Destroyer in my stocking for Christmas.So, I built most of the model right out of the box. I assembled the torso and the hull. For the moment I didn’t connect the two, and I also left off both arms and the head. These are all parts that help add a little bit of life to the model, so I generally don’t connect these until the end.
 To build
the heavy gauss cannon, I took the regular cannon from the Destroyer set and
the spare one I mentioned up above.
Using my hobby blade, I cut the spare cannon in half right behind the
barrel assembly. I shaved and filed this
until it was smooth and level. Then, on
the other cannon, I cut off the little nib that the muzzle normally attaches
to.
To build
the heavy gauss cannon, I took the regular cannon from the Destroyer set and
the spare one I mentioned up above.
Using my hobby blade, I cut the spare cannon in half right behind the
barrel assembly. I shaved and filed this
until it was smooth and level. Then, on
the other cannon, I cut off the little nib that the muzzle normally attaches
to.
Helpful
Hint—I made both of these cuts before assembling the
cannons. It’s always easier to cut
through less material, and all of these cuts were at places with very clear
guides. So why make more work?
 Once all
the cutting was done, I glued the cannon halves together and let them dry a
bit. Then I glued them together, front
to back. This was a bit of work, because
everything needed to line up perfectly.
I triple-checked the top and bottom seams, and I also kept checking the
whole assembly to make sure it was straight.
Once all
the cutting was done, I glued the cannon halves together and let them dry a
bit. Then I glued them together, front
to back. This was a bit of work, because
everything needed to line up perfectly.
I triple-checked the top and bottom seams, and I also kept checking the
whole assembly to make sure it was straight.
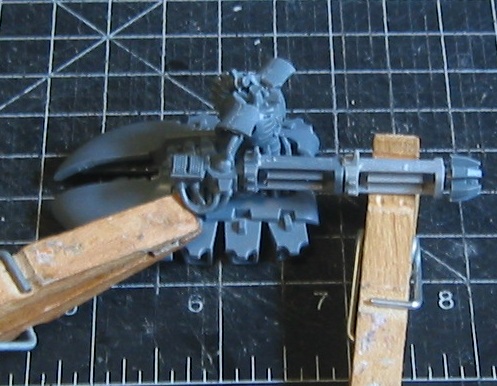
I gave the assembled cannon plenty of time to dry and then put the whole arm together. Because it’s so long, that’s a lot of torque on the shoulder. I held it in place for several minutes, and then I braced it with a few clothespins until it was dry. That meant letting it sit overnight, actually. I didn’t want to risk it sagging or ending up with a weak bond.

In the
fluff, it mentions that Destroyers usually come from the Immortals and
Lychguard, and sometimes from the Deathmarks.
Well, it seemed to me that if a Destroyer was going to have a “heavy”
ranged weapon, it’d probably be a Necron already used to such things. So I decided to use a Deathmark head on the
model. It’ll make him stand out a bit
more and it ties him to the theme of “gunners” usually only having one eye.
And there you have it. Heavy Destroyer for the price of a regular one. I’ll probably paint his shoulders black to add to the Deathmark feel. Overall, though, I’m really happy with how this quick little conversion turned out.

No comments:
Post a Comment