So, some of you longfangs here might remember Necromunda. It was one of the older Games Workshop
side-games that was more-or-less Warhammer 40K but with gang warfare instead of
planetary battles. Normally you’d control an army, in Necromunda you’d just
control seven or eight individual models.
GW tried to bring it back a few years ago, but as far as I can tell it
never really caught on (or got much support).
Rumor has it that the new Inquisition game is going to be a
tighter, more Imperium-centric version of Necromunda.
Then again, rumor also said we’d be getting a plastic
Warhound a few Christmases back...
Anyway, one of the defining traits of Necromunda was the
dense scenery. The new 6th Edition rules
of Warhammer 40K really allow for some neat stuff with denser game tables,
too. So my friend Marcus had been
playing around with a few mission ideas in that vein. A few weeks back he invited a few of us over
one night to watch bad Sy-Fy movies, have a few drinks, and build a bunch of
scenery. My job was to help make it look
as good as possible for as little as possible.
Most of what we used were just old containers that were heading
for the bin. Oatmeal, fish food, some
random nut containers, stuff like that.
Almost anything made of mostly cardboard would work for this. We also had a few cereal and pizza boxes to
use for raw cardstock where we needed it.
And we had a few plastic bits as well, like cat treats and yogurt
drinks.
 For tools, the only semi-exotic things we had were Ms.
Gillian’s hot glue gun and my own 1/16” hole punch. You may remember I use said punch for rivets, which add a huge level of texture and detail for minimal
effort. Everything else was done with
scissors, white glue, and your basic hobby knife.
For tools, the only semi-exotic things we had were Ms.
Gillian’s hot glue gun and my own 1/16” hole punch. You may remember I use said punch for rivets, which add a huge level of texture and detail for minimal
effort. Everything else was done with
scissors, white glue, and your basic hobby knife.
The first step was just fastening containers down onto some
bases Gillian had cut. There wasn’t a
lot of planning here, just grouping things together in ways that looked vaguely
industrial.
Then we added some broad details. Squares and rectangles make great
panels. I’d give them a slight curve
with the handle of my hobby knife and then glue them in place.
 Helpful Hint—Putting panels in the same place
on multiple pieces gives a standardized, manufactured look. It’s one of those tiny, subtle touches
that’ll stand out.
Helpful Hint—Putting panels in the same place
on multiple pieces gives a standardized, manufactured look. It’s one of those tiny, subtle touches
that’ll stand out.
Once I had a bunch of panels in place, I added rivets to
them. I tried to space them evenly—again,
to give it that standardized look. I've found on a project like this, the best thing to do is have a pile of rivets pre-punches and a small blob of white glue. I use the tip of my knife to put a tiny drop of glue wherever I want the rivet, wipe it off, and then use the tip to put the rivet in place. I hold it in place for five or six seconds and then move on to the next one. Once I've got it down, I can usually do four or five rivets a minute. These towers took about twenty minutes.
 Helpful Hint – An easy way to add quick detail
is to just apply rivets around an existing shape. On most food packages you’ll find a logo, a
nutrition block, or a bar code which sits very square with the rest of the
package. Just line that rectangle or
square with rivets. When you paint over
it, you’ll suddenly have a bunch of texture on the flat surface.
Helpful Hint – An easy way to add quick detail
is to just apply rivets around an existing shape. On most food packages you’ll find a logo, a
nutrition block, or a bar code which sits very square with the rest of the
package. Just line that rectangle or
square with rivets. When you paint over
it, you’ll suddenly have a bunch of texture on the flat surface.
Of course, you could also go Orky with a lot of this and
just add panels and “patches” at random.
If you work the cardstock a bit, it’ll get soft and you can even have
two patches overlap. Depending on if
your scenery is supposed to be Ork-built or something they’ve adopted as their
own, you may want to have something more manufactured as a base layer of detail
and then add Orkiness on top of it.
Marcus had a few random tubes, pipes, and other scenery
bits. Those got hot glued on here and
there, but we went pretty light on them overall.
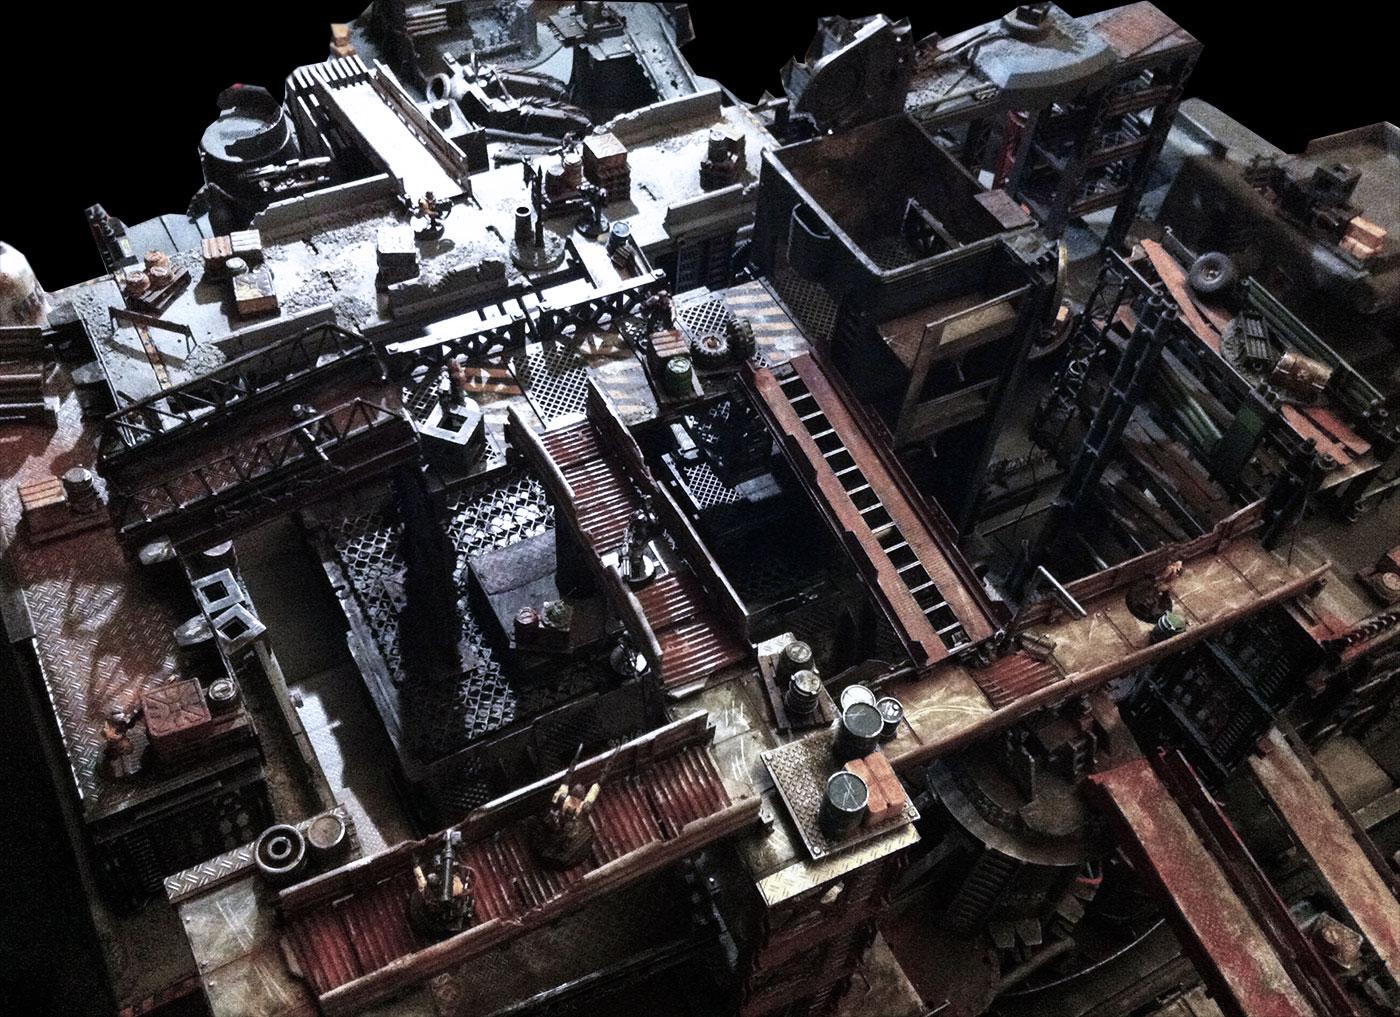
And really... that’s it. Four of us spent a little over three hours and built eight or nine of these pieces. That’s enough to fill a good chunk of a battlefield with dense urban terrain, and most of it came out of the trash.
And really... that’s it. Four of us spent a little over three hours and built eight or nine of these pieces. That’s enough to fill a good chunk of a battlefield with dense urban terrain, and most of it came out of the trash.
Consider this being watched.
ReplyDelete