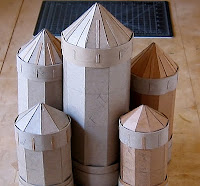
Okay, I kind of left things hanging back in 2011. When I last spoke of this project,
I’d cut a bunch of strips of card. Now,
what to do with them.
Helpful Hint – Okay, two of these strips (one 1”, one 3/4”) need to be extra-long to
go around my main, central tower without any gaps. Where could I get a piece of cardstock long
enough? The Post Office. Priority Mail envelopes are 12 1/2” x 9 1/2”
and they’re free (just don’t get greedy).
The cardstock they’re made from is a hair too thin for building, in my
opinion, but it’s perfect for detail work.
For convenience sake, by the way, I’m going to talk about
the elements as the main tower (1), the tall towers (2), and the short towers
(also 2). Each of them is going to get a
couple strips of card. I made sure the
strips had a good curve to them. In
fact, after wrapping them around a spraypaint can, I wrapped them again around
a vitamin jar so they’d have a good tight curve. Also, I checked each one first and did a
quick eyeball trim to each piece as needed.
If some were a bit short, I wasn’t too worried...
This Is Important – Before adding any of the
detail strips, I figured out what was the best side of each tower. This was the “outside,” and all the detail
seams went to the “inside.” Once the
towers are placed on the island, the seams (and possible gaps) will get hidden
between the towers. On the main tower,
put the seams and gaps off to either side but not front or back.
So, the breakdown went like this. The main tower and the two tall towers each
got the 1 1/2” strips wrapped around their bases, flush to the ground. Then they got a 1” strip over that, also
flush to the ground. At the top, they
got a 1” strip with a 3/4” strip over that, both flush to the seam where the
tower tops begin.
Also, not so much a helpful hint as a heads up... Unless
you’ve got some really long, narrow clamps, the only way to fasten the top
strips is by holding them. Just be prepared and have the television on, your earphones in place, or whatever will help you pass the time.
This Is Also Important – The top detail on the
main tower is what uses those two extra-long strips I mentioned above. This is the only tower that gets seen all the
way around, so it needs to have a nice, clean seam. I actually wrapped the two strips in
different directions to help hide it.
The two short towers got a 1” strip around the base with one of the 3/4” strips wrapped over it, both flush to the ground.
At the top, they just got a 1” strip and nothing else. I’ll be giving that band some different detail in
a little bit.
Looking at the original Epic 40,000 model again, the peaked
towers had a series of vents or slots or some such thing on them. Magical arrow slits maybe. Whatever they are, I liked the look of them
and wanted to give that design aspect a nod with this model.
I cut a few long strips that were 1/8”
wide, and then cut them to make nine pieces 1 1/2” long each. I placed one on each triangle of the top of
the main tower, running from the base right up the center line. This was another one of those “take your time”
things.
Helpful Hint – I used my hobby knife a lot to
nudge these pieces a hair one way or another.
It’s got a strong point which makes it better for fine adjustments than
my (relatively) huge fingers.
Then I cut another eighteen pieces at 1 1/4” each. These went on the triangles for each of the
tall towers. Same process—I took my time
and used the knife to nudge things to center. I’m going to do vents/ slots around the edge of the short
towers, too, but I’ll put all that up next week. For now I’m trying to aim for shorter, more
frequent posts than really long ones that only go up every other week or so.
Next time, final details and assembly.
 I also had another book come out. Last week Permuted Press just released a collection of short stories I wrote called The Junkie Quatrain. It’s four connected/ interwoven/ overlapping short stories set in the same post-apocalyptic world. I’ve been explaining it to people as 28 Days Later crossed with Akira Kurosawa’s Rashomon. It adds up to a mid-sized novella, so it’s also very cheap.


